- 19 -
Wall Plug
Wall Plug
Screw
Wall
Wall
Back Plate
Back Plate
⑤ • Mount the Unit on the wall with 4 screws.
• Drive each Screw into the two upper Wall Plugs through
the screw holes on the Back Plate.
• After tighten up the two upper Screws, tighten up the
remaining two Screws.
⑥ Please ensure the set fixed tightly on wall by shaking
it left and right.
④ Lead the Flexible Cord to the set thru (4a) or (4b) as shown below for electric wiring process.
⑤
⑥
Flexible Cord must enter
the Unit thru designated
point only (do not make
additional holes).
CAUTION
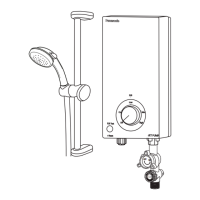
3. How to fix Electric Home Shower.
① The distance of the Unit should be more
than 250 mm at right and left of the wall.
② Make 4 holes at the wall by means of a drill
(refer Figure 1).
③ Drive a Wall Plug into the hole.
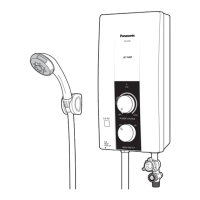
2. How to remove the Front Plate
① Make sure the Power Control Knob is at “Off”
condition.
② Remove the screw at the bottom of the Unit.
③ Remove the Front Plate by lifting up the bottom
side and then unhook the top side.
Note
Power Control Knob attached to Front Plate.
OUTLET INLET
Screw
Front Plate
Power Control Knob
Power Control
Knob
Lift up
25 mm
Ø6 mm
②
Wall Plug
③
4. Electric Wiring
① Lead the Flexible Cord connected to ELB terminal
inside the unit: 2.5 mm², 3 core Flexible Cord.
② Unscrew the Cord Holder and fix the Flexible Cord. Strip
the lead wire (coating). Fasten the live wire (L) and neutral
wire (N) to the ELB (L,N) and earth wire to the Ground Point
with 1 N•m (10 kgf.cm) torque. Fix back the Cord Holder to
its position to clamp the Flexible Cord.
Bath Room
Earth
ON/OFF DP
(double pole) Switch
Miniature Circuit
Breaker (MCB)
Flexible Cord 2.5 mm², 3 core
L
N
Flexible
Cord
40 mm
145 mm
13 mm
13 mm
ELB Terminal
Ground
Point
1 N•m
L N
5 mm
Cord Holder
Note: The Back Plate must be mounted with 4 Screws.
4a)
4b)
Flexible
Cord
Flexible
Cord
Fitting
Rubber
4a) Cut the Fitting Rubber which
is attached to the Back Plate,
and pass the Flexible Cord
through it.
4b) Lead the Flexible Cord from
the back of the Back Plate
(please break the portion
indicate).
①
Wall Wall
250 mm
minimum
250 mm
minimum
Figure 1
Screw
Screw
135 mm
126 mm
171.7 mm
15 mm
383 mm
11.5 mm
ENGLISH
INSTALLATION
Proper size of Flexible Cord and electric wiring must be
installed to avoid smoke emission and fire hazards.
WARNING
The home shower must be permanently connected to the electric supply through the ON/OFF
DP (double pole) Switch having a contact separation of at least 3 mm in all poles incorporated
in the fixed wiring. This switch must be clearly identifiable but out of reach of a person using
a fixed bath or shower.
WARNING
Off High
ELB
PowerControl
ELBTest
DH-3MP1
PushOn-Off
ELBReset
PushUp
Off High
JET PUMP
 Loading...