EasyManua.ls Logo

Panasonic ES-LV9Q - User Manual

Panasonic ES-LV9Q
24 pages
Print Icon
To Next Page IconTo Next Page
Loading...
Operating Instructions
(Household) Rechargeable Shaver
Model No. ES-LV9Q
Thank you for purchasing this Panasonic product.
Before operating this unit, please read these instructions completely and save them for future use.
Safety precautions........... 2
Intended use ............................6
Parts identication ..................7
Preparation...............................8
How to use .............................10
Cleaning thoroughly ..............13
Replacing the system outer
foil and the inner blades .......14
Replacing the cleaning liquid
...15
When the LOW/STATUS lamp
glows
.......................................16
FAQ .........................................17
Troubleshooting ....................17
Battery life ..............................21
Removing the built-in
rechargeable battery .............21
Specications ........................22
Contents
Question and Answer IconNeed help?

Do you have a question about the Panasonic ES-LV9Q and is the answer not in the manual?

Summary

Safety Precautions

Product Warnings and Malfunctions

Details warnings regarding battery, modification, repair, and abnormalities.

Power Supply and Accident Prevention

Power Supply and Cord Safety

Covers safe handling of the power supply, adaptor, and cords.

Accident Prevention Measures

Advises on preventing accidents with medical devices and children.

Cautionary Measures for Use

Detergent Contact and Skin Irritation Cautions

Cautions regarding detergent contact, skin irritation, and general use.

Additional Safety Cautions

Shaver Preparation and Charging

Shaving Beard Instructions

Shaver Head and Trimmer Operation

Shaver Cleaning and Drying Modes

Shaver Maintenance and Lubrication

Replacing Shaver Outer Foil and Blades

FAQ and Troubleshooting

Troubleshooting Common Problems

Provides solutions for common problems with the shaver and recharger.

Self-Cleaning Recharger Troubleshooting

Recharger Operation Issues and Solutions

Addresses problems like blades not washing, drying, or cracking.

Shaver Operational Troubleshooting

Shaver Charging and Mode Start Issues

Solves issues like the mode not starting, shaver not charging, or loud sounds.

Shaver Sensor and Sound Issues

Shaving Sensor Response Problems

Addresses issues with the shaving sensor not responding or responding incorrectly.

Battery Management and Disposal

Overview

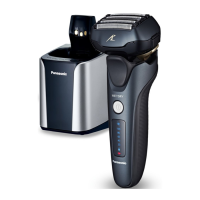
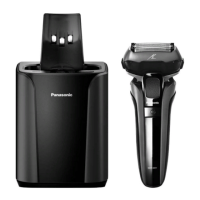
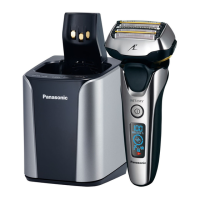
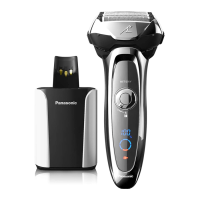
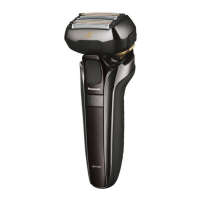
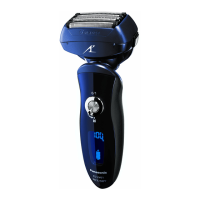
This document describes the Panasonic ES-LV9Q Rechargeable Shaver, a WET/DRY shaver designed for household use.

Function Description

The Panasonic ES-LV9Q is a rechargeable shaver equipped with a smart lock function to prevent accidental operation. It features a shaving sensor that automatically adjusts power based on beard thickness, providing high power for heavy beards and reduced power for thinner areas to minimize skin burden. The shaver head can be set to "FREE" for flexible movement to prevent missed spots or "LOCK" to fix its position. It also includes a built-in trimmer for sideburns and pre-shaving long beards.

Usage Features

Shaving: To use, press the power switch and slowly glide the shaver over the face against the grain of the beard, holding the system outer foil perpendicularly against the skin. For areas like under the chin and around the throat, stretching the skin can help the beard stand for a closer shave. Avoid applying excessive pressure or shaving with only a part of the system outer foil to prevent damage. The shaver can be used for both wet shaving with lather and dry shaving. It is watertight, allowing for use in the shower and cleaning with water.

Trimmer: To use the trimmer, slide the trimmer handle up to the "mm" position until it stands upright, then press the power switch. For optimal use, apply the trimmer edge gently and perpendicularly to the skin, moving it slowly downward. To lower the trimmer, press and hold the top knob and slide the handle down.

Battery and Charging: The shaver has a built-in rechargeable Lithium-ion battery. A full charge takes approximately 1 hour and provides about two weeks of use (based on one 3-minute dry-shave usage per day at 20 °C – 30 °C). Charging can be done by inserting the shaver into the self-cleaning recharger and plugging the adaptor into a household outlet, or by plugging the adaptor directly into the shaver's appliance socket. The charge status lamp (arrow symbol) glows during charging and turns off after 5 seconds when fully charged. The battery capacity lamp shows charging progress. If the battery capacity is low ("10%" appears and blinks, accompanied by two beeps when switched off), the shaver can still be used 1-2 times.

Smart Lock Function: The power switch automatically unlocks when the main body is grasped, and the remaining battery capacity is displayed for about 1 second. It automatically locks 1 minute after releasing the main body, with the switch lock lamp (lock symbol) lighting up for 5 seconds before turning off.

Self-Cleaning Recharger Modes: The self-cleaning recharger offers three modes:

  • Charge Mode: Starts automatically when the shaver is attached.
  • AUTO Mode (Clean/Dry/Charge): Activated by pressing the SELECT button. The CLEAN and DRY lamps glow, and the mode starts after approximately 6 seconds. This mode cannot be changed once started.
  • Dry/Charge Mode: Activated by pressing the SELECT button twice. The DRY lamp glows, and the mode starts after approximately 6 seconds.

Notes on Usage:

  • It is recommended to allow about a month for skin and beard to adjust to a new shaving method, especially for wet lather shaves.
  • Avoid bringing the system outer foil into contact with hard objects to prevent damage.
  • The appliance may not operate in temperatures below approximately 5 °C.
  • The shaving sensor's response may vary depending on the type and quantity of shaving gel or beard thickness.
  • To prevent erroneous operation, place fingers on the finger rest while using the shaver.
  • The sonic vibration cleaning mode is activated by pressing the power switch for more than 2 seconds when the shaver is off; shaving is not possible in this mode.

Maintenance Features

Cleaning with Self-Cleaning Recharger: It is recommended to clean the shaver after each use.

  1. Preparation: Remove the protective cap, insert the shaver into the self-cleaning recharger, and plug the adaptor into a household outlet.
  2. Detergent Preparation: Press the cleaning liquid unit removal button to remove the unit. Pour tap water and the entire packet of special detergent into the unit, ensuring the water level does not exceed the maximum line. Insert the unit back into the recharger until it clicks.
  3. Cleaning Cycle: Press the SELECT button to start the desired cleaning mode (AUTO or Dry/Charge). The "Clean" cycle takes 10 minutes, followed by a "Dry" cycle of 80-170 minutes (depending on ambient temperature).
  4. Completion: Remove the adaptor after the selected mode is completed.

Cleaning with Water (Sonic Vibration Cleaning Mode):

  1. Turn off the shaver and disconnect the AC adaptor.
  2. Apply hand soap and water to the system outer foil.
  3. Press the power switch for more than 2 seconds to activate the sonic vibration cleaning mode. This mode suppresses foam splashing. The battery capacity lamps blink, and the mode automatically turns off after about 20 seconds (or can be turned off manually).
  4. Remove the outer foil section and clean it under running water. Rinsing in sonic vibration cleaning mode reduces splashing.
  5. Shake the shaver to remove excess moisture and wipe with a dry cloth.

Cleaning with Brush:

  • Long Brush: Use to clean the outer foil section, system outer foil, shaver body, and trimmer.
  • Short Brush: Use to clean the inner blades by moving it in the illustrated direction. Avoid moving it perpendicularly against the blades to prevent damage and maintain sharpness.

Lubrication: To maintain smooth blade movement and a comfortable shave:

  1. Apply one drop of oil to each system outer foil.
  2. Raise the trimmer and apply a drop of oil.
  3. Switch the shaver on for approximately five seconds.
  4. Switch off the shaver and wipe off any excess oil with a soft cloth.

Replacing Parts:

  • System Outer Foil: Replace approximately once a year. The foil/blade check lamp (foil symbol) appears on the lamp display annually to indicate this.
  • Inner Blades: Replace approximately once every two years.
  • Cleaning Liquid: Replace when the STATUS lamp glows for 5 seconds after pressing the SELECT button, or after 6 months, even if the lamp does not light up. To replace, remove the AC adaptor, remove the cleaning liquid unit, wash away old liquid, rinse the unit, wipe beard trimmings from the cleaning tray, and prepare new cleaning liquid.

Troubleshooting Cleaning Issues:

  • Foaming: If the cleaning liquid foams, it may be due to mixing soapy water or other detergents. Replace the cleaning liquid and use only the specified detergent.
  • Accumulated Liquid/Waste: If cleaning liquid accumulates or water does not drain from the tray, remove waste from the drain at the bottom of the cleaning tray using a toothpick.
  • Leaking Liquid: Ensure the self-cleaning recharger is placed on a level surface. Avoid pressing the cleaning liquid unit removal button during cleaning.
  • Sticky Blades: Blades may not dry quickly in certain temperatures. Run "Dry/Charge" mode again or wipe with a soft cloth before shaving.
  • Cracked/Deformed Blades: Replace the system outer foil and/or inner blades.

Disposal: The shaver contains a built-in rechargeable Lithium-ion battery. Before disposing of the shaver, the battery must be removed. To do this, ensure the shaver is disconnected from the AC adaptor, fully discharge the battery by turning on the power until it dies, then follow the illustrated steps to remove it. Insulate the positive and negative terminals of the removed battery with tape to prevent short circuits. Dispose of the battery at an officially designated location. The battery is not intended for consumer replacement; contact an authorized service center for replacement.

Panasonic ES-LV9Q Specifications

General IconGeneral
Shaving System5-blade
Shaving SensorYes
Multi-Flex 5D HeadYes
Wet/DryYes
Battery TypeLi-ion
Charging Time1 hour
Operating Time50 minutes
Automatic Cleaning & Charging StationYes
TypeFoil
Number of Blades5
Pop-up TrimmerYes
Voltage100-240V
WaterproofYes
ColorSilver
Motor Speed14000 CPM
Quick Charge3 minutes
WeightApprox. 200g

Related product manuals