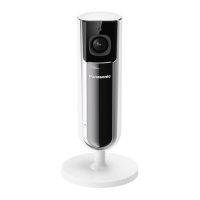
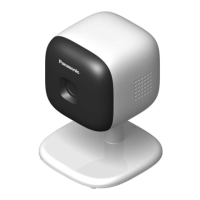
Lens unit
Microphone
Stand
LED indicator
Hole
Y
ou can prevent the camera from falling
by passing a string through the hole in the
stand.
Temperature sensor
Speaker
M N
U
sed when registering the camera to the
hub.
DC socket
LED indicator
Y
ou can use the LED indicator to confirm the
camera’s status.
Indicator Status
Off No power, or LED
i
ndicator is turned
off
*1
Green, lit
Normal operation
*
1
Green, blinking Registration mode
Red Motion detection
f
eature was triggered
Red, blinking Live images are
b
eing viewed or
recorded
Indicator Status
Red, blinking quickly Camera is out of
r
ange of the hub, or
device malfunction
Amber, blinking Camera is not
r
egistered to a hub
*1 You can configure the camera so that its
L
ED indicator does not light during
normal operation. For more information,
refer to the User’s Guide (page 13).
Setup overview
1 Initial setup
Make sure you can access the system
using your mobile device. For details,
refer to the System Setup Guide included
with your hub.
2 Registration
Required only if the camera was
purchased separately (i.e., not as part of
a bundle).
3 Confirm the usage area
Read the information in this document to
confirm that the desired usage area is
suitable to proper operation.
4 Connection
Place the camera in the desired location
and connect it to the power outlet.
Registering the camera
This procedure is not required for devices
t
hat were included as part of a bundle.
Before you can use the camera, it must be
r
egistered to the hub.
If the camera is not registered to a hub, the
camera’s LED indicator blinks in amber.
You can register each device by using the
registration buttons or the [Home Network]
app.
7
Setup
 Loading...