17
Before Use
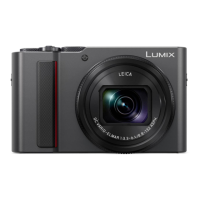
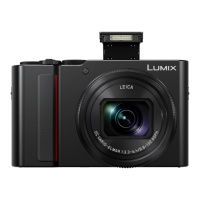
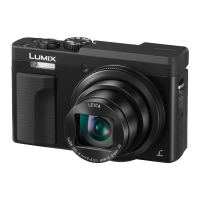
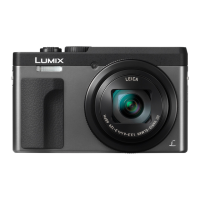
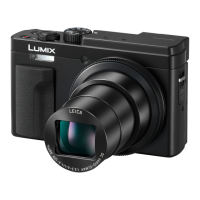
Names and Functions of Main Parts
12
Strap eyelet (→18)
17
[LVF] button (→32) /
[Fn4] button (→47)
18
Flash open lever (→142)
19
[AF/AE LOCK] button (→99)
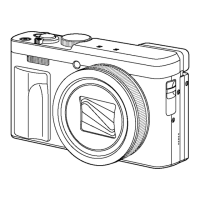
20
Charging lamp (→22) /
WIRELESS connection lamp (→223)
21
[ ] ([Post Focus]) button (→118) /
[Fn2] button (→47)
22
[ ] (Delete) button (→163) /
[Q.MENU/
] (Cancel) button (→45) /
[Fn3] button (→47)
23
[ ] (4K photo mode) button (→107) /
[Fn1] button (→47)
24
[ ] (Playback) button (→156)
25
Cursor button (→37)
[
] (Exposure compensation) ( )
(→100)
[
] (White balance) ( ) (→103)
[
] (Drive Mode) ( ) (→123)
[
] (Focus Mode) ( ) (→83, 96, 97)
26
[MENU/SET] button (→37, 43)
27
[DISP.] button (→37)
28
[HDMI] socket (→270)
29
[USB/CHARGE] socket (→21, 277, 280)
30
Card/Battery door (→20, 25)
31
Release lever (→20, 25)
32
DC coupler cover (→283)
When using an AC adaptor, ensure that
the Panasonic DC coupler (optional) and
AC adaptor (optional) are used.
33
Tripod mount (→304)
Do not attach this unit to tripods that
have screws with a length of 5.5 mm
(0.22 inch) or more. Doing so may
damage this unit or the unit may not be
secured properly on the tripod.
34
Speaker (→31, 197)
35
Touch screen (→40) / monitor (→284)
Function buttons [Fn5] to [Fn9] are
touch icons.
They can be displayed by touching the
[ ] tab on the recording screen.
20
21
22
23
24
25
26
27
28
29
17 12
33 32 31 3035
18 19
34
 Loading...