EasyManua.ls Logo

Patriot Lighting 20704 - User Manual

Patriot Lighting 20704
2 pages
Print Icon
To Next Page IconTo Next Page
Loading...
Black (hot/power)
White (neutral)
Bare/Green
(ground)
White
Red
Black
Black
White
Blue
Blue
White
Green
Green
Receiver
1. Use existing pull chains on the desired
fan to set fan speed to HIGH and to turn
the light ON.
2. Turn o circuit breakers and wall switch
to the fan.
DANGER: Failure to disconnect
power supply prior to installation may
result in serious injury or death.
3. Lower the canopy of the previously
assembled fan and insert receiver.
Note: If installing this product with
a new fan, insert the receiver in the
mounting bracket before wiring the
fan; wire the fan according to these
instructions, then continue fan assembly
as directed in the fans instruction
manual.
PREMIUM
REMOTE CONTROL
Model #20704 (363-5811)
4. Disconnect existing wire connections,
then secure all wire connections with
wire connectors according to diagram
and these steps:
• Connect the Blue wire with white label
from the receiver to the Blue fan wire.
• Connect the Black wire with white
label from the receiver to the Black fan
wire.
Connect the White wire with white label
from the receiver to the White fan wire.
• Connect the Red wire with red label
from the receiver to the Black (hot/
power) supply wire.
• Connect the White wire with red
label from the receiver to the White
(neutral) supply wire.
Fan Pull
Chain
Light Pull
Chain
Canopy
High
LED Indicator
Wall Bracket
Mounting
Screw
5. Wrap electrical tape (not included)
around each wire connector down to
the wire. Then, push wire connections
into the outlet box. Place the White wire
connections on the opposite side of the
outlet box from the Black and Blue wire
connections.
6. Reinstall the canopy.
7. Turn on power supply and wall switch to
the fan.
8. Remove the battery cover from the back
of the remote and install the A23 12-
volt battery. Replace the battery cover
and press the HIGH button to ensure
the LED indicator illuminates and the
fan turns on.
9. If desired, the wall bracket can be
attached to a wall using the mounting
screws.
Questions? Call our customer service department at
1-877-459-3267, 9 a.m. - 5 p.m. Central Time.
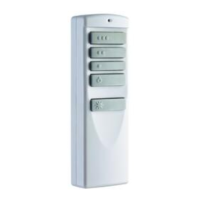
Remote
Qty. 1
Wall Bracket
Qty. 1
Battery
Qty. 1
Receiver
Qty. 1
Wire Connector
Qty. 5
Mounting Screw
Qty. 2
Owners Manual
Qty. 1
Read instructions completely before installing the remote.
WARNING: If the color of the household supply wires is different than what is referred to in the instructions below, a professional electrician should determine proper wiring.
CAUTION:
• Do not install in damp locations. For indoor use only.
• Do not use with fans that have integrated remote controls.
• Be sure the outlet box is properly grounded or that a green or bare (ground) wire is present.
This unit is intended to control a ceiling fan with electrical source of AC 110/120V, 60Hz.
To reduce the risk of re or electric shock, do NOT use a full-range dimmer switch to control the fan speed.
This equipment has been tested and found to comply with the limits for a Class B digital device, pursuant to Part 15 of the FCC Rules. These limits are designed to provide
reasonable protection against harmful interference in a residential installation. This equipment generates, uses and can radiate radio frequency energy and, if not installed and
used in accordance with the instructions, may cause harmful interference to radio communications.
However, there is no guarantee that interference will not occur in a particular installation. If this equipment does cause harmful interference to radio or television reception, which
can be determined by turning the equipment o and on, the user is encouraged to try to correct the interference by one or more of the following measures:
--Reorient or relocate the receiving antenna.
--Increase the separation between the equipment and receiver.
--Connect the equipment into an outlet on a circuit dierent from that to which the receiver is connected.
--Consult the dealer or an experienced radio/TV technician for help. Any changes or modications not expressly approved by the grantee of this device could void the user’s
authority to operate the equipment. tt
HKC-US
3350 Players Club Pkwy. #225, Memphis, TN 38125
(877)459-3267
®
Owner’s
Manual
SAFETY INSTRUCTIONS
SAFETY INSTRUCTIONS
ASSEMBLY INSTRUCTIONS
1 5
2 6
3
7
4
8
9
Warning: Never wire fan to
a wall control. Only wire to a
single-pole on/o wall switch.
Canopy
Question and Answer IconNeed help?

Do you have a question about the Patriot Lighting 20704 and is the answer not in the manual?

Summary

SAFETY INSTRUCTIONS

Electrical Safety & Usage Cautions

Crucial warnings and cautions for safe installation and operation, covering electrical hazards and proper wiring.

ASSEMBLY INSTRUCTIONS

Fan Remote Installation Guide

Step-by-step instructions for installing the receiver, wiring connections, and mounting the remote control.

OPERATING INSTRUCTIONS

Remote Control Operation

How to use the remote for fan speed, light control, dimming, and special features like light delay.

TROUBLESHOOTING

Remote & Fan Troubleshooting

Solutions for common issues such as un-synced remotes, LED indicator problems, and fan/light control failures.

1-YEAR LIMITED WARRANTY

Warranty Terms & Service

Details on the manufacturer's warranty coverage, limitations, and procedures for obtaining service.

Overview

This document describes the Patriot Lighting Premium Remote Control, Model #20704 (363-5811), designed for ceiling fans. It provides detailed instructions for installation, operation, troubleshooting, and warranty information.

Function Description

The Patriot Lighting Premium Remote Control is a device intended to control a ceiling fan with an electrical source of AC 110/120V, 60Hz. It allows users to adjust fan speed (High, Medium, Low), turn the fan off, and control the fan's light. The remote includes a dimming function for compatible bulbs and a "Light Delay Off Mode" that turns off the light after one minute. The system consists of a remote control unit, a receiver that integrates into the fan's canopy, and a wall bracket for mounting the remote. The remote is pre-synced at the factory but can be re-synced if necessary due to power surges or other issues. It is designed for indoor use only and should not be used with fans that have integrated remote controls or with full-range dimmer switches for fan speed control.

Important Technical Specifications

  • Model Number: #20704 (363-5811)
  • Power Source: AC 110/120V, 60Hz for the fan/receiver.
  • Remote Battery: A23 12-volt battery (Qty. 1).
  • FCC Compliance: The device complies with Part 15 of the FCC Rules for Class B digital devices, designed to provide reasonable protection against harmful interference in a residential installation.
  • Components Included:
    • Remote (Qty. 1)
    • Receiver (Qty. 1)
    • Wall Bracket (Qty. 1)
    • Battery (Qty. 1)
    • Wire Connector (Qty. 5)
    • Mounting Screw (Qty. 2)
    • Owner's Manual (Qty. 1)
  • Safety Warnings:
    • Do not install in damp locations.
    • Ensure the outlet box is properly grounded.
    • Do NOT use a full-range dimmer switch to control fan speed.
    • Never wire the fan to a wall control; only wire to a single-pole on/off wall switch.
    • Failure to disconnect power supply prior to installation may result in serious injury or death.

Usage Features

  • Fan Speed Control: Dedicated buttons for High, Medium, and Low fan speeds.
  • Fan Power Off: A button to turn the fan off.
  • Light Control: A single button to turn lights off and on. For dimmable bulbs, pressing and holding this button dims or brightens the lights. For non-dimmable bulbs, it acts as a simple on/off switch.
  • Light Delay Off Mode: Press and hold the fan power button for five seconds to activate this mode, which turns off the light after one minute. The remote's LED indicator flashes four times to confirm the setting.
  • D/CFL Switch: A physical switch inside the battery compartment allows selection between "CFL" for standard non-dimmable bulbs and "D" for incandescent and other dimmable bulbs, ensuring proper light functionality.
  • Remote Synchronization (Learn Function): The remote is pre-synced but can be re-synced if needed. To re-sync, turn off the main power, then turn it back on. Within 30 seconds, press and hold the "learn" button on the remote (using a small screwdriver) for 3 seconds. The fan will turn on, and the light (if applicable) will blink three times, indicating successful synchronization. An alternative syncing method involves pressing and holding the high and low speed buttons simultaneously for 5 seconds after power is restored.
  • LED Indicator: The remote features an LED indicator that illuminates when buttons are pressed, confirming signal transmission.
  • Wall Bracket: The remote can be stored in a wall-mounted bracket using the provided mounting screws.

Maintenance Features

  • Battery Replacement: The remote uses an A23 12-volt battery. If the LED indicator does not illuminate, the battery likely needs to be replaced or reoriented correctly.
  • Troubleshooting Guide: The manual includes a comprehensive troubleshooting section for common issues such as:
    • LED indicator illuminates but remote doesn't control the fan (re-syncing instructions provided).
    • LED indicator does not illuminate (check/replace battery).
    • LED indicator stays on (check for stuck buttons).
    • Remote controls more than one fan (syncing instructions for specific fans).
    • Dimming feature not functioning (check D/CFL switch setting and bulb compatibility).
    • Fan not running at high speed (ensure fan's manual pull chain is set to HIGH SPEED).
    • Light not turning on (ensure light's manual pull chain is set to ON).
  • Cleaning: While not explicitly detailed, general maintenance for electronic devices typically involves keeping them clean and dry.
  • 1-Year Limited Warranty: The manufacturer provides a one-year limited warranty against defects in materials and workmanship from the date of purchase. To obtain service, customers should contact the Service Department with proof of purchase. The warranty covers repair, replacement, or refund at the manufacturer's option but excludes costs of installation/removal, misuse, accidental damage, improper handling, and consequential damages.

Patriot Lighting 20704 Specifications

General IconGeneral
BrandPatriot Lighting
Model20704
CategoryRemote Control
LanguageEnglish