EasyManua.ls Logo

PawHut D06-095 - User Manual

PawHut D06-095
2 pages
Print Icon
To Next Page IconTo Next Page
Loading...
WARNING
Children have died or been seriously injured
when gates are not securely installed.
ALWAYS install and use gates as directed
using all required parts.
YOU must install wall cups to keep gate in
place.Without wall cups, child can push out and
escape.
STOP using when a child can climb over or
dislodge the gate.
USE only with the locking mechanism securely
engaged.
NEVER use to keep child away from pool.
NEVER leave child unattended.
Intended for use with children between 6 and
24 months. • Install according to manufacturer’ s
instructions.
KEEP INSTRUCTIONS FOR FUTURE USE.
READ ALL INSTRUCTIONS BEFORE
ASSEMBLY AND USE OF GATE.
KEEP SMALL PARTS AWAY FROM
CHILDREN DURING ASSEMBLY.
BEFORE ASSEMBLY
C:
Wall Cups (4)
D:
Screws (4)
E:
Spanner (1)
B:
Threaded Spindle
Rods (4)
F:
Sticker (4)
A:
Gate Frame (1)
EXTENSIONS AND MAX SIZE
MAX SIZE12 in8 in
6.9 in
NoMODEL NO.
D06-096
29-58 in
D06-095
29-38 in
With 6.9 inch
36-38 inch
With 8 inch
37-39 inch
With 12 inch
41-43 inch
No EXTENSION
29-31 inch
NOTE The gap between the gate and the wall should not
exceed more than
2.5 inch on either side (Figure 3-4 and 3-5)
If the gate has been installed properly the gap
between the door latch and frame should now be
closed
(Figure 3-6)
Spanner
Figure 3-2
Figure 3-1
Spanner
Figure 3-3
2.5 inch
Figure 3-4
2.5 inch
Figure 3-5
3/64 inch
Figure 3-6
INSTALLING YOUR GATE
STEP 1
Locate the (4) threaded spindle rods (B).
Rotate the adjustment wheels along the
threading, eliminating the gap between
the adjustment wheel and the rubber
foot (Figure 1-1).
NOTE You may notice a slight gap
between the gate door latch and the
frame (Figure 1-2).
THIS IS NOT A DEFECT this gate is
a pressure mounted gate and this gap
will disappear once you tighten the gate
in its opening.
Figure 1-1
DO NOT REMOVE
THE ZIP TIE UNTIL
INSTALLATION IS
COMPLETE.
(Figure 1-3)
Figure 1-3
Figure 1-2
STEP 3
Insert all 4 threaded spindle rods into the wall cups (Figure 3-1).
Tighten the wheels using the spanner tool. (Figure 3-2 and Figure
3-3) Do not over tighten. It may be necessary to hold the
threaded spindle rods while rotating the adjustment wheels to
ensure that the entire unit does not rotate while installing the
gate.
NOTE if your door latch is not properly engaging with the
receiving component, ensure that your gate is level, mounted
properly and that you have not over-tightened the adjustment
wheels.
STEP 2
Insert the threaded spindle rods with
adjustment wheels into the hole on all
four corners of the sides of the gate.
(Figure 2-1)
Place the gate in desired opening with
the bottom close to the floor. The
distance between the bottom of the gate
and the floor should be less than
1/8
inch
(Figure 2-2). Once you are satisfied
with the placement of your gate trace
the spindle rods rubber feet onto the
surface of your opening making sure
these are level (Figure 2-3). Then remove
the gate from the opening. Then screw
the 4 wall cups to the wall using the
screws (Figure 2-4), or paste the 4 wall
cups using the stickers provided (Figure
2-5).
Figure 2-4
Figure 2-3
Figure 2-5
1/8 inch
Figure 2-2
Figure 2-1
INdbb067_UK_D06-095_D06-096
Question and Answer IconNeed help?

Do you have a question about the PawHut D06-095 and is the answer not in the manual?

Summary

Gate Safety and Installation Overview

Child Safety Warning

Crucial safety advice regarding secure installation, potential hazards, and intended use of the gate for child safety.

Pre-Assembly and Specifications

Preparation steps before assembly and details on gate extensions and maximum size configurations.

Installing Your Gate

Step 1: Prepare Spindle Rods

Locate and adjust threaded spindle rods by rotating adjustment wheels to eliminate the gap.

Step 2: Position Gate and Mount Wall Cups

Place gate in opening, mark level positions, then screw or paste wall cups to the wall.

Step 3: Insert Rods and Tighten

Insert spindle rods into wall cups and tighten using the spanner, ensuring proper gate level.

Gate Operation and Maintenance

Operating the Door Latch

Instructions on how to open and close the gate door latch using the spring lock mechanism.

Adding a Gate Extension

Steps to add gate extensions, including removing spindle rods and assembling the extension.

Use at the Top of Stairs

Recommendation for safe placement of the gate at the top of stairs, specifying distance from the first step.

Important Usage Notes

Key considerations for proper installation, maintenance, and safe use, including regular checks.

Removing Your Gate from the Wall

Procedure to detach the gate from the wall by depressurizing it via the adjustment wheels.

Care and Maintenance

Guidelines for periodically checking the gate for damage, wear, and cleaning with mild detergent.

Overview

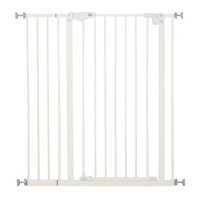
This document describes the PawHut pressure-mounted safety gate, models D06-095 and D06-096, designed for use with children between 6 and 24 months.

Function Description:

The PawHut safety gate is a pressure-mounted barrier intended to restrict access for children within a home environment. It is designed to be installed in doorways or openings, preventing children from entering potentially hazardous areas. The gate features a door latch mechanism that allows for opening and closing, and it can be configured with extensions to fit various opening widths. A key safety feature is its requirement for wall cups to be securely installed, as failure to do so can allow a child to dislodge the gate and escape. The gate is not intended for use with pools and should never be used to leave a child unattended.

Important Technical Specifications:

  • Model Numbers: D06-095, D06-096
  • Intended Age Range: 6 to 24 months
  • Installation Type: Pressure-mounted, requiring wall cups for secure installation.
  • Maximum Size (D06-095): 29-38 inches
  • Maximum Size (D06-096): 29-58 inches
  • Components:
    • Gate Frame (1)
    • Threaded Spindle Rods (4)
    • Wall Cups (4)
    • Screws (4)
    • Spanner (1)
    • Stickers (4) (for wall cup installation)
  • Extension Compatibility: The gate can be used with extensions to accommodate wider openings.
    • No Extension: 29-31 inches
    • With 6.9 inch extension: 36-38 inches
    • With 8 inch extension: 37-39 inches
    • With 12 inch extension: 41-43 inches
  • Gap Tolerance:
    • Initial gap between door latch and frame: This is normal for a pressure-mounted gate and closes upon tightening.
    • Gap between gate and wall: Should not exceed 2.5 inches on either side.
    • Gap between bottom of gate and floor: Should be less than 1/8 inch.
  • Automatic Closing Feature: When the opening width is 8 inches, the gate has an automatic closing function. For opening widths greater than 23 inches, the gate will remain normally open.
  • Top of Stairs Usage: If used at the top of stairs, the safe distance to the first step should be at least 16 inches. Wall cups are crucial for firm affixing in this scenario.

Usage Features:

Installation:

  1. Preparation: Locate the four threaded spindle rods (B). Rotate the adjustment wheels to eliminate the gap between the wheel and the rubber foot.
  2. Initial Placement: Insert the threaded spindle rods into the holes on all four corners of the gate. Place the gate in the desired opening, ensuring the bottom is close to the floor (less than 1/8 inch gap).
  3. Wall Cup Marking: Trace the spindle rod rubber feet onto the wall surface, ensuring they are level.
  4. Wall Cup Installation: Remove the gate, then screw the four wall cups to the wall using the provided screws (D), or paste them using the provided stickers (F).
  5. Final Installation: Insert all four threaded spindle rods into the wall cups. Tighten the wheels using the spanner tool (E). Do not overtighten. It may be necessary to hold the threaded spindle rods while rotating the adjustment wheels to prevent the entire unit from rotating.
  6. Gap Closure: The initial gap between the door latch and frame should close once the gate is properly tightened.
  7. Zip Tie: Do not remove the zip tie until installation is complete.

Operating the Door Latch:

  • To Open: Ensure the base locks at the bottom of the gate door are in the horizontal position. Pull the spring lock away from the easy open latch while simultaneously lifting the lock lever upwards. This releases the locking latch, allowing the door to push or pull open.
  • To Close: Pull the door shut, ensuring the top door latch closes. Then, place the lock at the bottom of the gate down on the side occupied by the child. The gate swings both ways unless one of the swing stops is down. If both swing stops are down, the gate will not swing at all.
  • Automatic Closing: The gate will close automatically and lock when the opening width is 8 inches. For openings greater than 23 inches, the gate will remain open.

Adding a Gate Extension:

  1. Preparation: Remove the top and bottom threaded spindle rods from the main gate frame.
  2. Assembly: Assemble the gate and extension as illustrated in the manual.
  3. Repositioning: Reposition the gate with the extension and follow the gate fitting instructions.
  4. Recommendation: It is preferable to install any extensions on the hinge side of the gate.

Removing the Gate from the Wall:

  • Rotate the adjustment wheels on each of the four threaded spindle rods to depressurize the gate from its doorway or opening. Gently pull or push the gate free.

Important Safety Warnings:

  • Children have died or been seriously injured when gates are not securely installed.
  • Always install and use gates as directed using all required parts.
  • Wall cups must be installed to keep the gate in place.
  • Stop using when a child can climb over or dislodge the gate.
  • Use only with the locking mechanism securely engaged.
  • Never use to keep a child away from a pool.
  • Never leave a child unattended.
  • Keep small parts away from children during assembly.
  • Improper installation can result in the gate becoming unstable or dislodged.
  • Base locks must be used at all times, on both sides of the gate.
  • This product will not necessarily prevent all accidents.
  • Do not use if any components are missing or damaged.
  • Stop using when a pet can climb over or dislodge the gate.
  • Additional or replacement parts should only be obtained from the manufacturer or distributor.

Maintenance Features:

  • Regular Checks: Periodically check the gate for signs of damage, wear, or missing components. Check regularly to ensure all hardware and mountings are tightened.
  • Cleaning: Do not use abrasive cleaners or bleach. Clean by sponging with warm water and a mild detergent.
  • Storage: Keep instructions for future use.

PawHut D06-095 Specifications

General IconGeneral
BrandPawHut
ModelD06-095
CategoryPet Care Product
LanguageEnglish

Related product manuals