Do you have a question about the paws & pals PTAF-02 and is the answer not in the manual?
Configure the feeder's current hour and minute settings.
Determine the number of meals per day for automatic feeding.
Define specific feeding times and portion sizes for each meal.
Guidelines for safe operation, food type, placement, and maintenance.
Step-by-step guide for setting time, frequency, portions, and recording messages.
Instructions for initiating manual feeding and its limitations.
How to activate sleep mode and indicators for low battery.
Steps to assemble the automatic pet feeder components correctly.
Instructions for taking apart the automatic pet feeder.
Instructions for washing the food container and compartments.
Guidance on proper storage of the feeder unit.
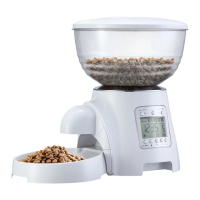
The device described is an automatic pet feeder designed to provide scheduled meals for pets, primarily dogs and cats. It offers a range of programmable features to ensure pets are fed consistently and in appropriate portions, even when their owners are away.
The primary function of this device is to automatically dispense dry pet food at pre-set times and in pre-determined portions. Users can program up to five meals per day, with each meal's timing (hour and minute) and portion size (from 1 to 20 portions, where 1 portion is approximately 10g or 1/10 cup, and 20 portions is 200g or 2 cups) being fully customizable. The feeder includes an LCD control panel for easy programming and monitoring of settings.
A key feature is the ability to record and play a personalized message (up to 10 seconds) at feeding times. This can help call the pet to eat and provide a familiar voice, enhancing the pet's feeding experience. The message will play three times at the designed feeding time.
The device also offers a manual feeding option, allowing users to dispense food on demand. In manual feeding mode, up to 40 portions can be dispensed, which can be useful for guests feeding pets or for occasional extra treats.
For periods when automatic feeding is not needed, such as when the pet is away or if the owner prefers to hand-feed, the feeder can be put into a "sleep mode." In this mode, the automatic feeding function is turned off, conserving power. The device can be easily woken up from sleep mode to resume its scheduled functions.
Powering the device can be done either via a DC5.5*2.1 cable (presumably an AC adapter) or by installing four D-size batteries, offering flexibility in placement and ensuring operation even during power outages. The device includes a low battery indicator (a flashing icon and red light, along with an audible alarm) to alert users when batteries need replacement, ensuring uninterrupted service.
The feeder is designed to serve dry food only, making it suitable for a wide range of commercially available kibble. It is not recommended for puppies or kittens less than 7 months old, suggesting it's best for more mature pets.
Setting up the feeder involves several intuitive steps, all managed through the LCD control panel and a set of buttons: "Set," "Lock," "OK," "Rec/Play," "UP," "Down," "Vol," and "Manual."
Setting the Current Time: Users press and hold the "Set" button to enter time mode. The [HOUR] icon flashes, allowing adjustment with the UP/DOWN buttons, confirmed by "OK." The process is repeated for minutes. The UP/DOWN buttons offer fast forward/backward functionality for quicker adjustments.
Setting the Frequency of Meals: After setting the time, pressing "Set" again allows users to choose the number of meals per day (1 to 5). The [Numbers] icon flashes, and UP/DOWN buttons adjust the frequency. Once confirmed with "OK," the LCD automatically transitions to feeding time and portion settings for each meal.
Setting Feeding Times and Portions: For each scheduled meal (e.g., Meal 1, Meal 2, etc.), the [HOUR] icon flashes, allowing users to set the specific hour and minute using the UP/DOWN buttons, confirmed by "OK." Subsequently, the [PORTION] icon flashes, enabling adjustment of the portion size (1-20 portions) using the UP/DOWN buttons, also confirmed by "OK." This sequence is repeated for all selected meals.
Recording a Message: To record a personalized message, users press and hold the "Rec/Play" button until the "Rec" icon flashes. They can then record their message (up to 10 seconds). Releasing the button completes the recording, indicated by the icon flashing three times. The message can be played back by pressing "Rec/Play" to verify.
Adjusting Volume: The "Vol" button allows users to enter volume adjustment mode, indicated by a flashing icon. Volume levels can be adjusted using the UP/DOWN buttons. The device offers different visual indicators for volume levels (e.g., one bar for 1-3, two bars for 4-6, three bars for 7-9). Setting the volume to 0 will silence the device.
Manual Feeding: Pressing and holding the "Manual" button for 3 seconds initiates manual feeding. The [PORTION] icon will show the dispensed portions. Pressing "Manual" again stops the manual feed.
Sleep Mode: To turn off automatic feeding, users press and hold "OK" for 3 seconds until the [PORTION] icon disappears. The machine enters sleep mode. To wake it up, press and hold "OK" for 3 seconds again until the [PORTION] icon reappears.
Screen Lock: The device features a screen lock function to prevent accidental changes to settings. Pressing and holding the "Lock" button for 3 seconds locks or unlocks the screen. If idle for 2 minutes, the screen will self-lock.
During any setting process, pressing the "Manual" button allows users to exit and save the current parameters. This provides flexibility and prevents accidental data loss.
Maintaining the pet feeder is straightforward, focusing on hygiene and proper operation.
Cleaning: Before cleaning, the power switch must be turned off. The food container and feeding compartments should be washed frequently with soap and water to prevent grease and food buildup. It is crucial not to submerge the feeder's base in water or other liquids, as this could damage the internal PCB and components. This emphasizes the importance of keeping the electronic parts dry.
Assembly and Disassembly: The manual provides clear instructions for assembling and disassembling key components, which is essential for thorough cleaning and maintenance.
Food Level Check: Users are advised to check the food level frequently to ensure the feeder is dispensing properly. This prevents situations where the pet might miss a meal due to an empty food container.
Power Management: Always turn the unit off before cleaning, adding food, or removing the feeder. This is a safety measure to prevent accidental dispensing or damage during maintenance.
Placement: The feeder should be placed on a leveled surface to ensure stable operation and proper food dispensing. Nothing should be placed on top of the feeder, as this could obstruct its mechanism or cause instability.
The device is designed for indoor use only, further emphasizing the need to protect its electronic components from outdoor elements. The warning about placing batteries in the correct positive/negative orientation is critical, as incorrect installation can prevent the feeder from working and potentially cause damage.
| Product Name | Automatic Pet Feeder |
|---|---|
| Brand | Paws & Pals |
| Category | Pet Care Product |
| Type | Automatic Pet Feeder |
| LCD Display | Yes |
| Material | Plastic |
| Dish Material | Stainless Steel |
| Suitable For | Cats and Dogs |
| Power Source | Battery or AC Adapter |
| Feeding Times | Programmable |
| Voice Recording | 10 Seconds |
| Dish Type | Removable |