7. Direction for Use
7.1 General Operation Guidance
1) The Pch Life TENS & PMS unit needs to be charged for up to 10 hours before the
first use.
2) Connect the electrode cables to the output sockets at the bottom of the unit.
3) Connect the pads to the cables by snapping them on.
4) Use a damp towel to wipe the skin where you intend to put the pads, so as to
remove any body oil, cosmetic or dirt. Remove the protective film and place the pads
on the area making sure that both pads are on the skin and not overlapping.
Warning: To avoid an electrical short, never put two electrode pads together.
5) Turn on the unit by sliding the On/Off switch from Off to On.
Warning: Do not move pads or touch them with your hands during use, it may cause
strong stimulation.
6) When you have turned on the unit, the LCD display will automatically show Mode
1. The “T” (Timer) will automatically choose the time duration of 20 minutes.
7) To change the modes, press the M (Mode) button. Once you have selected a mode,
gradually increase the intensity by pressing the + button, and to decrease the intensity
by pressing the – button. The chosen power output depends on your comfort level. At
the precondition of acceptance, the intensity should be chosen as high as possible for
the best effect but still feel comfortable.
8) To set the time of use, press the T button. The auto time set is 20 minutes. Each
press of the T button increases the time by 10 minutes. After the time runs out the
device turns off automatically, and it can be restarted if treatment is needed to be
continued.
9) Sit back and enjoy the deep soothing sensations!
Notes: The Pch Life TENS & PMS unit is very safe, the output intensity increases
only by pushing the + key. Even if the intensity is increased to the maximum, it is
within the safe range, but may feel uncomfortable. When the user switches the mode,
the intensity will automatically go down to the minimum for safety reasons.
10) Press the Pause key (“►II” button) to lock the LCD display, the “MODE” display
will blink.The device will not work no matter what key you press on the control
panel,it is locked.To unlock press the Pause key again.
11) If you need to turn off the device during stimulation, slide the On/Off switch to
“OFF”.
12) Before storing the TENS & PMS use the protective film to cover the electrode
pads.
Notes:
① Never connects this product with a common headphone.
② Please do not touch the USB port when using the device. The USB port is only
used to connect the charger, do not connect other devices.
③ The charger supplied by the manufacturer must in compliance with IEC/EN
60601-1, the use of unauthorized chargers can impair the safety.
④ The battery needs to be charged for up to 10 hours before the first use.
7.2 Electrode guidelines
1) Use only the electrodes supplied by the manufacturer; other electrodes may
present a risk of unsuitable electrical characteristics with your stimulator.
2) Do not use the electrodes on different people, otherwise, skin reaction or cross
contamination may occur.
3) Always turn power off before removing or repositioning the electrodes.
4) Wash skin thoroughly, and then dry it before applying the electrodes.
5) Apply the whole surface of the electrodes firmly to the skin. Do not use electrodes
that do not stick properly to the skin or only partially stick to the skin.
6) In case of skin redness under the electrodes after a stimulation session, do not start
a new session in the same place if skin redness is still evident.
7.3 Regular TENS Application principles
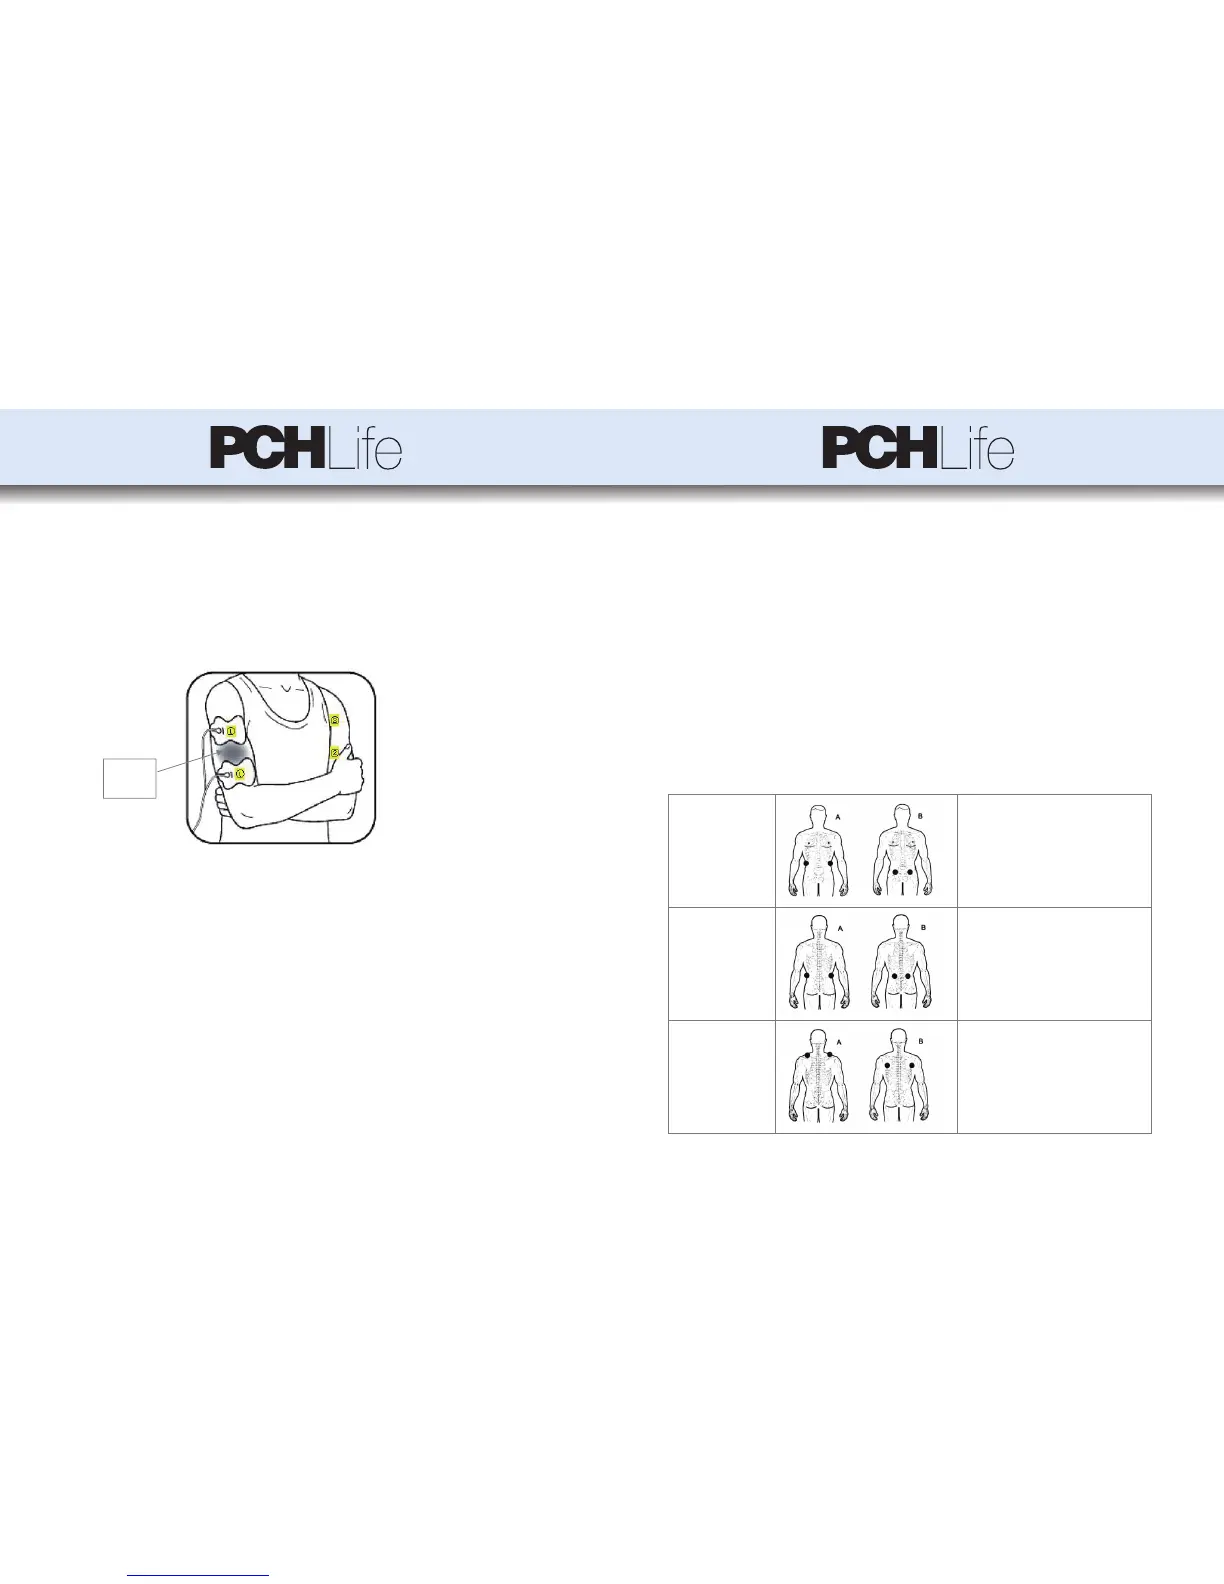
1) Find the exact pain point or the area where the muscles ache most. For best
relief of pain, place the electrode pair from one channel on either side of the pain.
(See Figure 1: Twin mode) or you may place one electrode on the painful site and
the other near the site of pain.
2) Intensity: The intensity can be gradually increased up to the point when it
becomes uncomfortable. Always stay below that point of discomfort.
3) Recommended application duration and Mode selection:
When starting out, choose Mode 1 at a low Intensity level for 10 minutes up
to 3 times a day. You may increase the intensity and time after you have
become familiar with the device and the feel for the stimulation. Stay with
Mode 1 for a few days before trying any of the other Modes and intensity
settings. Remember, the modes to be used for pain relief are Modes 1, 2,3, 4, 5
and 6.
It is difficult to recommend a particular mode for a specific type of pain and it
is usually determined by the user’s feel of relief.
However, if you do not feel any relief of pain after having tried different
modes and intensities it is recommended that you consult with your physician.
4) If the stimulation sensation becomes weaker or disappears, you may
increase the intensity by pressing the up key (+) to a point when the stimulation
becomes uncomfortable, but if the sensation does become uncomfortable, press
the down key (-) to decrease the intensity. Always stay under the point of
discomfort!
5) If you experience an adverse reaction (skin irritation/redness/burns /other
painful sensation), or if you feel unusual discomfort, stop using the device
immediately.
6) There are two ways to place the pads, in twin or opposed modes.
Fix the two pads from one channel on either side of the pain area, or one
electrode on the painful site and the other near the site of pain, but on the same
side of body. If you want to use both channels at the same time, make sure that
the second pair of electrodes is also fixed near the side of pain on the same side
of the body (right under or over the first pair)
Fixing the two or four pads respectively on the opposite sides of the
body is not recommended and provides little benefit.
7.4 Regular TENS Application Methods
Use the device for temporary relief of pain associated with sore and aching muscles
in the shoulder, waist, back, neck, upper extremities (arm), and lower extremities
(leg) due to strain from exercise or normal household work activities.
Users can choose Mode 1, 2, 3, 4, 5 or 6 for temporary relief of pain.
* Many people experience immediate relief from muscle pain, while others require
several days of regular use to feel the benefits. The results vary and will depend
upon your underlying conditions and how often you use the device.
If your pain does not improve, you can try to increase the intensity and time or
change the mode.
Note:
The charts below are merely a suggestion for where to place the electrodes, what
Mode to choose and how long to stimulate, but only after the user has gone
through the starting procedure (above) and is familiar with the device.
Figure 9:
● Abdomen Mode 1 for 10-20 minutes, Mode 2 for 10-20
minutes, and Mode 6 for 10-20 minutes; twice or
3 times a day.
* Persistent and consistent use can help to
improve the abdomen muscles.
● Waist
Mode 1 for 10-20 minutes, Mode 3 for 10-20
minutes, and Mode 6 for 10-20 minutes; twice or
3 times a day.
The device exercises the muscles in the waist
* It is advisable to do some waist exercise after
the application.
● Shoulders and Back
Mode 1 for 10-20 minutes, and Mode 2 or 3 for
10-20 minutes; twice or 3 times a day.
Apply the electrodes to the points shown to
exercise these shoulder muscles
Targeted
muscle
18 19
7.5 Regular PMS Application principles
1) Identify the targeted muscle which needs to be stimulated. In order to improve
or facilitate muscle performance, place the two electrodes from one channel on
opposite ends of the muscle or close to the belly of the muscle. (See Figure 9)
If you like to work with both channels at the same time you may place the second
electrode pair near the first pair or onto another muscle to be stimulated like the
biceps on the opposite arm in Fig 9 below.
2) Intensity: The intensity can be gradually increased up to the point when it
becomes uncomfortable. Always stay below that point of discomfort.
3) Recommended application duration and Mode selection:
The modes to be used for improving the muscle performance are Modes 1, 4,5
and 6.
Mode 1: exercise preparation
Mode 4: Build endurance
Mode 5: Active recovery
Mode 6: muscle strengthening
7.6 Regular PMS Application Methods
This function is intended to stimulate healthy muscles including abdomen
muscles in order to improve or facilitate muscle performance.
You can use the electrode adhesive pads on almost every muscle and joint area on
your body. Please note that this device is intended to stimulate healthy muscles
in order to improve or facilitate muscle performance. It is not intended as
therapy for any medical condition.
Users can choose Mode 1, 4, 5 or 6 to stimulate the following points to quickly
facilitate muscle performance. In order to better improve the muscle
performance, you may increase the intensity gradually to a level which is still
comfortable and does not cause pain or discomfort. Furthermore, you should
use the Pch Life TENS & PMS regularly to maintain the benefit you may have
gained during exercise.
Note:
The charts below are merely a suggestion for how to place the electrodes,
what Mode to choose and how long to stimulate, only after the user has gone
through the starting procedure (above) and is familiar with the device.


 To Next Page
 Loading...