Do you have a question about the Peak MANCHESTER and is the answer not in the manual?
Measure and mark post positions, use a string line for alignment, and lay panels flat with pickets oriented correctly.
Position the first spike and hammer it flush with the surface, ensuring it is plumb using a level.
Insert the first post through panel tabs onto the spike and secure with a pin. Insert the second post to mark its location.
Hammer the second spike at the marked location, insert the second post, and secure with a pin. For slopes, use screws.
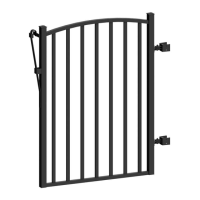
Measure and mark post positions, use a string line for alignment, and lay panels flat with pickets oriented correctly.
Position the first spike and hammer it flush with the surface, ensuring it is plumb using a level.
Insert the first gate post through hinges onto the spike and secure with a pin. Determine placement for the second spike.
Slide retainer onto the second post, insert onto spike, and secure with pin. Align retainer with latch and fasten.
| Brand | Peak |
|---|---|
| Model | MANCHESTER |
| Category | Fencing & Gates |
| Language | English |