- 7 -
estremamente importante e prezioso. Le saremo quindi
molto grati se, dopo aver utilizzato un ns. prodotto,
vorrà compilare il QUESTIONARIO SODDISFAZIONE
CONSUMATORE, segnalando eventuali osservazioni o
suggerimenti, che troverà nel nostro sito internet: www.
pegperego.com
SERVIZIO ASSISTENZA PEG-PÉREGO
Se fortuitamente parti del modello vengono perse o
danneggiate, usare solo pezzi di ricambio originali Peg
Pérego. Per eventuali riparazioni, sostituzioni, informazioni
sui prodotti, vendita di ricambi originali e accessori, contatta
il Servizio Assistenza Peg Pérego indicando, qualora fosse
presente, il numero seriale del prodotto.
tel. 0039/039/60.88.213 numero verde: 800/147.414
(contattabile da rete fissa)
fax 0039/039/33.09.992
e-mail assistenza@pegperego.it
sito internet www.pegperego.com
EN_English
Thank you for choosing a Peg-Pérego product.
WARNING
_ IMPORTANT: read these instructions carefully and
keep them for future reference.
Ignoring these instructions may compromise the
safety of your child.
_ This product can only be used with the following PEG
PEREGO products:
BOOK • BOOK PLUS • BOOK POP-UP • BOOKLET • BOOK
3W • BOOK CROSS • BOOK FOR TWO.
_ This product is suitable for transporting 2 year old
children weighing no more than 22 kg (48.5 lbs).
_ Do not use this product for a number of occupants
exceeding that envisaged by the manufacturer.
_ The product must be assembled by adults.
_ Do not use if any parts are missing or broken.
_ WARNING:
• Never leave your child unattended.
• Do not hang weights off the handlebar.
• Do not let the passenger on the footboard lean on the
handlebar.
_ Follow the instructions for use set out in this manual.
_ WARNING: Before use, make sure that all the
attachments are properly fastened.
_ WARNING: When opening and closing, make sure your
child is at a safe distance to avoid injury.
_ This product is not a toy. Do not let your child play
with this product.
_ Use only spare parts supplied or recommended by the
manufacturer/distributor.
_ Do not use accessories that have not been approved
by the manufacturer.
_ NOT TO CLIMB ON AND OFF STEPS.
_ AVOID ROUGH AND UNEVEN TERRAINS.
_ WARNING: This product is not suitable for running or
skating. Do not use the footboard as a skateboard to
push the stroller.
INSTRUCTIONS FOR USE
1 Unfasten the basket from the gray buttons placed on
the rear bar.
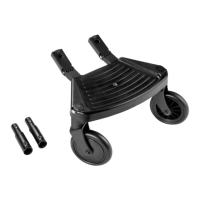
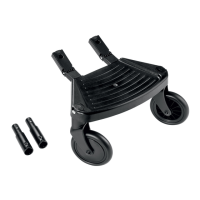
2 Attach the adapters to the chassis as shown, until it
clicks into place.
IMPORTANT: When fastening the adapters, make sure
they are assembled with the arrows showing and
pointing towards the central pedal.
3 Remove the screws from the two footboard brackets
(Fig_a). Slip the brackets over the adapters. If present,
the lower part of the brackets should be placed over
the tube that connects the two brake levers (Fig_b).
IMPORTANT: The bracket pin must be positioned as
shown (Fig_c).
4 Finally, fasten the two brackets by tightening the two
screws removed earlier.
5 Fasten the basket to the gray buttons placed on the
rear bar of the frame.
6 Fasten the wheels to the footboard, inserting the pin
in the special slot under the board.
IMPORTANT: check it has engaged correctly by pulling
the wheels slightly outward.
7 Extend both footboard extensions by pulling them as
shown, until you hear them click (Fig_a).
Fasten the footboard to the two brackets, ensuring it
clicks into place (Fig_b).
8 To ensure the footboard has engaged properly,
check for the color green (Fig_c). Footboard fastened
correctly (Fig_d).
9 It is possible to set the footboard to “idle” without
removing it from the frame:
_ Lower the basket bar (Fig_a).
 Loading...