FIRST CONTROL
• The well must be right, without sand or sediments, if not provide to bleed it.
• Before plunging the group check the sense of rotation of the motor: it must be anticlockwise looking
from the shaft exit side. For water cooled motors also control the topping-up of the liquid according to
the motor manufacturer’s instructions.
MOTOR COUPLING
• Check the free rotation of the motor-pump and the cable condition, if not fitted, block the connector
into its seat with a proper key (5 kgm).
Clean the surfaces to be coupled.
• Keep out the suction screen and cable protection, put the suction head of the pump in correspondance
of the motor prisoners and cable cross; couple the grooved joint of the pump to the motor shaft then
fix it whit nuts as standard (3 kgm).
• Make sure that a clearance exists on pump joint by using a screw-driver appealing to the motor,
reassemble the suction screen and cable protection and insert the motor cable in its own seat.
CABLE CONNECTION
• Joint the motor cable to the line cable (10) with high insulating system (thermotightening or dielectric
resin).
• Choose the standard feeder (2) according to: voltage - power - length- type of service (insulation >1
kV).
• When finishing the cable connection, before plunging the electropump, verify the followings by using
suitable instruments: the CONTINUITY among phases, between the earth conductor and motor mass,
the INSULATION between phases and earth.
INSTALLATION
• Handle the pump (12) carefully; don’t hurt it and don’t make it fall.
Apply safety and accident-prevention rules in force in the building yards when screwing pipings (9) and
getting down the group. Be careful to avoid overtunings that could hurt persons and plants.
• Tighten the threads of the discharge pipings; for safety purposes it is better to execute some spot-wel-
dings at the coupling level. With plastic pipings use proper connections.
• Anchor the group with resistant, antioxidant cables (8), suitable to bear the weight of the machine with
discharge pipings full of water.
• When getting down the pump, link the electric cables to the discharge piping, fix them with plastic hose
clamps (each 3 mt), be careful: don’t damage them and NEVER use them to uphold the group.
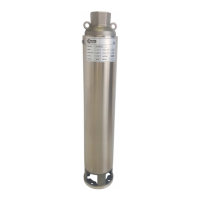
3” - 4” - 6” ELECTROSUBMERSIBLE PUMPS • Instructions
GB
Standard use
Well
Liquid
Service
arthesian depth DN 80 mm (3”) DN 100 mm (4”) DN 150 mm (6”)
clean water or lightly charged, max, temperature 25°C; sand content 40 g/m
3
continuous or intermittent max. 20 starts/hour well distributed. Max, voltage
drop 3% on nominal data voltage.