This document is an instruction manual for the Perlegear TV Cart, Model PGTVMC03, Version 2.0. It provides detailed instructions for assembling and using the TV cart, along with important safety information, technical specifications, and adjustment features.
Function Description:
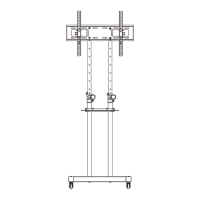
The Perlegear TV Cart is a mobile stand designed to hold a television, offering flexibility in placement and viewing angle. It features a base with casters for easy movement, two adjustable poles to control the TV's height, and a glass shelf for additional components. The cart is designed to secure the TV using brackets that attach to a square plate on the upper poles. It also includes cable management features to keep cables organized.
The manual emphasizes the importance of reading all instructions thoroughly before installation. Users are advised to check all package contents for damage and to contact customer service for replacement parts if needed. It explicitly states that the product should not be used for any purpose or in any configuration not specified in the instructions, disclaiming liability for injuries or damage resulting from incorrect assembly, mounting, or use.
A critical "TIP OVER WARNING" highlights the risk of serious or fatal crushing injuries from tip-over. To prevent this, users are warned never to allow children to climb, stand, hang, or play on any part of the TV or TV cart. The manual recommends using tip-over restraints or anchoring the stand to a wall, noting that these measures may reduce but not eliminate the risk of tip-over.
Important Technical Specifications:
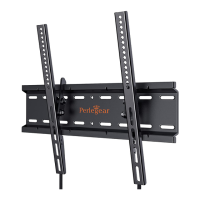
- VESA Compatibility: The TV cart supports VESA patterns ranging from a minimum of 100x100 mm (4x4 in.) to a maximum of 600x400 mm (23x16 in.). If the TV's VESA pattern is outside this range, the cart is not compatible.
- Dimensions (Approximate VESA measurements):
- 100 mm ≈ 4 in.
- 200 mm ≈ 7 7/8 in.
- 300 mm ≈ 11 3/4 in.
- 400 mm ≈ 15 3/4 in.
- 600 mm ≈ 23 6/10 in.
- Supplied Parts: The manual lists various components including Square Tubes (A2), Casters (B2), Tube and Pole Connector (C2), Pole Assembly (D2), Glass Shelf Support (F2), Glass Shelf (G2), Support Plate (H2), Square Plate (I2), TV Bracket (J2), Shelf Support Connector (K2), Wrench, Socket Wrench, and Cable Ties.
- Hardware for Assembling the TV Cart: Includes bolts (M6x12mm A1, M8x20mm B1, M5x12mm G1), washers (Ring Washer with 3 Holes C1, Bolt Washer M8x50mm D1), nuts (M8 E1, M6 F1), Knobs (H1), and Allen Keys (5/32in. I1, 13/64in. J1).
- Hardware for Attaching TV Brackets to TV: Includes various bolts (M6x12mm A, M6x35mm B, M8x25mm C, M8x35mm D, M4x30mm E, M8x50mm F), M6/M8 Washer (G), and spacers (2.5mm H, 10mm I, 22mm J).
- Tools Needed (Not Included): Phillips Screwdriver.
Usage Features:
- Assembly Process: The manual provides a step-by-step guide for assembly:
- Step 1: Assemble the Base: Involves sliding the tube and pole connector onto the square tubes, then securing the base with bolts and washers, and attaching casters using an Allen key.
- Step 2: Secure Pole Assembly to Base: Details how to adjust the height of the pole assembly by loosening knobs, stretching the upper poles, and then inserting latches and fastening knobs to fix the height. It emphasizes that both upper poles should be adjusted to the same height. Finally, the pole assemblies are secured to the tube and pole connector using bolts, washers, and an Allen key.
- Step 3: Install the Square Plate to Upper Poles: Guides on securing the square plate to the support plate via holes on the upper poles using bolts, washers, and nuts.
- Step 4: Secure the TV Brackets to TV: This crucial step involves selecting the correct bolts and spacers based on the TV's design (flat, inset holes, cable interference, or rounded back). It provides guidance on verifying adequate thread engagement for bolts and warns against bolts that are too short (won't hold TV) or too long (will damage TV). It also explains how to use spacers in multi-layers if necessary and stresses that TV brackets must be equally centered and securely fastened. The knobs (H1) are then secured to the brackets (J2) after removing pre-assembled nuts (S). Finally, the TV brackets are secured to the TV.
- Step 5: Secure the TV onto the Square Plate: Instructs users to hang the TV with brackets onto the square plate, push the bottom of the TV to the square plate, and then tighten the preassembled bolts on the brackets until they touch the square plate. A warning for "HEAVY!" indicates that assistance may be needed.
- Step 6: Secure the Glass Shelf Support to the Lower Poles: Explains how to attach the glass shelf support to the lower poles using shelf support connectors and nuts.
- Step 7: Install the Glass Shelf: Directs users to tighten bolts to secure the glass shelf to the glass shelf support. A note warns against over-tightening or using an electric drill to prevent breaking the glass shelf.
- Adjustments:
- Adjustment 1: Tilt Adjustment: Users can loosen the tilt knobs (H1) on both sides, adjust the TV tilt position, and then tighten the knobs until the TV stays at the desired angle. A note warns against over-loosening the knobs.
- Adjustment 2: Height Adjustment: This adjustment requires the TV to be removed from the square plate first. Users need to take off the latches (L) and loosen the knobs (K). Then, they can adjust the two upper poles to the desired height (ensuring both are adjusted simultaneously), insert the latches into the nearest holes, and tighten the knobs to fix the poles in place. A "HEAVY!" warning indicates that assistance may be needed for this step.
Maintenance Features:
While the manual doesn't explicitly detail "maintenance features" in a dedicated section, it implies maintenance through its instructions and warnings:
- Regular Checks: The initial safety information advises checking package contents for undamaged components, suggesting an ongoing need to ensure parts are not damaged or defective.
- Correct Assembly and Use: By providing detailed assembly instructions and warnings against incorrect use, the manual guides users to maintain the product's integrity and safety.
- Contact for Replacement Parts: The instruction to contact customer service for replacement parts implies that individual components can be replaced if they become damaged or defective, contributing to the longevity and safe use of the product.
- Proper Tightening: Instructions to "tighten the bolts" and warnings against "over-tightening" (for the glass shelf) or "over-loosening" (for tilt knobs) are crucial for maintaining the structural integrity and stability of the cart.
- Cable Management: The inclusion of "Cable Tie Organizer" and "Cable Tie" parts indicates a feature to keep cables tidy, which can prevent damage to cables and improve the overall safety and appearance of the setup.
The manual concludes by thanking the customer and reiterating Perlegear's commitment to quality products and services, encouraging users to contact support for any questions or issues.