EasyManua.ls Logo

Perun ETU++ - User Manual

Perun ETU++
8 pages
Print Icon
To Next Page IconTo Next Page
Loading...
1
ETU++
Manual
Perun ETU++ replaces stock electronics in replicas with Electronic Trigger Unit by G&G. It
provides lots of additional features, as well as allows the replica to work with many different
battery types. Reading this manual will help you fully exploit this unit’s potential and in case
of encountering any problems, you can look here for solutions.
Manufacturer:
Perun
Barwicka 8 St.
60-192 Poznań
Poland
e-mail: info@perunairsoft.pl
Table of contents
1. Technical data.................................................................................................................................. 2
2. Features and programming ............................................................................................................. 2
3. Factory settings ............................................................................................................................... 4
4. Diagnostic system ............................................................................................................................ 5
5. Switch check .................................................................................................................................... 7
6. Custom/DIY projects ........................................................................................................................ 7
Question and Answer IconNeed help?

Do you have a question about the Perun ETU++ and is the answer not in the manual?

Summary

Technical Data

Recommended Power Sources

Recommends Li-Po/Li-Ion batteries (7.4-14.8V) and high C-parameter/capacity for optimal performance.

Capacity and C-Parameter

Explains how battery capacity and C-parameter influence replica rate of fire.

Compatibility with High-ROF and High-Power Builds

States compatibility with demanding setups regarding rate of fire and muzzle velocity.

Electronic Fuse

Integrated fuse cuts power on short circuit or gearbox jam; does not require replacement.

Battery Connector Type

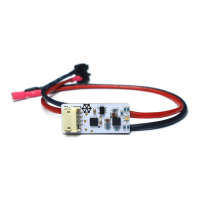
The ETU++ comes with a pre-soldered T-Plug connector.

Power Consumption When Idle

Idle power consumption is 0.75mA; advises disconnecting the battery when not in use.

Features and Programming

Programming Mode Entry

Explains how to enter programming mode for 'SEMI' and 'AUTO' selector positions using specific switch sequences.

Firing Mode Selection

Allows selection of firing modes (safe, semi, 2-5 shot burst, auto) with specific LED/sound feedback.

Active Brake (AB)

Stops motor after shot to prevent spring compression and double shots; 5 levels available.

Precocking

Keeps piston rearward for faster trigger response; levels 1-8 adjustable.

Binary Trigger

Allows shots on both trigger pull and release; can be cancelled by holding trigger.

ROF Reduction

Lowers automatic fire rate with 5 levels of reduction (6%-30%).

DMR Mode

Enables semi-automatic shots with limited frequency (0.25s-3s intervals) for DMR setups.

Li-Po and Li-Ion Alarm

Alerts when battery voltage drops below 3.7V per cell, requiring recharge.

Master Reset

Resets the unit to factory default settings by holding the trigger for 2 seconds.

Factory Settings

Diagnostic System

Disconnected Motor; Switch Check

Checks motor connection and switch states (trigger, selector, sector gear) via LED colors.

Fuse Activation

Indicates short circuit (continuous red) or gearbox jam (blinking red) via LED color.

Trigger Pull Detected During Start-up

Signals a trigger held during startup, possibly indicating a short or mechanical issue.

Gearbox Cycle Detection Failure

Indicates issues with sector gear switch, cut-off lever, or wiring if cycle end isn't detected.

Unit Temperature Too High

Alerts when the electronic board overheats; unit stops until cooled.

Battery Too Low Voltage

Warns if battery voltage is below 7V; requires a battery between 7V and 17V.

Battery Too High Voltage

Warns if battery voltage exceeds 17V; requires immediate disconnection to prevent damage.

Main Transistor or Driver Damage

Red and yellow blinking indicates damage to the main transistor or driver, requiring repair.

Battery Voltage Sensing Malfunction

Red and white blinking indicates a malfunction in the battery detection system, requiring repair.

Switch Check

Disconnected Motor; Switch Check

Checks motor connection and switch states (trigger, selector, sector gear) via LED colors.

Selector Switch Closed

Indicates selector switch closure when set to 'AUTO' via red LED.

Selector Switch Opened

Indicates selector switch opening from 'AUTO' via blue LED.

Trigger Switch

Confirms trigger switch closure via purple LED.

Sector Gear Switch

Confirms sector gear switch closure via green LED.

Custom;DIY Projects

Overview

The Perun ETU++ is an electronic trigger unit designed to replace the stock electronics in G&G replicas equipped with an Electronic Trigger Unit. It offers a range of advanced features and allows compatibility with various battery types.

Function Description

The Perun ETU++ enhances replica performance by providing a sophisticated firing control system. It offers independent settings for "SEMI" and "AUTO" selector positions, allowing users to customize their firing experience.

Firing Modes: Users can choose from several firing modes for each selector position:

  • Safe: No sound signal, steady green light.
  • Semi: One short single signal and blink.
  • 2-5 Shot Burst: Two to five short signals and blinks, corresponding to the burst length.
  • Auto: One long signal and blink.

Active Brake (AB): The AB feature stops the motor immediately after a shot, preventing spring compression and eliminating "overspin" (double shots on semi-auto with high rate of fire replicas). It offers 5 levels of braking strength, from weakest (1) to strongest (5), and can be disabled. Strong braking should be used judiciously as it can impact motor brush service life and increase heating.

  • Tip: To uncompress the main spring after use, switch to semi, fire a single shot, and hold the trigger. A second shot with the strongest AB setting will fire after 2 seconds.
  • LED Indication: No sound signal and blue LED means AB is disabled. 1 to 5 signals indicate braking levels.
  • Attention: AB settings are irrelevant when precocking is active but are stored in memory and become effective when precocking is disabled.

Precocking: In semi-auto mode, precocking keeps the piston in the rear position, ready for immediate firing. This reduces trigger response time, enhancing realism and providing an advantage in close-quarters combat (CQB). Precocking level is adjustable from 1 (weakest) to 8 (strongest) and automatically adapts to battery voltage and firing mode.

  • Tip: To release the spring after using precocking, switch to semi, fire a single shot, and hold the trigger. A second shot with the strongest AB setting will fire after 2 seconds.
  • LED Indication: No sound signal and yellow LED means precocking is disabled. 1 to 8 signals indicate precocking levels.
  • Attention: AB settings do not affect precocking and are ignored when precocking is enabled.

Binary Trigger: This feature allows semi-auto shots to be triggered not only on the pull of the trigger but also upon its release.

  • Tip: Hold the trigger for 2 seconds to cancel the second shot.
  • LED Indication: Purple and teal blinking alternately means binary trigger is disabled. 1 signal indicates activation.

ROF Reduction: This function lowers the rate of automatic fire, offering 5 reduction levels:

  • 1: 6% ROF reduction
  • 2: 12% ROF reduction
  • 3: 18% ROF reduction
  • 4: 24% ROF reduction
  • 5: 30% ROF reduction
  • Attention: These values are approximate and may vary with replica configuration. Semi-automatic shots and the first shot in a burst are always fired without power reduction to maintain good trigger response.
  • LED Indication: No sound signal and white LED means ROF reduction is disabled. 1 to 5 signals indicate reduction levels.

DMR Mode: DMR Mode restricts firing to semi-automatic shots and limits their frequency. It's primarily used for high-power, DMR-styled replicas on fields requiring such limitations. Available intervals are 0.25s, 0.5s, 1s, 2s, and 3s.

  • LED Indication: No sound signal and purple LED means DMR mode is disabled. 1 to 5 signals indicate interval levels.

Li-Po and Li-Ion Alarm: This alarm informs the user when the battery voltage drops below 3.7V per cell, indicating that the battery should be recharged. The unit automatically detects the number of cells and determines a safe voltage range.

  • Signal: Short sound signals every minute indicate the need for battery replacement.
  • Note: Disable this function if using batteries other than Li-Po or Li-Ion.
  • LED Indication: No sound signal and white LED means alarm is disabled. 1 signal indicates activation.

Master Reset: Returns the unit to factory settings.

  • Action: Pull and hold the trigger for 2 seconds. A long sound signal confirms reset.

Important Technical Specifications

  • Voltage Range: 7 to 17 volts.
  • Battery Compatibility: Works with Li-Po and Li-Ion batteries (7.4V, 11.1V, 14.8V nominal voltage recommended). High "C" parameter and capacity batteries are advised for safety and performance.
  • Electronic Fuse: Integrated electronic fuse automatically cuts power in case of a short circuit or gearbox jam. It is non-wearing and does not require replacement.
  • Battery Connector: Comes with a pre-soldered T-Plug connector.
  • Idle Power Consumption: 0.75mA (drains a half-laden 1200mAh battery in approximately one month). It is recommended to disconnect the battery when not in use.
  • Switch Wiring: The ETU++ socket has 4 pins for signal wires: selector, trigger, sector gear cut-off, and a common ground. All switches must be connected to the common ground.
  • Plug Type: JST ZHR-4, compatible with G&G replicas. Pre-installed wires are recommended for easier installation.
  • Switch Compatibility: Resistant to contact bounce; low voltage and current detection allow for a wide variety of switches.

Usage Features

Programming Mode Entry: Settings are made independently for "SEMI" and "AUTO" selector positions, except for Li-Po alarm and Master reset, which apply to both.

  • For "SEMI": Keep the selector on "SEMI" for a few seconds, then go to "AUTO" and back, twice ("SEMI" → "AUTO" → "SEMI" → "AUTO" → "SEMI"). Confirmed by one sound signal and blue LED.
  • For "AUTO": Keep the selector on "AUTO" for a few seconds, then go to "SEMI" and back, twice ("AUTO" → "SEMI" → "AUTO" → "SEMI" → "AUTO"). Confirmed by three sound signals and red LED.
  • Navigation: Switch the selector between "AUTO" and "SEMI" to move between modes. Pull the trigger to enable, disable, or set levels for modes.

Factory Settings: New units or units after a master reset will have the following default settings:

  • Firing mode: Semi on "SEMI", Auto on "AUTO".
  • AB: Level 3.
  • Precocking: Disabled.
  • Binary trigger: Disabled.
  • ROF reduction: Disabled.
  • DMR Mode: Disabled.
  • Li-Po and Li-Ion alarm: Enabled.

Custom/DIY Projects: The ETU++ is suitable for custom projects, providing a firing control unit for enthusiasts. It can be used to steer replicas based on inputs from trigger, selector, and sector gear cut-off switches. This can help convert replicas with known trigger/cut-off mechanism problems (e.g., P90, Steyr AUG) to a switch-based operation.

Maintenance Features

Diagnostic System: The ETU++ includes a diagnostic system to help identify and troubleshoot problems. After connecting the battery, the unit performs a start-up check, indicated by a short green LED blink upon successful completion.

  • Disconnected Motor / Switch Check (Yellow, blinking): Indicates motor disconnection and acts as a switch check mode. Engaging trigger, selector, or sector gear switches will cause the LED to glow purple (trigger), green (selector), or blue (sector gear) momentarily. Reconnecting the motor restores normal function.
    • Attention: Motor check only occurs at start-up. Disconnection after start-up is not signaled.
  • Fuse Activation (Red, continuous or blinking): Indicates a short circuit (continuous red) or gearbox jam (blinking red). The unit will function normally after battery reconnection, unless the short circuit persists.
  • Trigger Pull Detected During Start-up (Yellow and purple blinking alternately): Indicates the trigger was held during start-up, a short circuit in signal wiring, or mechanical malfunction. The unit functions normally after trigger release.
  • Gearbox Cycle Detection Failure (Yellow and green blinking alternately): The unit did not receive cycle end information from the sector gear switch and stopped firing after safety time limit. May indicate a problem with the switch, cut-off lever, or damaged wire.
  • Unit Temperature Too High (Yellow and white blinking alternately): The electronic board's temperature is too high. The unit will not function until it cools down.
  • Battery with Too Low Voltage (Yellow and teal blinking alternately): Battery voltage is below 7V. Replace with a battery between 7V and 17V.
  • Battery with Too High Voltage (Red and teal blinking alternately): Battery voltage is over 17V. Disconnect immediately to prevent permanent damage. Replace with a battery between 7V and 17V.
  • Main Transistor or Driver Damage (Red and yellow blinking alternately): Unit requires repair.
  • Battery Voltage Sensing Malfunction (Red and white blinking alternately): Unit requires repair.

Switch Check Mode: To check switches, disconnect the motor, then connect the battery. The unit will flash yellow. Closing a switch (trigger, selector, or sector gear) will momentarily change the LED color (purple for trigger, green for selector, blue for sector gear). This mode is active for 5 minutes.

Troubleshooting Common Problems:

  • Replica fires 2-round burst in semi-auto:
    • Cause: Motor/battery too strong for main spring (overspin), too high precocking level, or trigger mechanism malfunction.
    • Solution: Enable AB or precocking, set precocking to a lower level, check/replace cut-off lever/contacts.
  • Replica does not shoot; no light/sound:
    • Cause: Incompatible T-Deans battery connector (poor contact).
    • Solution: Try another battery or a T-Deans socket from a different manufacturer.
  • Battery and/or motor heat up excessively:
    • Cause: Battery has low capacity/C parameter, weak motor, or increased motor load due to friction (improper shimming, motor position).
    • Solution: Use higher capacity/C parameter battery, stronger motor, remove friction cause.
  • Motor beeps from time to time:
    • Cause: Li-Po alarm activated.
    • Solution: Replace battery or disable Li-Po alarm if using non-Li-Po/Li-Ion batteries.
  • Same battery/motor did not heat up earlier:
    • Cause: Low-resistance MOSFET transistor and wiring in Perun ETU++ allow higher current draw, leading to increased heating.
    • Solution: May require changing to new battery/motor.

Perun ETU++ Specifications

General IconGeneral
BrandPerun
ModelETU++
CategoryVideo Gaming Accessories
LanguageEnglish