EN
ASSEMBLY AND USER INSTRUCTIONS
Whenever this product is used the following information must be
taken into consideration: the bike rack is a safe product if used
correctly, but if it is used incorrectly it can cause damages to you
and to anyone driving behind you.
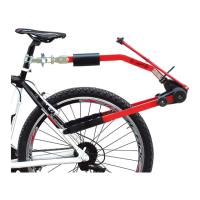
1) Insert the plugs 3 in the bearing rails 4 (Fig. A).
2) Mount the tyre cradles 6 on the bike carrier bar 4 in the most suitable
positions for the dimensions of your bike and x them with the screws 7,
nuts and washers 8 (Fig. A).
3) Fix the hook 9 to the tilt mechanisms 10 (Fig. A).
4) Tilt the xing block 24 by pulling hook 9, then insert the plugs 1 in the
square bearing tubes 2 (Fig. B).
5) Mount the two tilter blocks 50 to the square bearing tubes 2 and x
them with the screws 51, washers 52 and nuts 53 (Fig. B).
6) Mounting the bike xing arch 5:
- Insert the plugs 54 in the bike xing arch 5 (Fig. C);
- Carry out the operations 1, 2 (only for art. 706/4) and 3 (Fig. C);
- Insert the xing arch 5 in the seat in the tilter blocks 50, then fasten it
with the washers 20, the knobs 19 and the nuts 55 (Fig. C).
7) Mount the rear lights 11 to the lighting board 12 and x together with
the washers and nuts 13 (Fig. D); take care not to damage the wires and
not to over-tighten the nuts as this could damage the plastic parts.
Thread the 13 pin plug through the central hole of the lighting board 12.
8) Fix the number plate frame 14 to the lighting board 12 with the screws
15 (Fig. D).
9) Fix the lighting board assembly 12 to the square tube 16 with the
screws 17, the nuts and the washers 18; make sure you thread the tilt
hook 9 into the slot provided (Fig. E).
For personal safety and to avoid damaging the vehicle we recommend 2
people mount the bike carrier.
10) Push the lever 22 upwards, to disengage it turn the wrench 23 counter
clockwise (Fig. F1).
11) Place the xing block 24 on the towball 25 (Fig. F2).
12) Close the clamping device by lowering the lever 22: at least 45 kg.
clamping force is required. (Fig. F2).
Adjustment of closing hand force
It is always necessary to make the rst adjustment when the product is
purchased. Then, every time the product is used, the clamping force must
be checked and adjusted if necessary. In order to prevent accidents and
damage it is advisable to ask a second person to assist you in this
procedure as well. After disengaging and lifting the lever 22 the second
person must hold the cycle carrier in a horizontal position. The screw 26
must be adjusted with the wrench provided 27 so that the clamping
force on the lever is increased to a minimum of 45 Kg. (Fig. F2). Make
sure that the bike rack does not rotate when the clamping device has
been locked.
ONLY FOR ART.706/4
13) Clean the parts of the bodywork that will be in contact with the straps of
the bike carrier. Attach the strap hooks 35 to the edges of the vehicle
hatch, then insert the straps in the buckles 34 (make sure the inlet
direction is correct) (Fig. G).
IMPORTANT
: Give the straps a good tug to check for tightness. Check the
tightness before starting and during the trip.
HOW TO INSTALL THE BIKE CARRIER ON
THE TOWBALL
14) Place the biggest and heaviest bike on the bike rack rst, position the
wheels in the tire cradles 6 and lean it up against the bike xing arch 5.
Secure the bike to the bike xing arch 5 with the xing strap 28 (Fig.
I
1). Secure the wheels by means of the xing straps 29 (Fig. H).
POSITIONING AND FIXING THE BIKES ON
THE BIKE RACK
15) Repeat the operations in 14 for the second, third and fourth bikes. The
second and third bikes are
secured to the fixing arch 5 with the fixing
arms 30/31 (Fig. I1), whereas the fourth bike is secured to the third
bike with fixing arm 32 (Fig. I2).
IMPORTANT
: For safe transportation of the load the bike carrier is
supplied with a strap 33 for tying all the bikes to the fixing arch 5.
Check that the belt is mounted correctly by pulling on it (Fig. I1).
BIKE RACK INCLINATION
(Fig. L/M/N)
To tilt the bike rack hold it up with one hand while you pull the hook 9
with the other (Fig. L). To avoid injury or damage, this operation of
tilting the bike rack should be carried out with the help of a third
person. To close the bike rack, lift it until the tilt mechanism 10
engages completely by passing from the tilt position (Fig. M) to the
closed position (Fig. N). bike racks:
9/20
P1200041-02_706_PARMA_20/09/2023
Copyright © 2023 Peruzzo Italy - MADE IN ITALY
 Loading...