Do you have a question about the Pet Gear EASY STEP II EXTRA WIDE and is the answer not in the manual?
Provides customer service contact details, email, and operating hours for assistance.
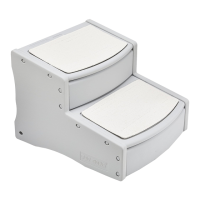
Component labeled 'A', forming one side of the pet step structure.
Component labeled 'B', forming the opposite side of the pet step structure.
Component labeled 'C', used to create elevated steps within the structure.
Component labeled 'D', used for connecting parts during assembly.
Component labeled 'G', providing central structural support for the pet steps.
Component labeled 'E', the uppermost step surface of the pet stair.
Component labeled 'F', the lowest step surface of the pet stair.
Connect the top stair (E) to the right panel (B) ensuring proper alignment and no gaps.
Insert a riser (C) between the assembled panels, ensuring a tight fit.
Add the bottom stair (F), noting the correct curved side direction for placement.
Insert another riser (C) to continue building the step structure, ensuring no gaps.
Place the center support panel (G) into the middle row of holes for stability.
Insert dowel (D) into the designated hole and slide into the notch on the center support panel.
Align and attach the left panel (A) to the structure, ensuring all holes align.
Not for aggressive pets; PET GEAR not liable for damage from destructive animals.
Instructions on how to order PET GEAR replacement parts using model number.
The Pet Gear Easy Step II Extra Wide (models PG9720XLCH/PG9720XLTN) is an instruction manual for an assembly-required pet step designed to assist pets, particularly those with mobility challenges or smaller stature, in accessing elevated surfaces like beds or couches. This product is specifically for pets and is not intended for human use.
The primary function of the Easy Step II Extra Wide is to provide a stable and safe means for pets to climb onto and descend from furniture. It features a two-step design, with an "Extra Wide" configuration to offer a more generous climbing surface, potentially increasing stability and comfort for larger or less agile pets. The steps are designed to be sturdy and durable, ensuring the pet's safety during use. The assembly process involves interlocking panels and stairs, creating a robust structure that can withstand a pet's weight and movement. The inclusion of a center support panel and dowels further enhances the structural integrity, preventing wobbling or collapse during use. The design emphasizes ease of assembly, with clear instructions and visual aids to guide the user through each step.
In summary, the Pet Gear Easy Step II Extra Wide is a practical and user-friendly solution for pet owners seeking to improve their pet's access to elevated surfaces. Its robust design, extra-wide steps, and comprehensive customer support for replacement parts underscore its commitment to pet safety, convenience, and long-term usability.
| Product Name | Pet Gear EASY STEP II EXTRA WIDE |
|---|---|
| Category | Pet Care Product |
| Type | Pet Stairs |
| Number of Steps | 2 |
| Weight Capacity | Up to 150 lbs |
| Foldable | No |
| Non-Slip Surface | Yes |
| Width | 20 inches |
| Height | 16 inches |
| Material | Plastic |
| Color | Chocolate |
| Suitable For | Dogs |