3
INTALL DIGITAL SIGN CLIENT APP
1. Copy your Digital Sign Client APK file into a USB stick, and insert the stick into
the device
2. From the Philips Android Configuration menu select Apps, and select File
Manager
3. Tab on the USB icon, and select the Digital Sign Client APK file
4. Tab Open from the pop-up menu and follow the installation instructions.
CONFIGURATION
1. From the Philips Android Configuration menu select Settings, Signage Display
and General settings
2. Tab on Boot on source, Input, and Custom App
3. Tab , (twice), and Source Setting
4. Tab Customer, select app and select the DS Client from the list, Save
5. Tab ,,,,(four times) tab Power and Reboot
USING DIGITAL SIGN CLIENT
1. Tap SETUP button for configuration of Digital Sign Client
2. Make sure the Server is set to http://dss.add-on.com (for demo server) or
enter your production server URL
3. Tap the SAVE button on the top of the page.
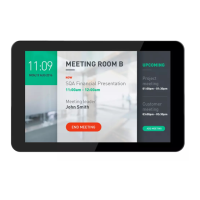
The meeting room sign appears, and you are now able to book a meeting and trial
the entire system.
LATER CUSTOMIZATIONS
1. Tap the logo image to enter the setup screen.
2. If you want to remove the navigation bar at the bottom of the screen, select
Advanced and turn on Kiosk mode
3. Change your settings and tap SAVE for saving and exit.
(Update server address, change logo, etc.)
If you want to go back to the Philips Android Configuration menu, then do this by
pressing Power key and volume down (both located on the backside) at the same
time. Enter Password: 1234 (default from factory) and OK

 Loading...