Preparations
Step 4: Setting speakers
IMPORTANT!
–This function is only available when
you have connected other 3.1-channel
speakers.
You can adjust the delay time (center and rear
only) for individual speakers to optimize the
sound effect according to your surroundings and
setup. Speaker settings are only active on
effective in the case of Multi-channel audio
output.
PBC
5
2
,
3
,
4
1
1
In disc mode, press SYSTEM MENU.
2
Select
icon and press 4.
3
Press 1 / ¡ / 5 / 4 keys on the remote
control to select your preferred option.
➜ Move to
and press ¡.
➜ Move to “CENTER DELAY” or “REAR
DELAY” and press ¡.
4
Press ¡ to set CENTER DELAY or REAR
DELAY values you want.
➜ Use longer delay time if the surround
speakers are closer to the listener than the front
speakers.
5
Press OK to confirm.
To remove the menu
Press SYSTEM MENU.
Step 5: Setting language
preference
You can select your preferred language settings
so that this DVD Mini Hi-Fi System will
automatically switch to the language for you
whenever you load a disc. If the language
selected is not available on the disc, the language
set by default will be used instead. But the menu
language of the DVD Mini Hi-Fi System cannot
be changed once selected.
PBC
1
In disc mode, stop playback and press SYSTEM
MENU.
2
Select
icon and press 4.
3
Press 1 / ¡ / 5 / 4 keys on the remote
control to select your preferred option.
➜ Move to
and press ¡.
➜ Move to one of the following and press ¡.
– Audio (disc’s soundtrack)
– Subtitle (disc’s subtitles)
–Disc Menu (on screen menu)
4
Press 5 / 4 to select a language and press OK.
5
Repeat steps 3~4 for other settings.
To remove the menu
Press SYSTEM MENU.
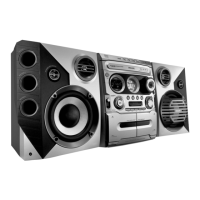
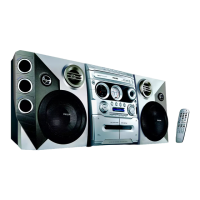
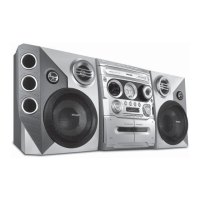
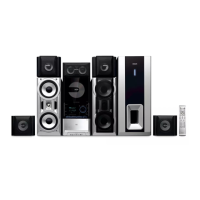
Connections
Step 1: Placing speakers
Place the front left and right speakers at equal
distances from the TV set and at an angle of
approximately 45 degrees from the listening
position.
Notes:
–To avoid magnetic interference, do not position
the front speakers too close to your TV set.
– Allow adequate ventilation around the DVD Mini
Hi-Fi System.
Step 2: Connecting speakers
Connect the speaker wires to the SPEAKERS
(FRONT) terminals, right speaker to “R” and left
speaker to “L”, coloured (marked) wire to “+”
and black (unmarked) wire to “–”. Fully insert
the stripped portion of the speaker wire into the
terminal as shown.
Notes:
–For optimal sound performance, use the
supplied speakers.
– Do not connect more than one speaker to any
one pair of +/- speaker terminals.
– Do not connect speakers with an impedance
lower than the speakers supplied. Please refer to
the SPECIFICATIONS section of this manual.
IMPORTANT!
The type plate is located on the rear of
the system.
To avoid overheating of the system, a
safety circuit has been built in.
Therefore, your system may switch to
Standby mode automatically under
extreme conditions. If this happens, let
the system cool down before reusing it.
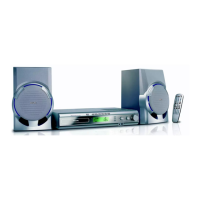
Speakers
Front Left (L)
Front Right (R)
Black
Black
White
Red
––––
+
 Loading...