EasyManua.ls Logo

Philips Norelco MG7790 - User Manual

Philips Norelco MG7790
10 pages
Print Icon
To Next Page IconTo Next Page
Loading...
MG7790M
G
779
0
BC
>75 % recycled paper
>75 % papier recyclé
Manufactured for: Philips Personal Health
a division of Philips North America LLC
P.O. Box 10313, Stamford, CT 06904, USA
This symbol on the product’s nameplate
means it is listed by Underwriters’
Laboratories, Inc.
Norelco is a registered trademark of Philips
North America LLC.
PHILIPS and Philips shield are registered
trademarks of Koninklijke Philips N.V.
©2022 Philips North America LLC. All rights
reserved.
4222.002.8789.3 (01/27/2022)
5/64 in.
2 mm
3/16 in.
5 mm
3/64 in.
1 mm
1/8 in.
3 mm
9/32 in.
7 mm
1/4 in.
6 mm
21/32 in.
16 mm
15/32 in.
12 mm
3/8 in.
9 mm
1/8 in.
3 mm
3/16 in.
5 mm
5/32 in.
4 mm
5/32 in. – 3/8 in.
4 mm – 9 mm
4
1
2
5
3
6
7
8
14
10
12
9
11
13
17
18
19
20
21 22
23
24
15
16
1
2
1
2
1
2
1
2
5
8
11
14
17
20
23
26
3
6
9
12
15
18
21
24
27
4
7
10
13
16
19
22
25
28
English
IMPORTANT
SAFETY
INSTRUCTIONS
When using an electric product, basic
precautions should always be followed,
including the following:
Read all instructions before using this
product.
DANGER
To reduce the risk of electric shock:
- Do not reach for a corded product that has
fallen into water. Unplug immediately from
the power outlet.
- Use product only in dry condition. Do not
use while bathing or in a shower.
- Do not place or store the product where it
can fall or be pulled into a tub or sink. Do
not place or drop the product into water or
other liquid.
Introduction
Congratulations on your purchase and
welcome to Philips Norelco!
To fully benet from the support that
PhilipsNorelco oers, register your product
at www.norelco.com/register.
General description (Fig. 1)
1 Extra-wide hair trimmer
2 Precision trimmer
3 Nose trimmer
4 Precision shaver
5 Full-size hair trimmer
6 On/o button
7 Battery status indicator
8 Socket for small plug
9 Stubble guard 3/64in. (1mm)
10 Stubble guard 5/64in. (2mm)
11 Beard guard 1/8in. (3mm)
12 Beard guard 3/16in. (5mm)
13 Beard guard 9/32in. (7mm)
14 Eyebrow guard 1/4in. (6mm)
15 Power plug
16 Small plug
17 Hair guard 5/32in. (4mm)
18 Hair guard 3/8in. (9mm)
19 Hair guard 15/32in. (12mm)
20 Hair guard 21/32in. (16mm)
21 Fading hair guard 5/32in.-3/8in. (4-9mm)
22 Fading hair guard 5/32in.-3/8in. (4-9mm)
23 Body guard 1/8in. (3mm)
24 Body guard 3/16in. (5mm)
Not shown: cleaning brush, pouch
This symbol indicates that the product
can be rinsed under running tap water.
Charging
Battery status indications
- When the battery is almost empty, the
battery status indicator lights up orange
(Fig.2).
- When the product is charging, the battery
status indicator ashes white slowly (Fig.3).
- During quick charge, the battery status
indicator ashes white. After approx.
5minutes of charging, the product contains
enough power for one cordless trimming
session.
- When the battery is fully charged, the
battery status indicator lights up white
continuously (Fig.4).
Note: After approx. 30 minutes, the light goes
out automatically.
Charging
Charge the product before rst use and when
the display indicates that the battery is almost
empty. When the product has charged for
3hours, it has a cordless operating time of up
to 6 hours.
- Charging, recharging or using the product
at temperatures below 40°F (4.5°C) or
higher than 95°F (35°C) adversely aects
the lifespan of the battery.
- If the product is subjected to a major
change in temperature, pressure or
humidity, let the product acclimatize for
30minutes before use.
1 Make sure the product is turned o.
2 Insert the small plug into the product and
put the power plug in any 120V AC outlet
(Fig.5).
3 After charging, remove the power plug
from the wall outlet and pull the small plug
out of the product.
Note: An adapter plug may be necessary for
cord usage in some foreign countries. Use
an attachment plug adapter of the proper
conguration for the power outlet.
Quick charge
After approx. 5 minutes charging, the product
contains enough power for one cordless
trimming session.
Using the product
Note: This product can be used without cord
or directly from the power outlet.
Note: Switch o and clean the product and
attachments after each use.
- Use this product for its intended household
use as described in this manual.
- For hygienic reasons, the product should
only be used by one person.
- Trimming is easier when the skin and hair
are dry.
- Be careful when you are trimming without
a guard because the cutting unit removes
every hair it touches.
Detaching and attaching cutting elements
1 To detach a cutting element, push upwards
against the teeth of the cutting element
and take it o the handle (Fig.6).
2 To attach a cutting element, insert the lug
of the cutting element into the guiding
slot at the front and push the back of the
cutting element onto the product (‘click‘)
(Fig.7).
Detaching the precision shaver and nose
trimmer
1 Place your nger on the arrow at the back
of the attachment and push it o the
handle in the direction of the arrow (Fig.8).
Attaching and detaching guards
1 To attach any type of guard onto a cutting
element,slide the front part of the guard
onto the teeth and push the projection
at the back of the guard into the product
(‘click‘) (Fig.9).
2 To detach any type of guard from the
cutting element, carefully pull its back part
o the product and then slide it o the
cutting element (Fig.10).
Note: When trimming for the rst time,
start by using the guard with the maximum
trimming length setting to familiarize
yourself with the product.
Switching the product on and o
1 Press the on/o button once to switch the
product on or o (Fig.11).
Attachments for use on beard
Full-size hair trimmer
Use the full-size hair trimmer without a guard
to trim hair close to the skin (to a length of
1/32in./0.5mm) or to create clean lines
around your beard, neck and sideburns.
1 To trim hair close to the skin, place the at
side of the cutting element against your
skin and make strokes against the direction
of hair growth (Fig.12).
2 For contouring, hold the cutting element
perpendicular to the skin and move it
upwards or downwards with gentle
pressure (Fig.13).
- Except when charging, always unplug this
product from the power outlet immediately
after use.
- Remove power cord from power outlet and
product before cleaning.
WARNING
To reduce the risk of burns, re, electric
shock, or injury to persons:
- This product is not intended for use by
persons (including children) with reduced
physical, sensory or mental capabilities,
or lack of experience and knowledge,
unless they have been given supervision or
instruction concerning use of the product
by a person responsible for their safety.
Children should be supervised to ensure
that they do not play with the product.
- Use this product only for its intended
household use as described in this manual.
Misuse can lead do hazards or serious
injuries. Do not use attachments not
recommended by Philips North America LLC.
- Never operate this product if it has a
damaged power cord, if it is not working
properly, after it has been dropped or
damaged, or after the product or power
cord has been dropped into water. For
assistance call 1-800-243-3050.
- Keep the power cord away from heated
surfaces.
- Never drop or insert any object into any
opening.
- Do not use the power cord in or near a
power outlet that contains an electric air
freshener to prevent damage to the power
cord.
- Do not use product outdoors or operate
where aerosol (spray) products are being
used or where oxygen is being administered.
- Always check cutters, cutting unit and
guards before using the product. Do not
use the product if cutters, cutting unit or
guards are damaged, as injury may occur.
- Always attach power cord to product rst,
then to power outlet. To disconnect, set
all controls to ‚o‘ position. Then remove
power cord from power outlet.
- Plug power cord directly into power outlet.
Do not use an extension cord.
- Unplug power cord before plugging in or
unplugging the product.
- The batteries used in this product may
present a re or chemical burn hazard if
mistreated. Do not disassemble, heat above
100°C (212°F) or incinerate.
IMPORTANT: The power plug contains a
transformer. Do not cut o the power plug to
replace it with another plug as this will cause a
hazardous condition.
- Only use original Philips accessories or
consumables. Only use detachable power
cord HQ8505.
- Charge, use and store the product at a
temperature between 40 °F / 4.5°C and
95 °F / 35°C.
- Keep product and batteries away from re
and do not expose them to direct sunlight
or high temperatures.
- If the product becomes abnormally hot or
smelly, changes color or if charging takes
longer than usual, stop using and charging
the product and contact Philips.
- Do not place products and their batteries in
microwave ovens or on induction cookers.
- Do not open, modify, pierce, damage or
dismantle the product or battery to prevent
batteries from heating up or releasing
toxic or hazardous substances. Do not
short-circuit, overcharge or reverse charge
batteries.
- If batteries are damaged or leaking, avoid
contact with the skin or eyes. If this occurs,
immediately rinse well with water and seek
medical care.
- When you handle batteries, make sure that
your hands, the product and the batteries
are dry.
- To avoid accidental short-circuiting of
batteries after removal, do not let battery
terminals come into contact with metal
objects (e.g. coins, hairpins, rings). Do not
wrap batteries in aluminum foil. Tape
battery terminals or put batteries in a
plastic bag before you discard them.
SAVE THESE
INSTRUCTIONS
MG7790-US_4222.002.8789.3_LEAFLET_A7_BW.indd 1-4MG7790-US_4222.002.8789.3_LEAFLET_A7_BW.indd 1-4 28-01-22 10:0128-01-22 10:01
Question and Answer IconNeed help?

Do you have a question about the Philips Norelco MG7790 and is the answer not in the manual?

Summary

Safety Instructions

Danger - Electric Shock

Precautions to prevent electric shock when using the product.

Warning - General Safety

Warnings to reduce risks of injury, burns, fire, or electric shock.

Getting Started

Charging and Battery Status

Detailed guide on charging, status indicators, and quick charge functionality.

Component Management and Operation

Switching On and Off

How to turn the device on and off using the power button.

Beard Trimming

Full-Size Trimmer Usage

Using the full-size trimmer for close shaving or contouring beards.

Beard Guards

How to attach and use beard guards for even grooming.

Body Trimming

Head Trimming

Specialized Trimming Attachments

Cleaning the Trimmer

Routine and Thorough Cleaning

Instructions for cleaning all parts after use, both routinely and thoroughly.

Support, Disposal, and Warranty

Overview

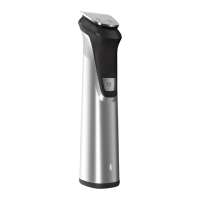
The Philips Norelco MG7790 is a versatile grooming tool designed for various trimming and shaving needs, offering a comprehensive solution for hair, beard, and body grooming. Its primary function is to provide precise and efficient hair removal and styling for different parts of the body, including the face, head, and body.

Function Description:

The device serves as a multi-groomer, capable of trimming hair to various lengths and achieving different styles. It features a full-size hair trimmer for general hair cutting, an extra-wide hair trimmer for larger areas, a precision trimmer for detailing and fine lines, a nose trimmer for unwanted nose and ear hair, and a precision shaver for clean edges and detailing beard styles. The wide array of attachments allows for a broad range of grooming tasks, from maintaining stubble and beards to full haircuts and body hair trimming.

Usage Features:

The MG7790 is designed for cordless operation, providing flexibility and ease of use without being tethered to a power outlet. It can also be used directly from the power outlet if needed. The device is equipped with a battery status indicator that clearly communicates the battery's charge level: orange when almost empty, slowly flashing white during charging, and continuously white when fully charged. A quick charge feature allows for a single cordless trimming session after only 5 minutes of charging, while a full charge provides up to 6 hours of cordless operating time.

For different hair lengths and styles, the device comes with a comprehensive set of guards. These include stubble guards (1mm, 2mm), beard guards (3mm, 5mm, 7mm), an eyebrow guard (6mm), hair guards (4mm, 9mm, 12mm, 16mm), fading hair guards (4-9mm), and body guards (3mm, 5mm). These guards are easily attached and detached from the full-size or extra-wide hair trimmer, allowing users to achieve desired hair lengths and styles with precision.

When trimming beards, the guards are moved against the direction of hair growth, ensuring the guard's surface remains in contact with the skin for effective trimming. For body hair, it is recommended to use the green body guards, especially for sensitive areas, and to stretch the skin with a free hand while moving the guard against hair growth. The device is suitable for use on dry skin and hair, as wet hair can stick to the body.

For head hair, the extra-wide hair trimmer can be used without a guard for very close cuts or to contour necklines and areas around the ears. When shaping contours, only one edge of the cutter blades should touch the hair ends. Fading hair guards are specifically designed for trimming hair around the ears with a faded result, with instructions to hold the side of the guard with the short teeth closest to the ear.

The precision trimmer is ideal for creating fine lines and contours, used by holding the trimming head perpendicular to the skin and moving it with gentle pressure. The nose trimmer is designed for safe and effective removal of nose and ear hair, with a caution not to insert the tip more than 5mm. The precision shaver is used after trimming to remove remaining unwanted hairs and detail beard styles, by gently pressing it onto the skin and shaving along contoured edges.

A travel lock function is integrated to prevent accidental activation during storage or travel. This feature is activated by pressing the on/off button for 3 seconds, indicated by a flashing orange battery status light, and deactivated by pressing the button again for 3 seconds. The device also automatically unlocks when connected to an electrical outlet.

Maintenance Features:

Maintaining the device is straightforward to ensure optimal performance and longevity. After each use, the product should be turned off and disconnected from the power outlet. All guards and cutting elements should be removed and rinsed under warm running tap water. The hair chamber can also be rinsed, and excess water should be shaken off before allowing all parts to air dry completely.

For a more thorough cleaning, the product handle can be wiped with a dry cloth. Any accumulated hairs in the hair chamber, cutting elements, and guards should be removed using the supplied cleaning brush. The nose trimmer head can be rinsed under hot water, and for stubborn hair/debris, it can be immersed in warm water for a few minutes before turning the product on to rinse it again.

The precision shaver requires specific cleaning steps: the top part is pulled off the bottom part, and any accumulated hair is blown or shaken out. The top part is then cleaned under warm tap water, excess water is shaken off, and it is reattached to the bottom part.

It is crucial to avoid using scouring pads, abrasive cleaning agents, or aggressive liquids like gasoline or acetone, as these can damage the product. Similarly, drying the trimmer teeth with a towel or tissue is discouraged to prevent damage. The product should be stored in the supplied pouch, ensuring it is dry and switched off, and the power cord should be removed before storage. The power cord and accessories should be stored in a safe location, away from potential damage.

Philips Norelco MG7790 Specifications

General IconGeneral
Power sourceAC/Battery
Charging time5 h
AC input voltage100 - 240 V
Fast charging time5 min
Maintenance-freeNo
Product colorBlack, Stainless steel
Body grooming attachmentsBeard trimmer, Ear trimmer, Eyebrow trimmer, Foil shaver, Hair trimmer, Nose hair trimmer, Stubble trimmer
Attachments quantity5

Related product manuals