EasyManua.ls Logo

Philips Norelco Multigroom 5000 - User Manual

Philips Norelco Multigroom 5000
11 pages
Print Icon
To Next Page IconTo Next Page
Loading...
Philips Norelco Multigroom 5000 Face, Head and Body MG5750/49
Frequently Asked Questions
Click on a question to go directly to the answer:
1. Can I rinse my Philips Groomer with water?
2. Where is the model and serial number of my Philips Male Groomer?
3. What do the symbols on my Philips Groomer mean?
4. Can I use my Philips Groomer while connected to the power outlet?
5. How do I charge my Philips Groomer?
6. How do I replace the attachments of my Philips Groomer?
7. How do I change the length settings of my Philips Groomer?
1. Can I rinse my Philips Groomer with water?
You can rinse your Philips Groomer or Trimmer only if it is waterproof. You can check that by looking
at the signs and symbols printed on your groomer's box or body.
Crossed out tap symbol
If you see a crossed out tap symbol on the box or body of your groomer, it means that the groomer is
not washable and should be cleaned without water.
Tap symbol
A tap symbol printed on your grooming device indicates that it is washable and its parts (cutters and
combs) can be cleaned with water. However, this does not mean that you can use it to clip or trim
your hair in the shower or bath.
Question and Answer IconNeed help?

Do you have a question about the Philips Norelco Multigroom 5000 and is the answer not in the manual?

Summary

Philips Norelco Multigroom 5000 FAQs

Rinsing your Philips Groomer with water

Determines if groomer is waterproof by examining symbols and water resistance.

Locating model and serial numbers

Details where to find the model and serial number on the device for identification.

Understanding grooming device symbols

Explains symbols for charging, travel lock, turbo mode, quiet mode, and oil reminders on the groomer.

Using groomer while connected to power

Clarifies usage of waterproof vs. non-washable devices when plugged into an electric socket.

Charging your Philips Groomer

Provides step-by-step instructions for charging the groomer via cord or a charging stand.

Replacing groomer attachments

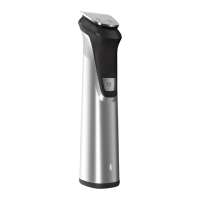
Guides on how to remove and reattach various grooming attachments like cutting units and combs.

Adjusting length settings on groomer

Explains methods for changing hair length settings using combs or wheels.

Overview

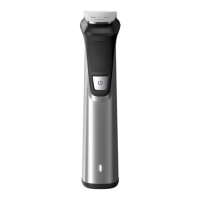
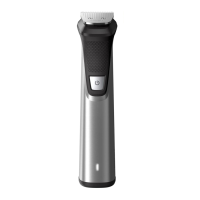
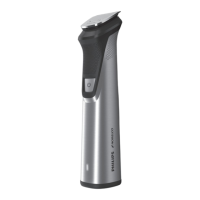
This document provides a comprehensive guide for the Philips Norelco Multigroom 5000 Face, Head and Body MG5750/49, detailing its functions, usage, and maintenance features.

Function Description

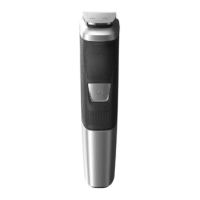
The Philips Norelco Multigroom 5000 is a versatile grooming device designed for face, head, and body hair trimming. It offers various attachments and settings to achieve different hair lengths and styles, functioning as a groomer, trimmer, hair clipper, and shaver. The device is designed for both dry and wet use, depending on the model's waterproof rating. Some models feature a Turbo Mode for extra power when trimming thick hair, and a Quiet Mode for reduced noise, particularly useful when grooming children.

Usage Features

The groomer's usage is highly dependent on its waterproof rating, indicated by specific symbols.

  • Waterproof Features: If the device has a "tap symbol," it means the parts (cutters and combs) can be cleaned with water, but it's not meant for use in the shower or bath. A "shower or bath symbol" indicates full waterproof capability, allowing for safe cleaning with water and use during showering or bathing. For safety, fully waterproof groomers operate only cordless and will not turn on if connected to a power supply. Devices with a "crossed out tap symbol" are not washable and must be cleaned without water.
  • Corded vs. Cordless Operation: Showerproof and washable devices (with the shower symbol) are designed to be used cordless to prevent accidents when wet. Non-washable devices (with the crossed out tap symbol) can be used while plugged into an electric socket. Washable devices (with the tap symbol) can be used corded but must be unplugged before cleaning with water.
  • Charging: The groomer can be charged by inserting the charging plug into its socket. A flashing indicator signals charging, and a continuously lit indicator means it's fully charged, turning off after about 30 minutes to save energy. Most groomers require 1 to 8 hours for a full charge, with a recommended 3-hour initial charge. Some models come with a charging stand; simply place the groomer in the stand after connecting it to a power outlet. Battery-operated devices use disposable AA batteries; ensure they are correctly inserted (+ and - poles) and replaced when the device runs slower or doesn't switch on.
  • Attachments and Length Settings: The device supports various attachments for different grooming needs.
    • Click-on Cutting Element: This is the main unit for fast, clean trims. It can be removed by pressing a release button or by pulling it upwards from under the teeth. To reattach, insert the bottom part first, then push the teeth part until it clicks.
    • Cutting Units with Legs: These are removed by holding both sides and pulling them off, and reattached by pushing them back into the slot until they click.
    • Combs with Legs: Trimming combs are added on top of the cutting unit for head or beard hair. They are removed by pulling them off and attached by gently sliding them down onto the cutting element, ensuring the legs fit into the designated slots.
    • Combs for Philips Kids' Hair Clippers: These combs are pushed backward from one side to remove. To attach, fit one side into the clipper's body, then push the other side in until it clicks, ensuring the desired hair length side points upwards.
    • Shaving Foil: Used for body hair, it's removed by pulling it off the shaver head, holding it by its edges. To reattach, snap it back onto the shaving head until it clicks.
    • Body Grooming Combs: These special combs are removed by carefully pulling the back part off the appliance, then pushing or removing it from the shaving unit. They snap onto the shaving foil for attachment.
    • Nose Trimming Attachments: For MultiGroomers, the nose trimmer attachment is removed by firmly gripping the handle and turning it clockwise until aligned with an indication point, then pulling it off. To attach, place it on the handle and turn until the indicator arrows on the body and attachment align.
  • Adjusting Length Settings:
    • Click-on Combs: Multiple combs are provided, each indicating a specific hair length (e.g., 4mm, 9mm, 12mm, 16mm). Simply click the appropriate comb onto the appliance.
    • Adjustable Comb: Some combs have a slide with numbers corresponding to hair length. Slide the button to select the desired length.
    • Zoom Wheel: Certain models feature a rotating zoom wheel on the body to match length settings indicated on the handle. Some have two rows of settings for short and longer lengths.
    • Push & Slide: Other models use a sliding button on the handle or comb itself. Push and slide the button up or down to change settings.
  • Travel Lock: To prevent accidental activation during travel, press and hold the on/off button for 3 seconds to activate the travel lock. The lock symbol will flash. To deactivate, press and hold the power button for 3 seconds again.
  • Special Modes: Turbo Mode (indicated by a 'T' symbol) provides extra power for thick hair. Quiet Mode (indicated by a baby symbol) reduces noise, ideal for children's hair.

Maintenance Features

Proper maintenance ensures the longevity and performance of the Philips Groomer.

  • Cleaning: The method of cleaning depends on the device's waterproof rating. Washable parts can be rinsed with water. Non-washable devices must be cleaned without water.
  • Oil Reminder: An oil drop symbol flashing on the device indicates a need for oiling. Groomers should be regularly cleaned and oiled with the provided oil or sewing machine oil.
  • Battery Replacement: For battery-operated devices, replace disposable AA batteries when the device runs slower or fails to switch on, ensuring correct polarity.
  • Troubleshooting Attachments: If an attachment is difficult to attach, check for obstructions inside the body and clean with a small brush or cotton bud. Avoid forcing attachments to prevent damage.

Always refer to the user manual for model-specific instructions and further support.

Philips Norelco Multigroom 5000 Specifications

General IconGeneral
ModelMG5750/49
Number of Attachments18
Battery TypeLithium-ion
Run Time3 hours
Charging Time1 hour
WaterproofYes
Quick ChargeYes
Worldwide Voltage100-240V
CordlessYes
Length Settings18
Warranty2 years
Blade MaterialSteel

Related product manuals