10
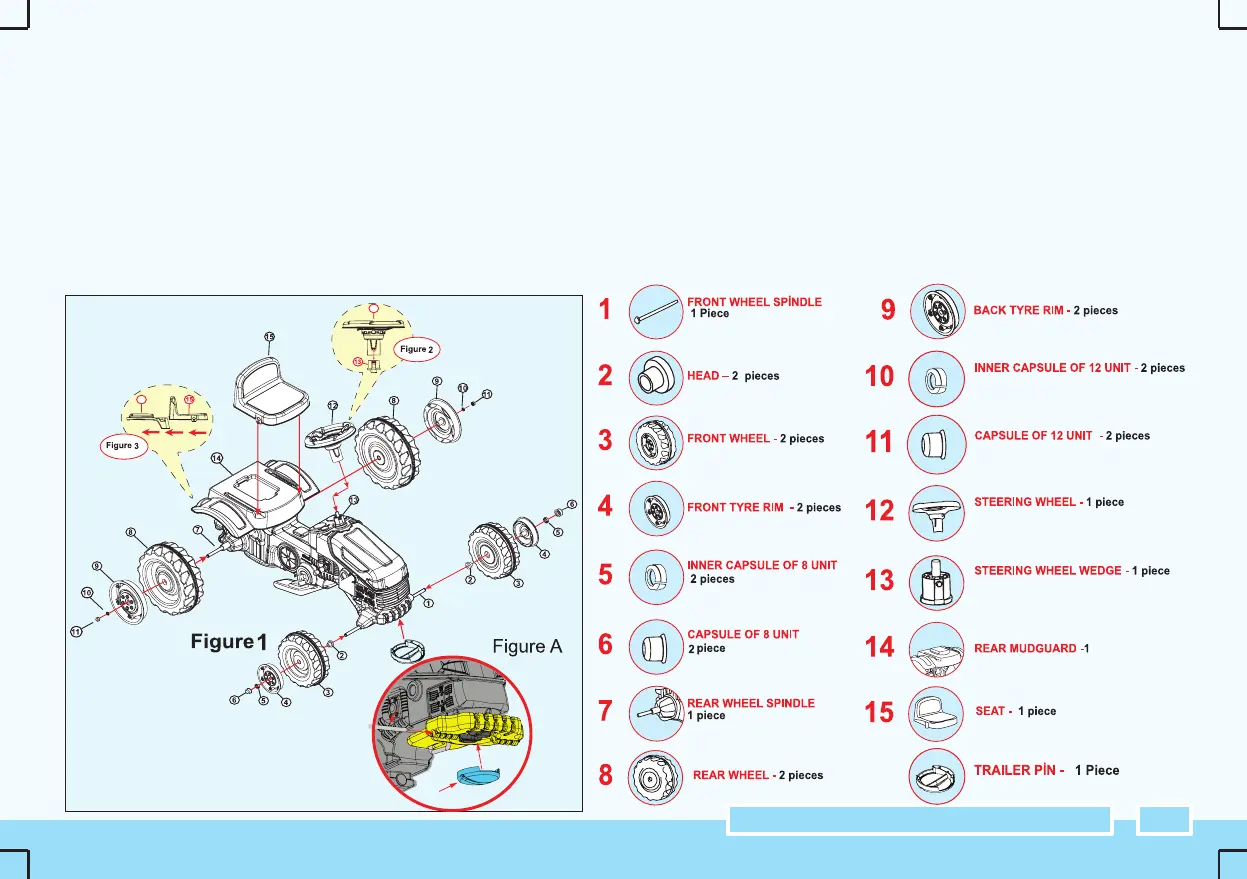
NOTICE: The product is shipped together with 2 front wheel rims and 2 small center points attached to front wheels, and with 2 rear wheel rims and 2 big center points
attached to rear wheels. Please check while assembling the product whether these pieces dropped into the bag during transportation, and if so, please place them to their slots.
MODE OF ASSEMBLY
Warning! The assembly of the product should be done by an adult.
1)Bevor applying step 1 of the installation make sure that the axle cap is on axle no 16 and continue with the installation. (Fıgure A)
2) Assembly of the front tyres: Respectively attach the disc (no2), the front tyres (It is delievered as attached to the tyre) (no.3), front tyre rim (no.4) as in (Figure 1) to the front tyre shaft
and place the capsule of 8 (no.5) into the hole (no.6) in the shaft and attach the capsule of 8 by pushing. (Figure 1)
3) Assembly of the back tyre: Respectively attach the back tyre (no.8) and back tyre rim (no.9) to the back tyre shaft (no.7) as in Figure 1. and place the capsule of 12 (no.10) into the
hole (no.11) in the shaft and attach the capsule of 12 by pushing. (Figure 1)
4) Assembly of the Wheel: Place the holes under the Wheel (no.12) on the grips which are on Wheel wedge (no.13) on the body, by pushing until they are locked. (Figure 2)
5) Assembly of the seat: Push the grips which are on the both side of the seat (no.15) inward. Place it by pushing backward from the front part of the seat connection hole on the mud-
guard (no.14). (Figure 3)
Attention! Make sure that the assembly parts are in their appropriate places before using the product after nishing assembly.
ASSEMBLY
16
14
14
16
1