EasyManua.ls Logo

Pinolino Laura User Manual

Pinolino Laura
20 pages
To Next Page IconTo Next Page
Page #1 background imageLoading...
Page #1 background image
Kleiderschrank ‘Laura’
Wardrobe ‘Laura’ • Armoire ‘Laura’
Aufbauanleitung
Assembly plan
Instructions de montage
Serien Nr. :
Serial No.:
No. série:
Art.-Nr. 14 00 25
Dekor: Uni, weiß • Wood efect: plain-coloured white • Décor: uni, blanc
STAND • UPDATE • ACTUALISATION: 21.02.13
Question and Answer IconNeed help?

Do you have a question about the Pinolino Laura and is the answer not in the manual?

Pinolino Laura Specifications

General IconGeneral
BrandPinolino
ModelLaura
CategoryIndoor Furnishing
LanguageEnglish

Summary

General Information and Safety

Product Compliance and Standards

Wardrobe adheres to European norm EN 71/3 for child safety.

Safety Requirements and Warnings

Guidance on safe handling, usage, and potential hazards.

Assembly and Maintenance Notes

Key points for correct assembly and cleaning.

Service and Additional Information

Details on material care, odor, and service procedures.

Product Specifications

Article Dimensions and Packaging

Details on the wardrobe's size, package dimensions, and weight.

Other Products in the Collection

Overview of related furniture and accessories from the same program.

Components List

Main Panels and Frame Parts

Identification of primary panels like sides, top, bottom, and back.

Internal and Accessory Parts

List of shelves, clothes rail, and connecting elements.

Hardware and Tools

List of Hardware Components

Details and quantities of all screws, fittings, and connectors.

Required Tools and Assembly Personnel

Specifies tools needed and the recommended number of people for assembly.

Assembly - Step 1: Initial Frame Construction

Step 1: Panel Preparation

Inserting dowels and eccentric rods into the first panels.

Step 2: Base Panel Attachment

Connecting the bottom panel to initial side elements.

Assembly - Step 2: Frame Expansion

Step 3: Mid Panel Integration

Attaching the intermediary panel to the base.

Step 4: Securing Side Panels

Connecting side panels to the base and mid sections.

Assembly - Step 3: Main Structure

Step 5: Attaching Side Panels

Connecting left and right side panels to the base assembly.

Step 6: Adding Lower Connecting Slat

Installing the bottom connecting piece for stability.

Assembly - Step 4: Reinforcement and Back Panel

Step 7: Assembling Main Frame

Connecting remaining structure elements and adding supports.

Step 8: Installing Base Supports

Attaching feet or base elements to the wardrobe structure.

Assembly - Step 5: Back Panel Installation

Step 9: Attaching the Back Panel

Securing the back panel to ensure structural rigidity.

Assembly - Step 6: Installing Fittings

Step 10: Mounting Hardware

Installing shelf supports and hinge mounting plates.

Assembly - Step 7: Shelves and Doors Preparation

Step 11: Installing Shelf Supports

Inserting the shelf support pegs into the side panels.

Step 12: Preparing Doors

Attaching hinge components to the wardrobe doors.

Assembly - Step 8: Door Installation and Shelves

Step 13: Mounting and Adjusting Doors

Hanging and fine-tuning the wardrobe doors for proper alignment.

Step 14: Installing Shelves and Clothes Rail

Placing shelves and attaching the clothes rail inside the wardrobe.

Assembly - Step 9: Final Touches

Step 16: Attaching Crown Molding

Installing the decorative crown element at the top of the wardrobe.

Step 18: Completed Wardrobe

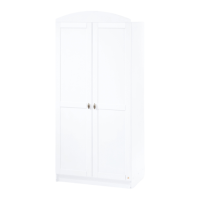
Final view of the fully assembled wardrobe.