EasyManua.ls Logo

Pioneer PL-X505 User Manual

Pioneer PL-X505
12 pages
To Next Page IconTo Next Page
Page #1 background imageLoading...
Page #1 background image
STEREO
TURNTABLE
PL=-X505
Operating
Instructions
arsae
le
Thank
you
for
buying
this
Pioneer
product.
Please
read
through
these
operating
instructions
so
you
will
know
how
to
operate
your
model
properly.
After
you
have
finished
reading
the
instructions,
put
them
away
in
a
safe
place
for
future
reference.
In
some
countries
or
regions,
the
shape
of
the
power
plug
and
power
outlet
may
sometimes
differ
from
that
shown
in
the
explanatory
drawings.
However,
the
method
of
con-
necting
and
operating
the
unit
is
the
same.
LINE
VOLTAGE
SELECTOR
SWITCH
Only
multi-voltage
models
are
provided
with
this
switch.
U.S.,
Canadian,
European,
U.K.,
and
Australian
models
are
not
provided
with
this
switch.
The
line
voltage
selector
switch
is
located
on
the
top
of
the
cabinet
of
this
turntabie.
Before
your
turntable
is
shipped
from
the
factory,
the
switch
is
set
to
the
power
requirements
of
the
turntable’s
destination.
Check
that
it
is
set
properly
before
plugging
the
power
cord
into
the
outlet.
If
the
voltage
is
not
WARNING:
to
prevent
Fine
OR
SHOCK
HAZARD,
DO
NOT
EXPOSE
THIS
APPLIANCE
TO
RAIN
OR
MOISTURE.
IMPORTANT
NOTICE
[For
U.S.
and
Canadian
models]
The
serial
number
for
this
equipment
is
located
on
the
rear
panel.
Please
write
this
serial
number
on
your
enclosed
war-
ranty
card
and
keep
in
a
secure
area.
This
is
for
your
security.
“This
product
is
manufactured
to
comply
with
the
radio
in-
terference
requirements
of
EEC
Directive
76/889/EEC
and
82/499/
EEC.”
properly
set
or
if
you
move
to
an
area
where
the
voltage
re-
quirements
differ,
adjust
the
selector
switch
as
follows:
@
Use
a
medium-sized
screwdriver.
Insert
the
tip
of
the
screwdriver
into
the
groove
of
the
selector
switch
and
turn
it
so
that
the
power
voltage
marking
of
your
area
Points
to
the
arrow.
YQ
PIONEER’
Question and Answer IconNeed help?

Do you have a question about the Pioneer PL-X505 and is the answer not in the manual?

Pioneer PL-X505 Specifications

Motor and Platter IconMotor and Platter
motor typeDC servo motor
drive systemBelt drive system
speed of rotation33-1/3, 45 rpm
wow and flutter0.05% WRMS +0.065% WTD Peak (DIN)
S/N ratio70 dB (DIN-B)
platter diameter303 mm aluminium die cast
Power IconPower
European, U.K., Australian models power requirementsAC 220 V —240 V, 50, 60 Hz
U.S., Canadian models power requirementsAC 120 V, 60 Hz
Other destination models power requirementsAC 110 V — 120 V/220 V — 240 V, 50, 60 Hz
Tone Arm and Cartridge IconTone Arm and Cartridge
tone arm typeIntegrated straight pipe arm
output voltage2.5 mV (1 kHz, 5 cm/s LAT Peak)
suitable stylus pressure1-15 g (optimum value 1.25 g)
frequency response10 Hz - 30, 000 Hz
load resistance50 kΩ
Dimensions and Weight IconDimensions and Weight
external dimensions360(W) x 100(H) x 355.5(D) mm
external dimensions (inches)14(W) x 4(H) x 14(D) in
net weight3.6 kg
net weight (lbs)8 lbs

Summary

Initial Setup and Safety

Line Voltage Selector Switch

Guides users on adjusting the voltage selector switch for correct power input.

General Safety and Important Notices

Covers essential warnings and notices for safe operation and model-specific information.

Safety Instructions

General Operating and Installation Safety

Covers essential safety guidelines for operation, placement, ventilation, and power.

Electrical Safety and Servicing Guidelines

Focuses on electrical safety, wiring, antenna grounding, and servicing procedures.

Important Warnings and Cautions

Highlights critical warnings, risk of shock, and the meaning of cautionary symbols.

Before Operating Turntable

Step 1: Assemble the Turntable

Detailed steps for assembling the turntable, including platter, mat, and tone arm setup.

Step 2: Connect Turntable to Amplifier

Instructions for connecting the turntable's output and ground leads to the amplifier.

Connection Checks and Confirmations

Important checks for correct connections and potential issues like no sound or hum.

Names and Use of Parts

Turntable Component Identification

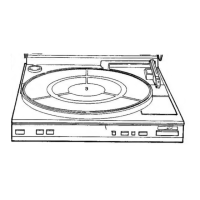
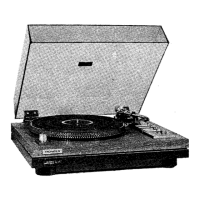
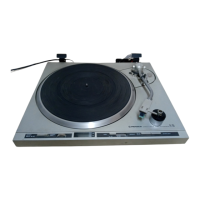
Identifies and describes the function of each part of the turntable.

How to Play Records

Normal Play (Auto Play)

Guide for automatic playback of all tracks on a record.

Manual Play Operations

Instructions for manual playback, including starting from a specific track.

Repeat Play and Interruption

Details on how to perform repeat playback and temporarily interrupt it.

Locate Operation

Instructions for moving the stylus to a desired position during playback.

Controlled Operation with Amplifier

Enables remote control of the turntable using a compatible Pioneer amplifier.

Information to User (U.S. Models)

FCC compliance information for U.S. models regarding radio interference.

Maintenance

Stylus and Cartridge Care

Guidance on replacing the stylus, cleaning the stylus, and cartridge replacement.

Record Care and Condensation

Advice on cleaning records and handling condensation to maintain performance.

Troubleshooting

Symptom-Based Problem Solving

Lists common symptoms, probable causes, and remedies for operational issues.

Specifications

Technical Details

Provides detailed technical specifications for the turntable and its components.

Functions and Accessories

Lists provided functions, power requirements, and included accessories.

Related product manuals