EasyManua.ls Logo

Pittsburgh Automotive 64264 - User Manual

Pittsburgh Automotive 64264
8 pages
Print Icon
To Next Page IconTo Next Page
Loading...
!"#"$%&'(%)*+#"$*%,$-%.$$/-00)))1.,(+&(2(*"3.$14&5
65,"7%&'(%$*4.8"4,7%#'//&($%,$-%/(&9'4$#'//&($:.,(+&(2(*"3.$14&5
;$*5 <=><=
Weight Capacity 3 Tons (6,000 lb.)
Maximum Height 19-5/8"
Minimum Height 3-1/8"
Owners Manual & Safety Instructions
Save This Manual Keep this manual for the safety warnings and precautions, assembly,
operating, inspection, maintenance and cleaning procedures. Write the product’s serial number in the
back of the manual near the assembly diagram (or month and year of purchase if product has no number).
Keep this manual and the receipt in a safe and dry place for future reference. 18f
When unpacking, make sure that the product is intact
and undamaged. If any parts are missing or broken,
please call 1-888-866-5797 as soon as possible.
Copyright
©
2018 by Harbor Freight Tools
®
. All rights reserved.
No portion of this manual or any artwork contained herein may be reproduced in
any shape or form without the express written consent of Harbor Freight Tools.
Diagrams within this manual may not be drawn proportionally. Due to continuing
improvements, actual product may differ slightly from the product described herein.
Tools required for assembly an d se rv ic e may n ot b e in cl uded.
Read this material before using this product.
Failure to do so can result in serious injury.
SAVE THIS MANUAL.
Question and Answer IconNeed help?

Do you have a question about the Pittsburgh Automotive 64264 and is the answer not in the manual?

Summary

Warning Symbols and Definitions

Important Safety Information

Floor Jack Safety Warnings

Critical safety instructions for safe operation and potential hazards.

Setup - Before Use

Functions Overview

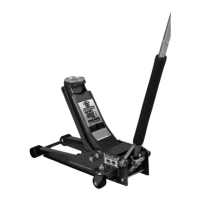
Identifies key components and their roles in the jack's operation.

Operating Instructions

Tool Set Up

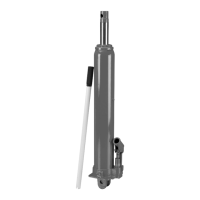
Instructions for assembling and preparing the jack, including handle.

Attaching the Handle

Detailed steps for connecting the upper and lower handle sections.

Bleeding the Hydraulic System

Procedure to remove air from the hydraulic system for proper function.

Adding Hydraulic Oil

Guide on how to fill the jack with the correct hydraulic fluid.

Lifting Procedures

Step-by-step instructions for raising a vehicle using the jack.

Lowering Procedures

Step-by-step instructions for safely lowering a vehicle.

Maintenance and Servicing

Cleaning, Maintenance, and Lubrication

Guidelines for keeping the jack in good working condition.

Troubleshooting Common Issues

Solutions for common problems encountered with the jack's operation.

Parts List and Assembly Diagram

Limited 90 Day Warranty

Overview

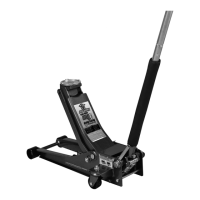
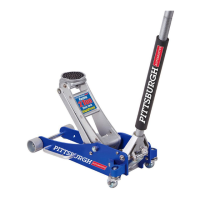
The provided document is an owner's manual and safety instructions for a Pittsburgh Automotive Heavy Duty 3 Ton Floor Jack with Rapid Pump. This manual outlines the proper setup, operation, and maintenance procedures for the device, emphasizing safety warnings and precautions to prevent personal injury and property damage.

Function Description

The Pittsburgh Automotive Heavy Duty 3 Ton Floor Jack is a lifting device designed to raise vehicles or other heavy loads. Its primary function is to provide a temporary lift, allowing for the placement of more permanent support means, such as jack stands. The jack operates hydraulically, using a handle to pump fluid and extend a lifting arm, which in turn raises a saddle positioned under the load. The "Rapid Pump" feature suggests an enhanced pumping mechanism designed for quicker lifting. Once the load is lifted, it is crucial to immediately support it with appropriate means, as the jack is not intended to hold a load for extended periods or for working underneath. The jack is equipped with a release valve, operated by turning the handle counterclockwise, which allows for controlled lowering of the load. The hydraulic unit, containing the hydraulic fluid, is central to its operation, and proper fluid levels and air bleeding are essential for its functionality. The device features front wheels and rear casters, enabling mobility and positioning under a vehicle. A handle socket is provided for inserting the handle, which serves both as a pumping mechanism for lifting and a control for lowering.

Usage Features

The manual details several key usage features and operational guidelines:

  • Setup: Before initial use, the handle must be attached. This involves aligning holes on the upper and lower handle sections, connecting them, and then inserting the assembled handle into the handle socket, securing it with a set screw. A critical safety note warns about a clip under tension in the handle socket, requiring ANSI-approved safety goggles during removal.
  • Bleeding Air: Prior to first use, or if the jack is not operating properly, the hydraulic system needs to be bled of air. This process involves loosening the fill screw, inserting the handle into the socket, turning it counterclockwise to open the release valve, and then pumping the handle several times to purge air. Finally, the fill screw is tightened.
  • Adding Oil: The manual provides instructions for adding high-grade hydraulic fluid. This involves removing the fill screw and slowly adding fluid until it reaches the top of the fill hole, then replacing the fill screw. It is important not to touch the handle while adding oil.
  • Lifting a Vehicle: To lift, the handle is first turned clockwise to close the release valve. The jack's saddle is then positioned under the vehicle manufacturer's recommended lifting point. The handle is pumped with smooth, full strokes until the saddle nearly reaches the lifting point, then positioned directly under it. Continued pumping raises the vehicle. Once the vehicle is raised, jack stands of appropriate capacity must be immediately slid under proper lifting points and securely locked into position. The manual explicitly states that the jack is a lifting device only and not for supporting loads during work.
  • Lowering a Vehicle: Before lowering, all tools and parts must be removed from under the vehicle. The saddle is positioned under the lifting point, and the handle is turned clockwise to raise the load slightly, allowing for the removal of jack stands. After jack stands are removed, the handle is slowly turned counterclockwise (never more than 1/2 full turn) to lower the vehicle onto the ground. The jack should then be lowered completely.
  • Safety Precautions: The manual heavily emphasizes safety. Users are instructed to always wear ANSI-approved safety goggles and heavy-duty work gloves. The jack must only be used on hard, level surfaces, and the rated capacity should never be exceeded. The vehicle's parking brake must be applied, and tires chocked before lifting. The jack should not be moved or used to dolly the vehicle while under load. No alterations should be made to the product, and the safety valve should not be adjusted. Users are warned to keep clear of the load during lifting and lowering and to lower the load slowly. The manual also stresses the importance of using matched pairs of jack stands and ensuring they are fully seated and locked.

Maintenance Features

Regular maintenance is crucial for the safe and effective operation of the floor jack:

  • Pre-Use Inspection: Before every use, the jack's general condition must be inspected. This includes checking for broken, cracked, or bent parts, as well as loose or missing components that could affect operation. Any problems must be corrected before use, and damaged equipment should not be used.
  • Operational Testing: Before actual use, the jack should be thoroughly tested for proper operation. If it does not work correctly, the bleeding procedure (described above) should be followed.
  • Hydraulic Oil Change: The hydraulic oil must be changed at least once every three years. This involves fully lowering the jack, removing the oil filler plug, and tipping the jack to drain all old hydraulic oil. The old oil must be disposed of according to local regulations. After draining, the jack is placed upright, and new high-quality hydraulic oil is added until it is 1/4" below the fill hole. The system is then bled by opening the valve and pumping the handle, followed by rechecking the oil level and refilling if necessary, and finally reinstalling the oil filler plug.
  • Storage: After use, the jack should be wiped dry with a clean cloth and stored in a safe, dry location, out of reach of children and other unauthorized individuals.
  • Troubleshooting: A troubleshooting guide is provided for common issues such as the jack not lifting at its weight capacity, the saddle lowering under load, a spongy pump stroke, the saddle not lifting all the way, the handle moving up when the jack is under load, or oil leaking from the filler plug. Solutions include checking the release valve, bleeding air from the system, flushing valves, checking and refilling oil, and adjusting the hydraulic oil level if it's too high. The manual strongly advises that if these solutions do not resolve the problem, a qualified technician should inspect and repair the jack. It reiterates that a damaged or malfunctioning jack should never be used.

Pittsburgh Automotive 64264 Specifications

General IconGeneral
SKU64264
BrandPittsburgh Automotive
Capacity3 ton
ColorRed
MaterialSteel
TypeFloor Jack

Related product manuals