Step 2 | Install TSA Powerclaw latch - Étape 2 | Installer le fermoirs TSA Powerclaw - Paso 2 | Instale el pestillo TSA Powerclaw
Loosely install latch in lower locked position.
***Do not hook upper latch to case before pin installation.***
Enclencher le fermoir en position ouverte sur la mallette.
***Ne pas engager le fermoir sur le couvercle avant d’installer la tige.***
Instale sin apretar el pestillo en la posición inferior bloqueada.
*** No enganche el pestillo superior a la carcasa antes de la instalación del pasador ***
Insert smooth end of new pin into case.
Be careful to align pin with holes in TSA latch.
Insérer la nouvelle tige par le bout lisse dans le trou de la mallette.
Aligner avec les trous du fermoir TSA.
Inserte el extremo liso del nuevo pasador en la caja.
Tenga cuidado de alinear el pasador con los agujeros en el pestillo TSA.
Use a hammer and punch to carefully install pin ush with case surface.
Utiliser un marteau et un poinçon pour pousser la tige à l'intérieur de son
logement jusqu'à ce que la tête de la tige afeure la surface.
Utilice un martillo y un punzón para instalar con cuidado el pasador
de contacto con la supercie de la caja.
Open and close latch several times to ensure proper operation.
Ouvrir et enclencher le fermoir à plusieurs reprises pour s'assurer de son bon fonctionnement.
Abra y cierre el pestillo varias veces para garantizar un buen funcionamiento.
Use key to verify locking/unlocking function.
Insérer la clé, verrouiller et déverrouiller le fermoir.
Utilice la llave para vericar la función de bloqueo / desbloqueo.
Step 3 | Verify latch function - Étape 3 | Vérier le fonctionnement du fermoir - Paso 3 | Verique la función de cierre
Push pin as far as possible by hand.
Enfoncer la tige le plus loin possible à la main.
Empuje el pasador lo más que pueda con la mano.
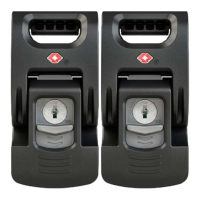
TSA POWERCLAW
RETROFIT KIT | TROUSSE DE REMPLACEMENT | KIT DE ACTUALIZACIÓN
Installation procedure 2 - Cases with short latch pin (Nanuk 908, 950, 960)
Cases with 4 latches - TSA latches should always be installed together on either side of the carrying main handle.
Procédure d'installation 2 - Mallette avec tiges de fermoir courtes (Nanuk 908, 950, 960)
Pour les mallettes avec 4 fermoirs - Les fermoirs avec serrure TSA doivent être installés de chaque côté de la poignée centrale.
Procedimiento de instalación 2 - Maleta con pasador de pestillo corto (Nanuk 908, 950, 960)
Maleta con 4 pestillos - Los pestillos TSA siempre deben instalarse juntos a cada lado del asa de transporte principal.
To view the detailed installation video visit nanuk.com/TSAlatchinstall
Pour voir les instructions détaillées, consulter nanuk.com/TSAlatchinstall
Para ver el video de instalación detallado, visite nanuk.com/TSAlatchinstall
Open and secure latch in lower locked position.
Ouvrir le fermoir et l'enclencher en position ouverte sur la mallette.
Abra y asegure el pestillo en la posición inferior bloqueada.
Remove pin, use pliers if necessary. Remove latch.
Retirer complétement la tige, utiliser des pinces si nécessaire. Enlever le fermoir.
Retire el pasador usando alicates si es necesario y quite el pestillo.
Step 1 | Remove Powerclaw latch - Étape 1 | Retirer le fermoir Powerclaw - Paso 1 | Retire el pestillo Powerclaw
Use hammer and punch to slide latch pin towards the outside of the case.
***Push on the opposite side of the splines of the pin.***
Utiliser un marteau et un poinçon pour sortir la tige vers l'extérieur de la mallette.
*** Frapper du côté opposé aux cannelures de la tige***
Utilice un martillo y un punzón para deslizar el pasador de cierre hacia el exterior de la maleta.
***Lado opuesto a la bisagra***