8 GB/IE
Congratulations!
You have chosen to purchase a high-quality
product. Familiarise yourself with the product
before using it for the first time.
Read the following instructions for
use carefully.
Use the product only as described and only
for the given areas of application. Store these
instructions for use carefully. When passing the
product on to third parties, please also hand
over all accompanying documents.
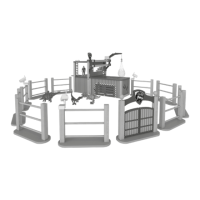
Scope of delivery (fig. A)
1 x dinoland, unassembled (1-12, 17-23, 35)
1 x accessory (13-16, 24-34)
14 x screw, 4x20mm (36)
20 x screw, 4x16mm (37)
2 x screw, 4x12mm (38)
4 x screw, 4x25mm (39)
1 x instructions for use
Technical data
Date of manufacture (month/year):
06/2022
Delta-Sport Handelskontor GmbH
hereby declares that this product
meets the following basic require-
ments, as well as other important regulations:
2009/48/EC – Toy Safety Directive
UK Conformity Assessed
Delta-Sport Handelskontor GmbH
hereby declares that this product
meets the following basic requirements, as well
as other important regulations:
Toys (Safety) Regulations 2011
Use according to guidelines
This product is a toy for private use and for
children aged 3 years and above.
Safety instructions
• Warning. Not suitable for children under 36
months. Choking hazard. Small parts.
• Children may play with this product only
under adult supervision.
• Adult assembly required.
Ensure that the product and all components
are not given to children until after assembly.
• Warning. Neither the packaging/mounting
materials nor the ‘SUPER DRY’ pouch (desic-
cant) are a constituent part of the toy and they
must be removed before the product is given
to children to play with.
• Warning. Desiccant contains calcium chloride
(CAS 10043-52-4). Keep out of reach of
children.
• Check the product for damage and wear be-
fore each use. The product may only be used
in good order and condition!
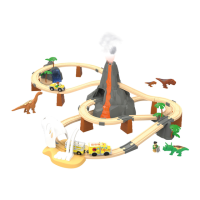
Assembly
You will need a Phillips screwdriver (not included
in delivery) to assemble the product. Two people
should assemble the product.
1. Assemble the research station as shown in
figs. B-G.
Note: When putting in the window (18) be sure
to align it correctly (fig. E). Screw the screws
(36) in just a little way at first to facilitate later
assembly.
2. Place the assembled dinosaur head (21/22)
on the roof and attach the ladder mounting
(17) (fig. H).
3. Attach the ladders (23) (fig. I).
4. Tighten the screws (36) securely.
5. Mount the crane, as shown in fig. J, and
attach it to the research station (figs. K-L).
6. Assemble the cage as shown in figs. M-O.
7. To assemble the accessories, pay attention to
fig. P. Place a camera (25) on each of three
fences (16).