• The device will attempt to connect to the
Target Device using Ethernet/IP protocol
by ODVA. Please note that not all target
devices support Ethernet/IP protocol.
• LCD Indicator will display Operation
Status.
11. Setting Target device to “Static”
(Disable BOOTP/DHCP)
After the IP address is assigned to the Target
Device using BOOTP/DHCP, it’s important
to disable BOOTP/DHCP or make the IP
static. If this is not done, the target device
will not have an IP address after its power is
cycled.
The device will attempt to communicate
with Target Device using Ethernet/IP
protocol by ODVA. Please note that not all
target devices support Ethernet/IP protocol.
The target device must support this feature
in order to work.
Important: Target Device IP, Own IP
Address and Gateway Address must be
on the same subnet or this feature will not
be active. An error message will be
displayed if the addresses are not on the
same subnet.
From the Main Menu select Static/Dynamic
and press Ok. Select Set IP Static and press
OK
LCD will display: “Connecting to ” and
display the IP address
Once communication is established the LCD
will display the message ”Set to Static
Success”
If an error message is displayed or unable to
connect then your target device may not
support this feature, have no IP address
assigned or Target Device IP and Own IP
Address are not on the same subnet
You can return to the previous menu any
time by pressing Cancel
12. Setting Target device to “Dynamic”
(Enable BOOTP/DHCP)
This feature allows you to set target device
to use BOOTP/DHCP if device is currently
set to Static. The device will attempt to
communicate with Target Device using
Ethernet/IP protocol by ODVA.
Please note that not all target devices
support Ethernet/IP protocol.
The target device must support this feature
in order to work.
• From the Main Menu select
Static/Dynamic and press Ok.
• Select Enable DHCP or Enable BOOTP
and press OK
LCD will display: “Connecting to ” and
display IP address
Once communication is established the LCD
will display the message ”Set to DHCP
Success” or ”Set to BOOTP Success”
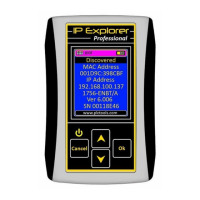
13. Detecting an Unknown IP Address
This device will attempt to detect unknown
IP address of your target
From the Main Menu select Read
Unknown IP and press Ok
• Connect a cable to the target device and
cycle its power
• LCD will display IP and MAC address.
• If the Target Device supports Ethernet/IP
protocol then attempt will be made to read
device identity.
Important: it may take up to a few
minutes to display the IP address.
Not every IP address can be detected
You can return to the Main Menu any time
by pressing Cancel
14. Reset IP Explorer Professional to
Factory Defaults
This will clear all Network Setting and
saved IP addresses from the device memory
• Turn device power Off
• Press and hold OK key, then press and
release Cancel key.
• Hold OK during countdown
• Release OK when prompted