Secondary DNS IP (0.0.0.0): ip-address <return>
Domain name (pluribusnetworks.com): domain-name <return>
Automatically Upload Diagnostics (yes): <return>
NOTE: The MGMT and in-band IP addresses must be on separate networks.
Pluribus Networks Freedom Series
Quick Start Guide
Quick Start Guide Overview
This guide describes the inial setup of a Pluribus Networks
server-switch, and is intended for experienced network administrators.
You are guided through the inial configuraon of a Pluribus Networks
server-switch and the inial connecvity to your management and data
networks.
Pluribus Networks server-switches provide out-of-band management on
the MGMT1 port. A separate interface provides in-band management
which is configured during inial setup. Use the in-band interface to
manage available services on the server-switch such as SSH or vManage.
This guide assumes that you have basic networking skills including Layer
2 and Layer 3, along with basic system administraon skills, and you
have installed your server-switch in your network rack.
Console Port F64
Console PortE28Q
Before You Begin
Gather the following informaon:
System Name:______________________________________________
Password for network-admin(default login):______________________
(Six characters or more required.)
MGMT interface IP address and netmask:________________________
In-band IP address and netmask:_______________________________
Default gateway IP address:___________________________________
CAUTION! Do not connect any ports to the network unl the server-switch is
configured. You can accidentally create loops on the network which may cause network
connecvity problems..
1. Log into the server-switch with the username network-admin and the
default password, admin.
2. Accept the EULA by entering Yes. To view the EULA, type eula and the
enre EULA is displayed for your review.
3. You can begin inial configuraon using the setup quesons in the Quick
Start Wizard.
console login: network-admin
Password: admin
Last login: Fri Oct 3 12:23:04 on console
Pluribus Command Line Interface v2.2
System setup required:
System Name (switch): hostname <return>
network-admin Password: password <return>
Re-enter Password: password <return>
Mgmt IP/Netmask: ip-address/netmask <return>
In-band IP/Netmask: ip-address/netmask <return>
Gateway IP (0.0.0.0): ip-address <return>
Primary DNS IP (0.0.0.0): ip-address <return>
Performing the Inial Configuraon
Note: Fabric Communicaon
All fabric communicaon occurs over the in-band or MGMT interfaces
on a server-switch.
In order for server-switches to form a fabric, the server-switches
communicate using Layer 2 or Layer 3 networking on the in-band or
MGMT interfaces.
You must create a fabric even if you have only one server-switch. If the
server-switch is joining an exisng fabric, then you can add it to the fabric
using a few simple commands.
1. To create a new fabric name corp-fabric, use the following command:
>fabric-create name corp-fabric network-type
in-band|mgmt
2. You can create a password for the fabric so that other server-switches can
only join the fabric if the administrator knows the password. Add the
password, sw0rdf1$h, using the following command:
>fabric-create name corp-fab password <return>
password: <sw0rdf1$h>
You can now join the fabric, corp-fabric, using the fabric-join command:
>fabric-join name corp-fab <return>
fabric password:<sw0rdf1$h>
1
2
Joining an Exisng Fabric
When a server-switch joins an exisng fabric, it receives the rest of the
configuraon from the fabric and then keeps track of the fabric state.
1. To join the an exisng fabric, ,network-fab, use the fabric-join
command:
>fabric-join name network-fab
2. If the fabric was created with an oponal password, you must enter the
correct password to join the fabric:
>fabric-join name network-fab password
fabric password: <password>
Using the fabric-join command restarts nvOS and causes a short
interrupon on the network.
Once you complete the inial configuraon, you can display the system
setup using the switch-setup-show command. Plug your network cable
into the MGMT port and the network port.
Configuring the Inial Fabric
3
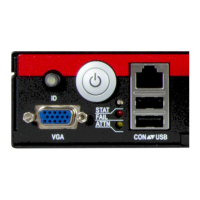
Console Port E68
You can connect to the server-switch by connecng a rollover
cable to the console port or connecng a keyboard and monitor
to the server-switch.
Connect the console port on the server-switch to your laptop or terminal
concentrator using a serial cable.
Set terminal emulator connecon to 9600 bps, 8 data bits, parity - none,
stop bits 1, flow control - none.
Plugin and power on the server-switch.
C
M
Y
CM
MY
CY
CMY
K
qsg-glossy-final-new-green-bleeds.pdf 1 12/14/2015 11:18:10 AM