OPERATING PREPARATION
Turn ON, standby and turn OFF the unit
Turn ON : Connect the AC Cord plug to the power outlets according to the unit’s voltage specification and the
unit is ready to operate. Press “I/ ” (on/standby) button and the unit is in the last operated function before the
unit brought to the standby.
Standby : Press “I/ ” (on/standby) button to make the unit standby that is indicated by POLYTRON appearance
on the VFD screen. While the unit is in standby mode, still there is a few electric current to the unit.
Turn OFF : To turn off the unit permanently, unplug the AC Cord plug from the power outlets. Placed the AC
Cord plug so it is easy to be reached and plug/unplug.
2. Press “ ” (pause) button, then press “ ” (record) button.
3. Select the desired record source :
* DVD/VCD/CD/MP3/MPEG4 :
a. Press “DVD/M.MEDIA” button on the front panel or “FUNCT” (function) button on the remote control
repeatedly to select DVD function.
b. Insert the disc that will be recorded.
c. To recording the programmed chapter/track, please refer “Program Play” (for DVD/VCD disc) or
“Playlist mode” on the “Playing MPEG4/MP3/JPEG disc” (for MPEG4/MP3 disc).
* USB or SD/MMC/MS Card :
a. Attach USB Flash Disk to the USB terminal or SD/MMC/MS card to the CARD slot and make sure
the unit is in the DVD function.
b. Press “DVD/M.MEDIA” button on the front panel or “MULTIMEDIA” button on the remote control
repatedly to select USB input or CARD input.
c. For the next operational, please refer “Playing MPEG4/MP3/JPEG files through USB, SD/MMC/
MS, DOCKING terminal”.
* RADIO :
a. Press “AM/FM” button on the front panel to select RADIO function.
b. Select the AM or FM Radio mode by pressing “AM/FM” button on the front panel or press “SLOW/
AM/FM” on the remote control.
c. Select/find preferred radio station.
* LINE IN :
a. Press “LINE IN/MP3 IN” button on the front panel to select LINE IN function.
b. Make sure the terminal installation cable and input that related has connected well. Operate the
external equipment connected to the unit according to the manual instruction.
* MP3 IN :
a. Press “LINE IN/MP3 IN” button on the front panel to select MP3 IN function.
b. Connect the Line Out / Headphones terminal of theMP3/MP4 player to the MP3 IN terminal of the
correctly. Then operate your MP3/MP4 player.
* DOCKING :
a. Connect your MP3/MP4 player to the DOCKING terminal correctly.
b. Press “DOCKING” button on the front panel or press “FUNCT” (function) button on the remote
control repeatedly to select DOCKING function.
c. For the next operational, please refer “DOCKING OPERATIONAL INSTRUCTION”.
* MICROPHONE :
a. Connect the Microphone to the MIC terminal on the front panel.
b. Operate the Microphone. Adjust Mic Level and Echo as needed.
Note : Microphone does not work when the unit is in RADIO function.
4. Press “ ” (pause) to start recording. The previous recording result will be erased
automatically if the cassette is not empty.
5. Press “ ” (eject/stop) button if recording is finish or stop recording.
Erasing the Tape Records
1. Press “ ” (eject/stop) button to open the cassette compartment. Insert the cassette that will be erased,
close the cassette compartment again.
2. Press “TAPE” button on the front panel to select TAPE function.
3. Press “ ” (record) button, the unit start erasing the tape records.
4. The cassette tape will stop itself if erasing process is finish.
Note : During erasing the records process, make sure that MIC is not connected to MIC terminal.
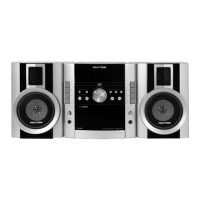
USB terminal
You can play MP3/MPEG4/JPEG that are stored on the USB Flashdisk/MP3/MP4 player byt inserting it to the
USB port of the unit. If you want to play MP3/MPEG4/JPEG files on the MP3/MP4 player through USB
connector of the unit, make sure MP3/MP4 player has USB port or USB cable data.
DOCKING terminal
You can us the unit as Amplifier for your MP3/MP4 player or other
compatible devices, by connecting it to the DOCKING terminal on the top
panel of the unit with DOCK ADAPTER addition. The shape of DOCK ADAPTER
are different each to other, depends on the MP3/MP4 player you had buy.
Note : Generally, the Dock adapter included in the purchase packet of the
MP3/MP4 player.
DOCKING
 Loading...