Do you have a question about the Porter-Cable 743 and is the answer not in the manual?
Locate and record the Model and Serial Number plate for future reference.
Maintain a clean, well-lit work area, avoid explosive atmospheres, and keep bystanders away.
Proper use of polarized plugs, avoidance of grounded surfaces, and cord care for shock prevention.
Stay alert, use common sense, dress appropriately, avoid accidental starts, and use safety equipment.
Secure workpieces with clamps, use correct tool, check switch operation, disconnect power for adjustments, store safely.
Maintain tools with sharp edges, check for damage, and use only manufacturer-recommended accessories.
Tool service must be performed by qualified personnel using identical replacement parts.
Keep hands away from blade, use auxiliary handle, check lower guard operation, and retract guard properly.
Use rip fence, proper blades, avoid kickback, maintain firm grip, and support work properly.
Understand kickback causes like pinched blades and avoid by proper precautions and firm grip.
List of symbols for volts, amperes, hertz, watts, kilowatts, liters, kilograms, and their meanings.
Table provides recommended AWG wire sizes for extension cords based on voltage, amperage, and length.
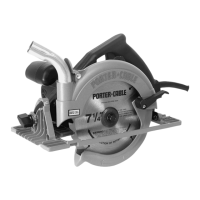
Designed for 7 1/4" blades with 5/8" bore, rated for 6000 RPM, with optional diamond-hole adapter.
Combination, fine tooth, and diamond blades for various cutting tasks.
Disconnect power, engage blade lock, loosen retaining bolt, remove flange, and retract guard.
Disconnect power, clean arbor, place blade, install flange, tighten bolt, and engage lock securely.
The guard is a safety device; ensure it rotates freely and returns quickly. Clean monthly, do not lubricate.
Disconnect power, lift lever, adjust saw housing for desired blade protrusion, and lock lever.
Disconnect power, loosen knob, tilt base to desired line, and tighten knob.
Positive stops at 90° and 45° should be checked periodically for accuracy.
Allows bevel cuts up to 3° beyond 45° or 90° stops by manipulating bevel stop sleeve.
Disconnect power, set sleeve to normal, position base for 90°, check squareness, adjust stop screw if needed.
Disconnect power, set sleeve to normal, position base for 45°, check angle, adjust stop screw if needed.
Left slot for 90° cuts, right slot for 45° cuts to follow a line on the work.
The blade wrench is stored in the bottom of the saw handle. Insert and push until seated.
Disconnect power, open cover, insert nozzle, and ensure it directs sawdust away from operator.
Disconnect power, open cover, insert bag tube, and clean bag periodically.
Accessory adapter connects exhaust nozzle to shop-type vacuum cleaner.
Disconnect power, insert guide through base slots, attach spring, adjust width, and tighten screw.
Use two hands for control. Support work on a rigid surface, clamp it, and align cut line.
Start motor, move saw forward keeping line indicator parallel to cut line, avoid forcing, and let blade stop.
Cutting lumber directly across the grain. Position work so cut is on the left.
Cutting wood lengthwise. Use rip guide or clamped guide strip for narrow/wide cuts.
Set blade at an angle (0°-45°). Compound cuts may require manual guard retraction.
Cut inside material area. Start near corner, adjust depth, retract guard, lower blade, and follow line.
Blow out passages with air, clean plastic with damp cloth. Check plug and outlet if tool fails to start.
Lubrication requires dismantling; brush inspection/replacement by authorized centers only.
All repairs by authorized centers are guaranteed. Contact for questions with tool's nameplate information.
Use only Porter-Cable Delta recommended accessories; others may be hazardous.
One-year warranty for repair/replacement of defective parts. Excludes misuse, abuse, and unauthorized repairs.
List of Porter-Cable Delta service centers across various US states for parts and repair.
List of Canadian Porter-Cable Delta service centers in Alberta, Manitoba, and Quebec for parts and repair.
| Type | Circular Saw |
|---|---|
| Power Source | Corded Electric |
| Weight | 12 lbs |
| Motor | 15 amp |
| Amperage | 15 A |
| Blade Size | 7-1/4 inches |
| Arbor Size | 5/8 inches |
| Depth of Cut at 90° | 2-7/16 inches |