This document provides instructions for the assembly, operation, and maintenance of the Portfolio 6 CT Path Light Kit, Model #00299, Item #0030661. It includes details on package contents, hardware, safety information, troubleshooting, and warranty.
Function Description
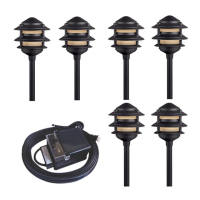
The Portfolio 6 CT Path Light Kit is a low-voltage landscape lighting system designed to illuminate pathways and outdoor areas. It consists of six individual path lights connected to a single transformer. The system is intended for outdoor use and offers various timer control options for automatic operation, including dusk-to-dawn sensing and timed shut-off.
Important Technical Specifications
General:
- Model Number: #00299
- Item Number: #0030661
- Quantity: 6 path lights per kit
- Power Source: 120-volt AC, 60-hertz outlet (for transformer)
- Light Bulb Voltage: 12-volt AC (for individual path lights)
- Transformer Rating: Total bulb wattage consumption should be less than 80% of the transformer rating.
- Maximum Total Bulb Wattage: Cannot exceed 120 volts when connected to the transformer.
Components (Quantity per kit):
- Top Cover (A): 6
- Middle Ring (B): 6 (preassembled to Top Cover (A))
- Plastic Lens (C): 6 (preassembled to Top Cover (A))
- Rubber (D): 6 (preassembled to Bottom Cover (E))
- Bottom Cover (E): 6 (preassembled to Top Cover (A))
- Wedge Base and Wire (F): 6 (preassembled to Fixture Cover (G))
- Fixture Cover (G): 6 (preassembled to Bottom Cover (E))
- Post (H): 6
- Stake (I): 6
- Connector (J): 6 (preassembled to Wedge Base and Wire (F))
- Transformer (K): 1
- Transformer Wire (L): 1
- Bulb (AA): 6 (12-volt AC)
- Bolt (BB): 18 (preassembled to Top Cover (A))
Replacement Parts (with Part Numbers):
- Top Cover (A): 301001-0083OL
- Middle Ring (B): 302001-0013OL
- Plastic Lens (C): 990706-0051TR
- Rubber (D): 990532-0063BK
- Bottom Cover (E): 302003-0023OL
- Wedge Base and Wire (F): 990323-0043BK
- Fixture Cover (G): 302005-0012OL
- Post (H): 303002-0052OL
- Stake (I): 303003-0036BK
- Bolt (BB): 990501-6134SA
Usage Features
Assembly:
- Bulb Installation: Unscrew the fixture cover (G) from the top assembly by turning counterclockwise. Insert the 12-volt bulb (AA) into the socket. Reassemble the top to the fixture cover (G).
- Fixture Assembly: Attach the stake (I) and post (H) to the fixture cover (G) by turning clockwise. Ensure all assembled unit parts are fully tightened without any loose components.
Operation:
- Connector Preparation: Unscrew the top from the connector (J) and set it aside for later use.
- Transformer Wire Connection: Insert the transformer wire (L) from the transformer (K) into the connector (J).
- Secure Connection: Retighten the top cover removed in Step 1 until the two contact pins completely pierce through the plastic shield of the wire, ensuring a secure electrical connection.
- Power Connection: Plug the transformer (K) into a standard 120-volt AC, 60-hertz outdoor outlet.
- Timer Control: The transformer features a rotary control switch with multiple settings:
- OFF: Power off; fixture will not light.
- ON: Power on; fixture will stay lit continuously.
- AUTO: Fixture will light automatically as the surrounding area gets dark (dusk-to-dawn).
- 4H: Fixture will light automatically as the surrounding area gets dark and turn off after 4 hours.
- 6H: Fixture will light automatically as the surrounding area gets dark and turn off after 6 hours.
- 8H: Fixture will light automatically as the surrounding area gets dark and turn off after 8 hours.
- Circuit Breaker: The transformer (K) includes a circuit breaker (button) that will automatically power down the unit if it overloads. Press the circuit breaker button to restart the transformer.
Maintenance Features
Troubleshooting:
- Light does not turn on at night:
- Possible Cause 1: Transformer is not connected to the power receptacle.
- Corrective Action 1: Connect the transformer into the power receptacle.
- Possible Cause 2: The bulb is broken.
- Corrective Action 2: Replace with a new bulb.
- Possible Cause 3: The contact pins of the connector do not pierce the wire well.
- Corrective Action 3: Make sure the contact pins pierce the wire well and touch the electric wire.
- Circuit Breaker Tripped: If the bulb from the landscape light does not light, check the circuit breaker on the transformer. Ensure the total bulb wattage connecting to the transformer (K) does not exceed 120 volts.
Safety Information (Crucial for Maintenance and Installation):
- Electrical Codes: All electrical connections must comply with local codes, ordinances, and the National Electric Code (NEC). Consult your municipal building department for permits and inspections.
- Power Disconnection: ALWAYS turn off electricity at the main fuse box or circuit breaker box before beginning installation or maintenance by switching the circuit breaker off or removing the fuse.
- Grounding: DO NOT connect the fixture to an electrical system that does not provide equipment grounding. Never use a fixture in a two-wire system that is not grounded. Improper grounding can lead to electric shock.
- Wire Connections: DO NOT connect the bare or green insulation fixture ground wire to the black (HOT) current-carrying or white neutral house wire. This can cause all metal parts of the fixture to carry electrical current, leading to severe injury or death.
- Fixture Support: DO NOT suspend any fixture by the house wires or wire connectors. Fixtures must be mounted directly to an outlet box or a mounting strip attached to an outlet box. Wire connectors are not designed to support the weight of a fixture.
- Outlet Box Support: All fixtures must be mounted to an outlet box supported by the building structure, not just the ceiling board.
- Wire Insulation: Be careful not to damage or cut the wire insulation during installation. Avoid contact with sharp edges to prevent electric shock.
- Bulb Wattage: DO NOT use lamps (bulbs) with a wattage greater than the maximum value stated on the fixture. Over-wattage can increase temperature and cause a fire risk.
- Water Proximity: Install all luminaires 10 feet or more from a pool, spa, or fountain to reduce the risk of electric shock.
- Transformer Loading: Total bulb wattage consumption should be less than 80% of the transformer rating.
General Maintenance:
- Replacement Parts: If any parts are missing or damaged, do not attempt to assemble the product. Contact customer service at 1-800-643-0067 for replacement parts. Customer service hours are Monday-Thursday, 8 a.m. - 6 p.m. EST, and Friday, 8 a.m. - 5 p.m. EST.
- Warranty: The manufacturer provides a one-year warranty against defects in materials and workmanship from the date of purchase. For warranty claims, return the product with proof of purchase to the original place of purchase. The manufacturer will, at its option, repair, replace, or refund the purchase price. The warranty does not cover damage due to misuse, accidental damage, improper handling, or inadequate installation.
Preparation:
- Before beginning assembly, ensure all parts are present by comparing them with the package contents list and hardware contents.
- Estimated Assembly Time: 1 minute.
- Helpful Tools (not included): Trowel.