Do you have a question about the Positive Grid RIFF and is the answer not in the manual?
Stereo jack providing a mix of playback and input audio for monitoring.
Connects RIFF to PC/Mac/iOS for audio and power; indicates readiness.
3.5mm stereo jack for headphones, mirroring the main output signal.
Direct jack for plugging in your guitar or bass.
Steps to set RIFF as the audio input source on Mac and PC.
Guidance on using RIFF for audio output, ideal for headphones.
Explanation of the display screen elements and indicator lights (CLIP, DIRECT, TONE).
How to navigate parameters (INPUT, OUTPUT, DIRECT, TONE) using the control knob.
Details on adjusting Input, Output, Direct mix, and Tone presets.
The Positive Grid RIFF is a compact and intuitive recording interface designed primarily for guitarists and bassists. It facilitates high-quality audio recording by connecting directly to a PC, Mac, or Apple iOS device via a USB connection. Its user-friendly design prioritizes ease of access to all features, making it suitable for both beginners and experienced musicians. A key feature is its direct signal monitoring capability, which allows for latency-free recording, ensuring that musicians can hear their input without delay while playing. Additionally, the RIFF comes pre-loaded with a variety of preset guitar tones, offering immediate access to different sounds without the need for extensive external processing.
The RIFF features a straightforward layout for connectivity. On the upper end panel, you'll find the OUTPUT Jack. This is a stereo jack that provides a mixed audio signal, combining the playback audio with the input signal. The balance between these two signals is determined by the RIFF's DIRECT parameter. Users can connect this output to their monitoring system (e.g., studio monitors or an amplifier) using appropriate cabling. The signal from this jack is identical to the signal provided by the headphone output.
Also on the upper end panel is the USB port. This connection serves two crucial functions: it establishes a two-way audio connection between the RIFF and your computer or iOS device, and it provides the necessary power for the RIFF to operate. Once connected, the RIFF's display will indicate that it is ready for use.
On the lower end panel, there is a HEADPHONE OUTPUT. This 3.5mm (1/8") stereo jack delivers an audio signal identical to that of the main OUTPUT jack. It is designed to accommodate headphones with impedance ratings ranging from 16 Ohms to 64 Ohms, making it versatile for various headphone types. Adjacent to the headphone output is the INPUT jack, where you directly plug in your guitar or bass.
For most setups, if the RIFF is connected to your computer before launching your recording software, it should automatically be recognized and selected as the primary audio input source. However, if this doesn't happen, manual selection is straightforward.
For Mac users, navigate to "System Settings" and then "Sound." Click on the "Input" tab and select "RIFF (Positive Grid)" from the list of available devices.
For PC users, open "Control Panels" and then "Sound." Click on the "Recording (input)" tab and select "RIFF (Positive Grid)."
Whether or not to use the RIFF as your output device depends on your existing audio setup. If you already have a dedicated studio monitoring system connected to your computer, you might prefer to continue using that system for output. However, the RIFF is an excellent choice for output when working with headphones or a personal monitoring system, offering a convenient and high-quality audio experience.
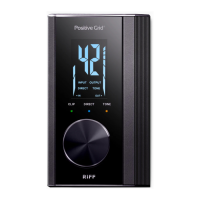
The RIFF's interface is designed for intuitive control, primarily through a single Control Knob and a clear Display.
DISPLAY: The central display provides real-time feedback on the current parameter and its value. The parameter name is highlighted by a box, and its value is shown as a two-digit number in the center. The left side of the display features a vertical Input Level meter, while the right side shows a vertical Output Level meter, allowing you to visually monitor your audio levels.
INDICATOR LIGHTS: Below the display, three indicator lights provide additional visual cues:
CONTROL KNOB: The RIFF is operated entirely using this single knob. Pushing down on the Control Knob cycles through the selectable parameters: INPUT, OUTPUT, DIRECT, and TONE, returning to INPUT in a continuous loop. Rotating the Control Knob adjusts the value of the currently selected parameter, with changes reflected on the display.
INPUT (0 to 50): This parameter controls the volume of the input signal from your instrument. The vertical Input Volume meter on the left of the display visually represents this level. Remember that the CLIP warning LED is directly affected by this parameter's setting.
OUTPUT (0 to 50): This parameter adjusts the volume of the overall output signal. The vertical Output Volume meter on the right of the display shows this level. It's generally recommended to keep this level relatively high to minimize noise. For safe listening, use the volume controls on your external monitoring system.
DIRECT (0 to 10): This parameter mixes the "dry" (unprocessed) input signal with the "wet" (processed) output from your recording software. By incorporating the direct signal, you can achieve zero-latency recording, which is crucial for overdubbing new parts without delay. While some software might offer similar functionality, the RIFF's direct monitoring is particularly convenient when using the device with a laptop and headphones. If the DIRECT parameter is set to any value other than 0 (Off), the DIRECT indicator light will activate.
TONE (0, 1, 2, 3): The RIFF utilizes DSP technology to provide a selection of preset tones. These built-in TONEs are designed to emulate popular guitar effect pedals, making it easy to achieve a great sound directly at the recording stage. TONEs are applied only to the input/direct signal. To select a TONE, choose the TONE parameter and rotate the Control Knob. When a TONE other than 0 (Off) is selected, the TONE indicator light will illuminate.
The RIFF is designed for simplicity and durability. As an audio interface, it generally requires minimal maintenance. Keeping the device clean and free from dust is recommended to ensure optimal performance and longevity of its components, particularly the jacks and the Control Knob. Avoid exposing the device to extreme temperatures or moisture. The robust design ensures that the RIFF can withstand regular use in various recording environments. For any operational issues or questions, users are encouraged to visit the Positive Grid online Help Center, which provides manuals, FAQs, and support contact options.
| Type | Guitar Amplifier |
|---|---|
| Speaker Size | 6.5 inches |
| Connectivity | Bluetooth, USB |
| Headphone Output | Yes |
| Software Included | BIAS FX 2 LE |
| Inputs | 1 x 1/4" (instrument) |
| Outputs | Headphone Output |