EasyManua.ls Logo

Possum SensorMATe 3 - User Manual

Possum SensorMATe 3
2 pages
Print Icon
To Next Page IconTo Next Page
Loading...
1 | P a g e D a t e d 0 6 / 0 3 / 2 0 1 5
Parts Lists
The following table illustrates the component parts contained within the specific kit sets:
Cotton Mat Kit - Product Code TBA
Plastic Mat Kit - Product Code TBA
SensorMATe 3 - Product Code 034-892
Enuresis Mat Connecting Lead - Product Code 034-859
Enuresis Mat Connecting Lead -Product Code 034-859
Enuresis Sensor (Cotton Mat) - Product Code 1010003
Enuresis Sensor (Plastic Mat) - Product Code 1010015
Setting up Procedure
1. Locate the sensing mat in the area of the bed or chair where soiling is likely to occur.
2. Connect the two connecting lead press-studs to the sensing mat.
3. Plug the Enuresis Connecting cable into the right hand RJ22 Socket located on the top of the
unit (See figure 2 over).
4. Insert the AA batteries (supplied) into the SensorMATe 2. Ensure correct polarity is as shown
in the battery compartment case (See figure 3 over)
5. Switch on the SensorMATe 3 using the membrane keypad On/Off Switch.
6. Set the Time and date if required.
7. Press the enter key and scroll to the “System Settings” menu using the navigation keys.
8. Scroll to and select the “Set Factory Defs.” To “Yes” and press “enter”.
9. Once the unit has reset navigate to the Enuresis Sens.” menu in the “Configure Right Input”
menu and adjust accordingly. Note: It is possible to adjust the sensitivity between 1 -9.
Setting 1 being the least sensitive with respect to moisture detection.
10. Scroll to and configure the Std. Alarm Count as desired. If the unit is transmitting to a
Carephone leave this set to “1”.
11. Set the Alarm Repeat delay (if required)
12. Set the Upscale Alarm (If required)
13. Select the Left arrow and scroll to and enter the “Radio Settings” Page.
14. Set the “Single Receiver” mode accordingly. Note: If the unit is transmitting to a Carephone
this should be set to “Yes”. If the unit is transmitting to a multi receiver system, it should be
set to “No”.
15. Select the Left arrow and scroll down to and enter the “Test Mode” Page.
16. Use the Up arrow to select “Tx ID# 3”.
17. Configure the target receiver to capture the radio code then select the SensorMATe “Enter
key.
18. Once the code has been captured momentarily press the standby button to reset back to
the home page.
SensorMATe 3 Enuresis solution Quick Start Guide
(Product Codes TBA Cotton Mat and TBA Plastic Mat Kits)
Watch the video here
Question and Answer IconNeed help?

Do you have a question about the Possum SensorMATe 3 and is the answer not in the manual?

Summary

Setting Up Procedure

Locate and Connect Sensing Mat

Locate sensing mat on bed/chair and connect press-studs.

Connect Enuresis Cable

Plug Enuresis Connecting cable into the right RJ22 socket.

Install Batteries

Insert AA batteries into SensorMATe 2, observing polarity.

Power On and Set Time;Date

Switch on SensorMATe 3 and set time/date if needed.

System Settings Configuration

Access 'System Settings' to set factory defaults and configure inputs.

Enuresis Sensor Sensitivity

Adjust 'Enuresis Sens.' sensitivity between 1-9 in 'Configure Right Input'.

Alarm Count and Delay Settings

Configure 'Std. Alarm Count' (default '1') and 'Alarm Repeat delay'.

Radio Settings

Set 'Single Receiver' mode ('Yes' for Carephone, 'No' for multi-receiver).

Test Mode and Radio Code Capture

Enter 'Test Mode', select 'Tx ID# 3', capture radio code, then reset.

System Testing and Safety

Test system with wet cloth, ensure cables are safe, and mat is dry.

Overview

The document describes the SensorMATe 3 enuresis solution, a device designed to detect moisture and trigger an alarm, primarily for bedwetting or incontinence management. It is presented as a "Quick Start Guide" for the SensorMATe 3, which is available in kits for both cotton and plastic mats.

Device Function and Purpose

The SensorMATe 3 is an enuresis sensor system that detects the presence of moisture (e.g., urine) on a sensing mat. Upon detection, it can trigger an alarm and transmit a radio code to a receiver, such as a Carephone, to alert caregivers. Its primary function is to provide an early warning system for individuals prone to enuresis, allowing for timely intervention and care. The system aims to enhance the quality of life by providing a reliable and configurable solution for managing incontinence.

Components and Kits

The SensorMATe 3 system is available in two main kit types, differentiated by the type of sensing mat:

  • Cotton Mat Kit:

    • SensorMATe 3 (Product Code: 034-892)
    • Enuresis Mat Connecting Lead (Product Code: 034-859)
    • Enuresis Sensor (Cotton Mat) (Product Code: 1010003)
  • Plastic Mat Kit:

    • SensorMATe 3 (Product Code: 034-892)
    • Enuresis Mat Connecting Lead (Product Code: 034-859)
    • Enuresis Sensor (Plastic Mat) (Product Code: 1010015)

Both kits share the core SensorMATe 3 unit and the connecting lead, with the primary difference being the material of the enuresis sensing mat.

Technical Specifications and Features

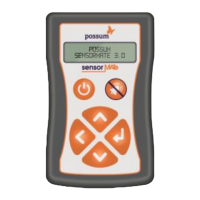
The SensorMATe 3 unit itself features a membrane keypad for interaction and a display screen. Key interface elements include:

  • On/Off Switch: To power the device on or off.
  • Navigation Keys: Used to scroll through menus and adjust settings (up, down, left, right arrows).
  • Enter Key: To confirm selections or enter menu options.
  • Alarm Mute Key: To silence the alarm when triggered.
  • RJ22 Socket: Located on the top of the unit, this socket is used to connect the Enuresis Mat Connecting cable.
  • Battery Compartment: Houses AA batteries (supplied), with specific polarity requirements. The device is powered by AA batteries, indicating it is a portable or semi-portable unit.

The device's functionality is highly configurable, allowing users to tailor its operation to specific needs:

  • Sensitivity Adjustment: The enuresis sensor's sensitivity can be adjusted between 1 and 9, with "Setting 1" being the least sensitive to moisture detection. This allows for fine-tuning based on the user's specific requirements and environment, potentially reducing false alarms or ensuring reliable detection for different types of moisture.
  • Alarm Count: Users can configure the "Std. Alarm Count," which likely refers to the number of detections before an alarm is triggered or a transmission is sent. For units transmitting to a Carephone, this is recommended to be set to "1" for immediate alerts.
  • Alarm Repeat Delay: An adjustable setting for the delay between repeated alarms, if desired.
  • Upscale Alarm: An optional alarm setting that can be configured.
  • Radio Settings: The device supports radio transmission to receivers.
    • Single Receiver Mode: Can be set to "Yes" if transmitting to a single Carephone, ensuring direct communication.
    • Multi-Receiver System: Can be set to "No" if the unit is part of a system with multiple receivers, suggesting it might support more complex network configurations.
  • Test Mode: Includes a "Test Mode" page where users can select "Tx ID# 3" to configure the target receiver to capture the radio code. This is crucial for initial setup and ensuring the device communicates correctly with the intended receiver.

Usage and Setup Procedure

The quick start guide outlines a detailed setup procedure to ensure proper functioning:

  1. Mat Placement: Position the sensing mat in the bed or chair where soiling is expected.
  2. Cable Connection: Connect the two press-studs of the connecting lead to the sensing mat.
  3. Unit Connection: Plug the Enuresis Connecting cable into the RJ22 socket on the SensorMATe 3 unit.
  4. Battery Installation: Insert AA batteries into the SensorMATe 3, ensuring correct polarity.
  5. Power On: Switch on the SensorMATe 3 using the "On/Off" switch.
  6. Initial Configuration:
    • Set the time and date.
    • Navigate to "System Settings" and select "Set Factory Defs." to "Yes" to reset the unit.
    • Navigate to "Enuresis Sens." in the "Configure Right Input" menu and adjust sensitivity (1-9).
    • Configure "Std. Alarm Count" (set to "1" for Carephone transmission).
    • Set "Alarm Repeat delay" and "Upscale Alarm" as required.
  7. Radio Settings:
    • Go to "Radio Settings" page.
    • Set "Single Receiver" mode ("Yes" for Carephone, "No" for multi-receiver).
  8. Test Mode and Pairing:
    • Go to "Test Mode" page.
    • Select "Tx ID# 3" and configure the target receiver to capture the radio code.
    • Press the SensorMATe "Enter" key to initiate code capture.
    • Momentarily press the "standby button" to return to the home page after code capture.

Maintenance Features

The document highlights a few key maintenance aspects:

  • Battery Replacement: The device uses AA batteries, and the guide includes an image illustrating how to replace them. This indicates that battery replacement is a routine user-level maintenance task.
  • Mat Drying: After testing or use, it is explicitly stated to "Ensure the mat is dried out before using with a customer." This is crucial for the mat's longevity and to prevent false alarms or improper functioning.
  • Cable Routing: Users are instructed to "Ensure the cables are routed in a manner so that they do not create any hazard." This emphasizes safety and proper installation to prevent tripping hazards or damage to the cables.
  • Factory Reset: The option to "Set Factory Defs." to "Yes" allows users to reset the device to its default settings, which can be useful for troubleshooting or reconfiguring the unit.

Testing the System

A final step in the setup procedure involves testing the system:

  • Moisture Test: "Test the System by applying a wetted finger or cloth across the sensing elements." This confirms that the mat and sensor are functioning correctly and detecting moisture as intended.

Overall, the SensorMATe 3 is presented as a user-friendly, configurable, and reliable enuresis detection system designed for ease of setup and effective monitoring in care environments.

Possum SensorMATe 3 Specifications

General IconGeneral
BrandPossum
ModelSensorMATe 3
CategoryAccessories
LanguageEnglish