EasyManua.ls Logo

Power Cooker Cooker - User Manual

Power Cooker Cooker
2 pages
Print Icon
To Next Page IconTo Next Page
Loading...
Quick Start Guide
*
Step 1 Step 2 Step 3 Step 4 Step 5
Place Inner Pot
into the unit.
Add
Ingredients.
Place Lid on Cooker
with Handle and Recessed
Valve pointed to the
“1:00 o’clock” position.
Rotate Lid counter-clockwise
until you feel a click.
Toggle Pressure Valve switch
to the CLOSE position.
Follow your recipe
for correct cook time.
Wash All Components Before First Use
*
See owner’s manual
for complete
instructions and
important safety
information before
using this product.
Step 6
For easiest cleanup,
wash Power Cooker
parts immediately
after cooking. Place
dishwasher-safe parts
on the top rack only.
PC_WAL3_8QT QUICK START_WM_ENG_V2_170103
NOTE: The Power Cooker will take 15 - 17 minutes
to pressurize before it starts to cook.
Question and Answer IconNeed help?

Do you have a question about the Power Cooker Cooker and is the answer not in the manual?

Summary

Quick Start Guide

Step 1: Prepare the Unit

Place the inner pot securely into the main unit before adding ingredients.

Step 2: Add Ingredients

Add all the ingredients for your recipe into the inner pot.

Step 3: Secure the Lid

Place lid with valve at 1:00, rotate counter-clockwise until it clicks.

Step 4: Set Pressure Valve

Toggle the pressure valve switch to the 'CLOSE' position.

Step 5: Cook According to Recipe

Follow your recipe for the correct cook time and settings.

Step 6: Cleanup After Cooking

Wash Power Cooker parts immediately. Dishwasher-safe parts on top rack.

Digital Control Panel Overview

Cooking Modes

Details on modes like COOK, LOW TEMP COOK, STEW, STEAM CANNING, RICE, and BROWN.

Pressure and Time Adjustment

Information on adjusting pressure, cook time, and using the delay timer.

Control Buttons

Functions of the PRESSURE ADJUST, COOK TIME, DELAY TIME, and KEEP WARM/CANCEL buttons.

Overview

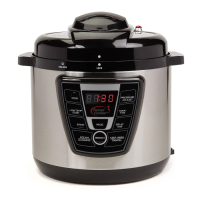
The Power Cooker is a versatile kitchen appliance designed for efficient and convenient cooking. It offers a range of cooking modes, allowing users to prepare a wide variety of meals with ease. The device features a digital control panel for intuitive operation and precise control over the cooking process.

Function Description:

The Power Cooker functions primarily as a pressure cooker, utilizing high pressure to significantly reduce cooking times while retaining moisture and nutrients in food. Beyond pressure cooking, it offers several specialized modes, including slow cooking, stewing, rice cooking, steaming/canning, and browning. This multi-functionality makes it suitable for preparing everything from quick weeknight dinners to elaborate meals and even preserving food. The unit is designed to be user-friendly, with a quick start guide that provides step-by-step instructions for initial setup and operation.

Important Technical Specifications:

The digital control panel of the Power Cooker features an LED display that shows "0000" when first plugged in. When a cooking mode is selected, the default time for that mode will blink five times. During the pressure-building phase, rotating double zeros will appear on the left side of the screen. Once the desired pressure is reached, the zeros will stop rotating, and the countdown timer will begin. After the cooking cycle is complete, the unit will beep, the LED display will become blank, and it will automatically switch to "KEEP WARM" mode until manually cancelled.

The Power Cooker offers eight distinct cooking modes, each with default settings and adjustable ranges:

  • COOK (Mode 1):

    • Default Time: 15 minutes
    • Pressure: 70 kPa
    • Cook Time Range: 1-30 minutes
    • This mode is ideal for general pressure cooking tasks.
  • LOW TEMP COOK (Mode 2):

    • Default Time: 6 hours
    • Pressure: Not applicable (indicated by "--")
    • Cook Time Range: 1-12 hours
    • This mode is designed for slow cooking, allowing for tender results over extended periods.
  • STEW (Mode 3):

    • Default Time: 30 minutes
    • Pressure: 70 kPa
    • Cook Time Range: 1-50 minutes
    • Optimized for preparing stews and other dishes requiring longer cooking under pressure.
  • STEAM/CANNING (Mode 4):

    • Default Time: 10 minutes
    • Pressure: 80 kPa
    • Cook Time Range: 1-120 minutes
    • Suitable for steaming vegetables, seafood, and for home canning processes.
  • RICE (Mode 5):

    • Default Time: 10 minutes
    • Pressure: 70 kPa
    • Cook Time Range: 1-30 minutes
    • Specifically calibrated for cooking various types of rice to perfection.
  • BROWN (Mode 6):

    • Default Time: 20 minutes
    • Pressure: Not applicable (indicated by "--")
    • Cook Time Range: 1-20 minutes
    • Used for browning meats and sautéing ingredients before pressure cooking, adding depth of flavor.
  • PRESSURE ADJUST (Mode 7):

    • This mode allows for fine-tuning of pressure settings and corresponding cook times.
    • Pressure options (kPa) and their default/range times:
      • 20 kPa: 10 minutes (Range: 10-60 minutes)
      • 30 kPa: 12 minutes (Range: 12-60 minutes)
      • 40 kPa: 15 minutes (Range: 15-60 minutes)
      • 50 kPa: 18 minutes (Range: 18-60 minutes)
      • 60 kPa: 20 minutes (Range: 20-60 minutes)
      • 70 kPa: 25 minutes (Range: 25-60 minutes)
      • 80 kPa: 30 minutes (Range: 30-60 minutes)
    • This flexibility enables users to adapt the cooker to specific recipes and desired textures.

Usage Features:

The Power Cooker is designed for straightforward operation. The quick start guide outlines six simple steps:

  1. Place Inner Pot: Insert the inner pot into the main unit.
  2. Add Ingredients: Place all desired ingredients into the inner pot.
  3. Secure Lid: Position the lid on the cooker with the handle and recessed valve pointing to the "1:00 o'clock" position. Then, rotate the lid counter-clockwise until it clicks into place, ensuring a secure seal.
  4. Toggle Pressure Valve: Switch the pressure valve to the "CLOSE" position to build pressure during cooking.
  5. Follow Recipe: Select the appropriate cooking mode and time according to the recipe. The Power Cooker typically takes 15-17 minutes to pressurize before the actual cooking time begins.
  6. Enjoy Meal: Once cooking is complete, the unit will automatically switch to "KEEP WARM" mode.

The control panel includes dedicated buttons for enhanced usability:

  • COOK TIME Button (8): Allows users to change the default cooking time for selected modes.
  • DELAY TIME Button (9): Enables users to program the meal to cook at a later time, with increments from 30 minutes up to 24 hours in 30-minute intervals. This feature is convenient for meal planning.
  • KEEP WARM/CANCEL Button (10): This button serves two purposes: it maintains food at a warm temperature after cooking, and pressing it during a cooking cycle will stop the current process.

Maintenance Features:

For optimal performance and longevity, the Power Cooker emphasizes easy maintenance:

  • Initial Cleaning: All components should be washed before the first use.
  • Post-Cooking Cleanup: For the easiest cleanup, it is recommended to wash Power Cooker parts immediately after cooking.
  • Dishwasher Safe: Dishwasher-safe parts should be placed on the top rack only for cleaning. This simplifies the cleaning process and ensures hygiene.

The Power Cooker combines multiple cooking functionalities with user-friendly controls and easy maintenance, making it a valuable addition to any kitchen. Users are encouraged to refer to the owner's manual for complete instructions and important safety information.

Power Cooker Cooker Specifications

General IconGeneral
BrandPower Cooker
ModelCooker
CategoryCookers
LanguageEnglish