5
OPERATION
WARNING: Never adjust the audio system and the headphones to a very high volume. Permanent
high volumes may damage your hearing! Your ear will get accustomed to high volumes which do not
seem to be that high any more after some time. Therefore, do not further increase a high volume after
getting used to it.
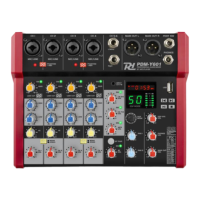
1. Use the button LINE / USB (13) to select the input signal assigned to channel LINE/USB.
Note: For recordings via the USB port, please take into account that there is a risk of feedback if the recording signal of the
computer is assigned to channel LINE/USB as an input signal.
2. For the basic setting, first set the controls :
- LEVEL (19, 20) to the minimum
- HIGH, LOW (14, 16), PAN (15) and BAL (17) to mid-position
- GAIN (12) and MASTER (23) to mid-position
Feed an audio signal to channel 1. Turn up the control LEVEL (19) until the audio signal can be heard well and it is possible to
adjust its sound with the controls HIGH and LOW (14). If you have to turn up the control LEVEL very far, turn up the control
GAIN (12) to increase the input gain. However, if the LED PEAK (18) lights up for a longer period of time, turn back the control
GAIN accordingly. The LED PEAK should briefly flash for signal peaks only.
Turn back the control LEVEL of channel 1. Feed an audio signal to channel LINE/USB and turn up its control LEVEL (20) until it
is possible to adjust the sound with the controls HIGH and LOW(16).
3. After the basic setting, use the controls LEVEL to mix the signals of channels 1 and LINE/USB in the volume ratio
desired or to fade them in or out individually. When a channel is not used, always turn back its control LEVEL to the
minimum.
4. For channel 1, use the control PAN (15) to place the mono signal in the stereo sound. For channel LINE/USB, use the
control BAL (17) to adjust the balance of the stereo signal.
5. To add the signal of the input TAPE IN (5) to the audio mix, press the button TAPE TO MAIN (11).
Note: When a recording is made via the output MASTER (6) and at the same time reproduced via the input TAPE IN, make
sure that the button TAPE TO MAIN is disengaged. Otherwise, there will be feedback.
6. Use the control MASTER (23) to adjust the level of the output signal sent to the jacks MASTER (6) and the USB port
(1). If one of the overload LEDs CLIP (22) lights up, turn back the control LEVEL or any channel control (19, 20) turned
up too far. Make sure that the button TAPE TO MAIN/MONITOR (11) is disengaged so that the LEDs CLIP will be able
to respond to the output signal.
7. Use the button TAPE TO MAIN/MONITOR (11) to select the signal assigned to the monitor output MONITOR (8). The
overload LEDs CLIP (22) respond to the signal selected for the monitor function. Use the control MONITOR (21) to
adjust the monitoring volume.