CONTENTS:
• Wireless Controller for Nintendo Switch
• AA Batteries (2)
• User Guide
SET UP:
Check for system update. Nintendo system update
version 6.0.0 or later is required for use of PowerA
Wireless controllers.
1. Connect your Nintendo Switch to the Internet
2. Typically, system updates will be downloaded
automatically when connected online.
3. Select ‘System Settings’ from HOME menu,
then scroll down to ‘System’ to see System Update
version and automatically check for system
update.
For additional help, search ‘system update’ from
Nintendo Support website.
INSTALL BATTERIES:
1. Remove the battery door, and install two AA
Alkaline Batteries
2. Confirm your Nintendo Switch Console is
powered ON.
WIRELESS PAIRING:
From the HOME Menu, select “Controllers,” then
“Change Grip and Order.” While the following
screen is displayed, press and hold down the SYNC
Button for at least one second on the Controller you
wish to pair.
NOTE: Once controller is paired once, it will auto-
connect next time.
UNDERSTANDING LED INDICATORS:
There are two LED locations on this controller:
top and front.
1. The top LED near the Sync button will flash Red
when the Alkaline batteries are nearing depletion.
Replace Alkaline batteries once LED is flashing to
avoid gameplay interruptions.
2. The four LED on the front indicate player number 1-8
and will cycle from left to right during wireless pairing.
TROUBLESHOOTING:
Q1. My Wireless Controller is not pairing
A1. Confirm batteries are properly installed, and
are not drained, used or damaged
A2. Confirm you are following the pairing process
listed above
A3. Remove and replace the Alkaline batteries to
reset the Wireless controller
SUPPORT
For support with your authentic PowerA accessories,
please visit the Support section of PowerA.com, email
CustomerService@PowerA.com or call (866)-308-
4031. Mon-Fri 5:00AM-5:00PM PST
MOTION WARNING
Playing video games can make your muscles,
joints, skin or eyes hurt. Follow these instructions
to avoid problems such as tendinitis, carpal tunnel
syndrome, skin irritation or eyestrain: • Avoid
excessive play. Take a 10 to 15 minute break every
hour, even if you don’t think you need it. Parents
should monitor their children for appropriate play.
• If your hands, wrists, arms or eyes become tired
or sore while playing, or if you feel symptoms such
as tingling, numbness, burning or stiffness, stop
and rest for several hours before playing again. • If
you continue to have any of the above symptoms or
other discomfort during or after play, stop playing
and see a doctor.
FCC STATEMENT
This device complies with Part 15 of the FCC Rules.
Operation is subject to the following two conditions:
(1) this device may not cause harmful interference,
and (2) this device must accept any interference
received, including interference that may cause
undesired operation.
Warning: Changes or modifications to this unit
not expressly approved by the party responsible
for compliance could void the user’s authority to
operate the equipment.
Customer Service
Service client
Kundendienst
Servicio a clientes
Assistenza clienti
Apoio ao Cliente
NOTE: This equipment has been tested and found
to comply with the limits for Class B digital device,
pursuant to Part 15 of the FCC Rules. These limits
are designed to provide reasonable protection
against harmful interference in a residential
installation. This equipment generates, uses
and can radiate radio frequency energy and, if
not installed and used in accordance with the
instructions, may cause harmful interference
to radio communications. However, there is no
guarantee that interference will not occur in a
particular installation. If this equipment does
cause harmful interference to radio or television
reception, which can be determined by turning the
equipment off and on, the user is encouraged to
try to correct the interference by one or more of the
following measures:
- Reorient or relocate the receiving antenna.
- Increase the separation between the equipment
and receiver.
- Connect the equipment into an outlet on a circuit
different from that to which the receiver is connected.
- Consult the dealer or an experienced radio/ TV
technician for help.
CAN ICES-3(B)/NMB-3(B)
This device contains licence-exempt transmitter(s)/
receiver(s) that comply with Innovation, Science and
Economic Development Canada’s licence-exempt
RSS(s). Operation is subject to the following two
conditions: 1. This device may not cause interference.
2. This device must accept any interference, including
interference that may cause undesired operation of
the device.
BATTERY LEAKAGE WARNING
Leakage of battery fluid can cause personal injury as
well as damage to your controller.
If battery leakage occurs, thoroughly wash the
affected skin and clothes.
Keep battery fluid away from your eyes and mouth.
Leaking batteries may make popping sounds.
To avoid battery leakage:
• Do not mix used and new batteries (replace all
batteries at the same time).
• Do not mix different brands of batteries.
• Alkaline batteries recommended. Do not use Lithium
ion, nickel cadmium (nicad), or carbon zinc batteries.
• Do not leave batteries in the remote for long periods
of non-use.
• Do not recharge alkaline or non-rechargeable
batteries.
• Do not put the batteries in backwards. Make sure that
the positive (+) and negative (-) ends are facing in
the correct directions. Insert the negative end first.
• When removing batteries, remove the positive
end first.
• Do not use damaged, deformed or leaking batteries.
• Remove exhausted batteries from the remote
• Rechargeable batteries must be removed from the
remote before being charged
• Rechargeable batteries should be charged under
adult supervision
• Do not short circuit the supply terminals
AUSTRALIAN WARRANTY STATEMENT:
This product comes with guarantees that cannot be
excluded under the Australian Consumer Law. You
are entitled to a replacement or refund for a major
failure and for compensation for any other reasonably
foreseeable loss or damage. You are also entitled
to have the goods repaired or replaced if the goods
fail to be of acceptable quality and the failure does
not amount to a major failure. If purchased within
Australia or New Zealand, this product comes with
a One-year warranty from date of purchase. Defects
in the product must have appeared within One year
from date of purchase, in order to claim the warranty.
All warranty claims must be facilitated back
through the retailer of purchase in accordance
with the retailer’s return policies and procedures.
Any expenses incurred, as a result of returning
the product to the retailer of purchase are the full
responsibility of the consumer.
CustomerService@PowerA.com
2-Year Limited Warranty: Visit PowerA.com for details and to register your product
Garantía limitada de 2 años. Visita PowerA.com para obtener detalles y para registrarte.
Garantia limitada de 2 anos: Visita PowerA.com para obter detalhes e registar o teu produto
Beschränkte 2-Jahres-Garantie – Details und Informationen zur Anmeldung nden Sie unter PowerA.com.
Garantie limitée de 2 ans – Rendez-vous sur PowerA.com pour de plus amples informations et pour enregistrer votre achat.
Garantia limitada de 2 años: Visita PowerA.com para obter detalhes e registar o teu produto
BDA Inc.
15525 Woodinville-Redmond Rd NE
Woodinville, WA 98072
WIRELESS
CONTROLLER
USER MANUAL
Manuel de l’utilisateur
Bedienungsanleitung
Manual de usuario
Manuale per l’uso
Manual do usuário
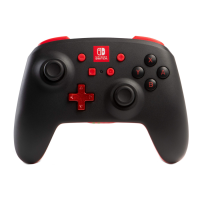
Directional Pad
LED Player Indicator
Plus Button
Home Button
Minus Button
C Button
Left Stick Action Buttons
Capture Button
R L
ZR ZL
Right Bumper Left Bumper
Right Trigger Left Trigger
LED Connection Indicator Sync Button
GAMECUBE STYLE