Do you have a question about the PowerAirFryer Oven CM001 and is the answer not in the manual?
Safety feature that stops the Unit if internal temperature control system fails, requiring unplugging to reset.
Device automatically shuts down the unit when the Timer LED reaches zero; fan runs for 20 seconds to cool down.
Ensures the Unit operates properly by using a dedicated electrical circuit, avoiding overloads with other appliances.
Appliance complies with EMF standards and is considered safe for use when handled according to manual instructions.
Details the Model Number, Supply Power, Rated Power, Function, Temperature range, and Display type.
Instructions for assembling Skewer Racks onto the Rotisserie Shaft and securing them with Set Screws.
Steps for assembling skewers into the Skewer Racks, securing them with clips and set screws.
Instructions for inserting the assembled spit or basket into the oven's rotisserie shaft socket and hanger.
Procedure for safely removing the rotisserie spit or rotating basket from the oven after cooking.
Includes the Power/Start-Stop Button for unit operation and Running Lights indicating cooking progress.
Features Temperature and Time Control Buttons, plus Cooking Presets for setting cooking parameters or using defaults.
Comprises the LED Digital Display showing time/temperature, and the Internal Light for visual checks of food.
Includes the Rotation Button to activate the rotisserie function, indicated by a blinking icon during use.
Guidance for experimenting with custom cooking times and temperatures once familiar with the appliance.
Initial setup steps including reading labels, removing packaging, and cleaning parts.
Ensuring the appliance is placed on a stable, level, horizontal, and heat-resistant surface before cooking.
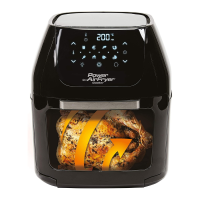
Highlights the appliance's ability to cook a wide variety of foods using provided charts and guides.
Steps for placing ingredients into accessories and starting the cooking process using the control panel.
Safe methods for removing hot food and accessories using a fetch tool or oven mitts.
Instructions for cleaning the appliance and its accessories after each use, including door removal.
Steps for properly storing the appliance after ensuring it is clean and dry.
FAQs covering food variety, liquid usage, checking food progress, and pre-heating requirements for optimal results.
Addresses auto shut-down, general operation, dishwasher safety for accessories, and unit malfunction inquiries.
FAQs related to door removal for cleaning and reattachment, and advice against attempting home repairs for malfunctions.
| Model | CM001 |
|---|---|
| Type | Air Fryer Oven |
| Category | Fryer |
| Capacity | 6 quarts |
| Power | 1700 watts |
| Control Type | Digital |
| Timer | Up to 60 minutes |
| Cooking Functions | Air Fry, Roast, Bake, Dehydrate |
| Accessories Included | drip tray |