V1.0 12V DC Winch 8964793
Visit www.princessauto.com for more information 7
Remove the parts and accessories from the packaging and inspect for damage.
Make sure that all items in the contents are included.
Contents: • Winch • Tethered Remote • Mounting hardware
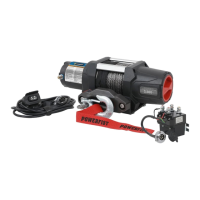
IDENTIFICATION KEY
A Motor Terminal
B Motor
C Hawse Fairlead
D Rope on Drum
E Clutch Hand Wheel
F Tethered Remote
G Clevis Hook with Latch
H Hook Strap
I Solenoid
ASSEMBLY & INSTALLATION
Letter references in parenthesis (A) refer to the included Identification Key.
Dashed numbers in parenthesis (Fig. 1-1) refer to a specific point in an
illustration or image.
MOUNTING THE WINCH
Four 5/16 in. screws, lock washers, washers and nuts, SAE Grade 5 or higher,
are required to permanently mount the winch. This hardware is not included
with the winch.
1. Choose a location on the vehicle that can withstand the stress of the
maximum weight capacity (see Specifications). Install a steel
reinforcement plate or additional bracing to strength the location.
2. Make sure there is adequate room for the winch and a flat surface for
it to sit on. Verify the structure where the bolts will go contains no
hidden wiring or components. Relocate either the winch or the
wiring/components if there is overlap.
3. Mark the holes along the center using the winch’s base as a template.
Reach through the front or back opening to make the marks.
4. Drill each hole with a 5/16 in. drill bit to accommodate the bolts.
5. Position the winch to align the bolt holes on the bottom with the pre-
drilled holes.