Do you have a question about the Powermatic JTG-10Q and is the answer not in the manual?
Information on obtaining service or repair for WMH Tool Group products through authorized stations.
How to find up-to-date product details and new additions from WMH Tool Group.
Details the limited warranty, exclusions, and liability limitations for WMH Tool Group products.
Crucial safety measures before assembly or operation, including personal protective equipment and environment.
Information on chemicals in dust and wood, and recommended safety equipment for reducing exposure.
Key rules for safe operation, including attention, stance, tool usage, and machine shutdown.
Explanation of 'CAUTION' and 'WARNING' symbols and their implications for user safety.
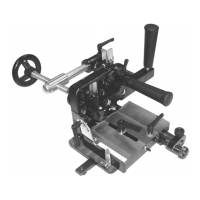
Lists all parts included in the shipping carton, identified by letters and quantities.
Specifies the necessary tools for assembly and operation, noting which are provided with the jig.
Step-by-step instructions for assembling the tenoning jig components.
Procedure to align the jig guide with the saw's miter gauge slot for proper setup.
Ensuring the backstop is positioned at 90 degrees to the saw table using a square and lock handle.
Adjusting the guide bushing on the guide rod for smooth movement and proper operation.
Steps to make the fence parallel to the saw blade, including final gap adjustments.
Critical safety warning about removing the table saw's blade guard and its re-installation.
Instructions on how to use the handwheel and handles to secure and feed the workpiece.
Methods for adjusting the fence position for rapid or fine adjustments relative to the saw blade.
Guidance on cutting tenons on the side of the workpiece against the fence, requiring a spacer.
Instructions for setting up and cutting angle tenons, including a safety warning about spacers.
Detailed list of all replacement parts, including part numbers, descriptions, sizes, and quantities.
| Table Size | 7-1/4" x 30" |
|---|---|
| Cutterhead Speed | 10, 000 RPM |
| Number of Knives | 3 |
| Maximum Depth of Cut | 1/8" |
| Dust Port | 4" |
| Weight | 62 Lbs |
| Dust Port Size | 4" |
| Phase | 1 Phase |