EasyManua.ls Logo

Powerplus POWEB2530 - User Manual

Powerplus POWEB2530
12 pages
Print Icon
To Next Page IconTo Next Page
Loading...
POWEB2530 EN
Copyright © 2018 VARO P a g e | 1 www.varo.com
1 APPLICATION ................................................................................... 3
2 DESCRIPTION (FIG. A) ..................................................................... 3
3 PACKAGE CONTENT LIST .............................................................. 3
4 SYMBOLS .......................................................................................... 4
5 GENERAL POWER TOOL SAFETY WARNINGS ............................ 4
5.1 Working area ............................................................................................................. 4
5.2 Electrical safety ......................................................................................................... 4
5.3 Personal safety ......................................................................................................... 5
5.4 Power tool use and care ........................................................................................... 5
5.5 Service ....................................................................................................................... 5
6 SPECIAL SAFETY INSTRUCTIONS FOR JIG SAWS ..................... 6
7 ADDITIONAL SAFETY INSTRUCTIONS FOR BATTERIES AND
CHARGERS ....................................................................................... 6
7.1 Batteries .................................................................................................................... 6
7.2 Chargers .................................................................................................................... 7
8 CHARGING AND INSERTION OR REMOVAL OF BATTERY ......... 7
8.1 Charger indications (Fig. 1) ...................................................................................... 7
8.2 Removal / insertion of battery (Fig. 2) ...................................................................... 8
9 OPERATION ...................................................................................... 8
9.1 Replacing saw blades (Fig. 3) .................................................................................. 8
9.2 Angle cutting adjustment (Fig. 4) ............................................................................. 8
9.3 Switch on and off (Fig. 5) .......................................................................................... 8
9.4 Adjusting the pendulum regulation knob (Fig. 6).................................................... 8
9.5 LED work light (Fig. 7) .............................................................................................. 9
10 OPERATION ...................................................................................... 9
10.1 Special notes on jig sawing ...................................................................................... 9
10.1.1 Sawing wood............................................................................................................... 9
10.1.2 Sawing metal .............................................................................................................. 9
10.1.3 Sawing plastic ............................................................................................................. 9
11 CLEANING AND MAINTENANCE .................................................... 9
11.1 Cleaning ..................................................................................................................... 9
Question and Answer IconNeed help?

Do you have a question about the Powerplus POWEB2530 and is the answer not in the manual?

Overview

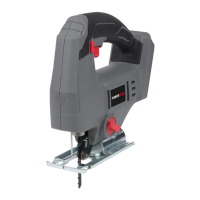
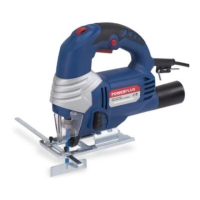
The POWERPLUS POWEB2530 is an 18V cordless jigsaw designed for sawing wood, metal, and plastics. It is not intended for professional use.

Function Description:

The jigsaw is equipped with a soft grip (1) for comfortable handling and an ON/OFF switch trigger (3) for operation. An unlock button (2) prevents accidental starts. It features an LED work light (4) to illuminate the work area, which activates when the tool is turned on. The jigsaw offers four cutting actions: one straight and three orbital, adjustable via a pendulum switch (5) and a pendulum regulation knob (9.4). Orbital action provides a more aggressive and faster cut, suitable for soft materials like wood or plastic, but results in a rougher finish. Straight cutting (position 0) is recommended for metal or hardwoods. The saw blade (8) is guided by a guide roller (6) and secured by a quick-release blade clamp (7) for easy replacement. The adjustable base (12) allows for angle cutting adjustments up to 45° (left or right) for contour sawing, secured by a lock lever (13). The tool operates on an 18V battery pack (10), which is inserted or removed using the battery pack release button (11). The charger (9) and battery pack are not included with the tool.

Important Technical Specifications:

  • Rated voltage: 18 V
  • Rotation speed: 0-2500 min⁻¹
  • LED worklight: Yes (1 LED)
  • Pendular positions: 4
  • Motor type: Carbon brush motor
  • Adjustable base: Yes
  • Stroke height: 18 mm
  • Cutting depth steel: 8 mm
  • Cutting depth wood: 65 mm
  • Cutting depth plastic: 20 mm
  • Connection type: T-shank
  • Quick change blades: Yes
  • Lock button: Yes
  • Base material: Steel
  • Battery connection: Slide-on
  • Acoustic pressure level LpA: 80 dB(A)
  • Acoustic power level LwA: 91 dB(A)
  • Vibration (aw): 11.6 m/s² (K = 1.5 m/s²)

Usage Features:

  • Safety First: Always read the manual and general safety instructions before use. Wear ear protectors and a face mask when operating. Mandatory use of eye protection is indicated by a symbol. Avoid operating in potentially explosive atmospheres or near flammable liquids/gases. Keep children and bystanders at a safe distance.
  • Battery and Charger: Use the battery and charger only in closed rooms. Do not expose them to water or incinerate them. Charge batteries at ambient temperatures between 4 °C and 40 °C. Store batteries in a cool, dry place (5 °C-20 °C) and never in a discharged state. Regular discharge and reloading (at least 4 times a year) are recommended for Li-ion batteries. The ideal charge for long-term storage is 40% capacity. The charger indicates status with solid green (ready to charge), flickering red + solid green (charging), and solid green + solid red (charged). If the battery is hot after continuous use, allow it to cool to room temperature before charging to extend battery life.
  • Blade Replacement: Disconnect the battery pack before changing blades. Pull the quick-release blade clamp lever, slide the saw blade (with teeth pointing forward) into the locating groove, ensuring the back edge fits into the clamp holder, then release the lever. Confirm the saw blade engages in the guide roller slot.
  • Angle Cutting: The base plate can be adjusted up to 45° left or right for bevel cuts. Loosen the lock lever, set the desired angle, and re-secure the lever.
  • Switching On/Off: Connect the battery pack firmly. Push the lock button (2) to the left or right and press the ON/OFF switch trigger (3) to turn on. Releasing the trigger turns the tool off.
  • Pendulum Adjustment: The pendulum regulation knob allows selection of four cutting actions: straight (position 0) and three orbital settings (I, II, III). Orbital action increases aggressiveness from I to III, providing faster cuts in soft materials. Straight cutting is recommended for metal and hardwoods.
  • Work Light: The LED work light (4) illuminates the work area when the tool is on. Do not stare directly at the light beam or aim it at people.
  • Sawing Technique: Hold the saw firmly. Ensure the workpiece is clamped tight and the saw line is marked. Connect a vacuum extractor nozzle if possible. Start the saw before placing the soleplate on the workpiece. Apply only necessary pressure; avoid lateral pressure on the blade. For plunge cuts, start the saw, tilt it carefully while supporting with the soleplate until the blade touches the saw line, then gradually tip the saw downwards until the sole is flush and the blade is perpendicular. A pilot hole may be drilled if needed.
  • Material-Specific Advice:
    • Wood: Check for nails or metal objects. Always wear a mask.
    • Metal: Lubricate the material and saw blade with cutting oil to protect the tool and prevent overheating. Support the item with wooden blocks.
    • Plastic: Perform a test cut to ensure the material tolerates the heat generated by sawing.

Maintenance Features:

  • Cleaning: Keep the machine's ventilation slots clean to prevent engine overheating. Regularly clean the machine housing with a soft cloth after each use. Ensure ventilation slots are free from dust and dirt. For stubborn dirt, use a soft cloth moistened with soapy water. Never use solvents like petrol, alcohol, or ammonia water, as these can damage plastic parts.
  • Screws: Regularly check and tighten all screws on the saw, especially those holding the blade.
  • General Maintenance: The machine is designed for long-term operation with minimal maintenance. Proper care and regular cleaning are essential for satisfactory operation.
  • Service: Repairs should only be carried out by a qualified specialist using standard spare parts to ensure safety standards are met.
  • Battery Storage: Store batteries in a cool, dry place (5 °C-20 °C). Never store batteries in a discharged state. Charge the tool at least once a month to ensure optimal operation.

Warranty:

The product has a 24-month warranty from the date of purchase for material or production flaws. Exclusions include batteries, chargers, defective parts subject to normal wear & tear (bearings, brushes, cables, plugs, accessories like drill bits, saw blades), damage from maltreatment, accidents, alterations, or transportation costs. Damage from inappropriate use is also not covered. The warranty is void if the device is not properly maintained (e.g., clean ventilation slots, regularly serviced carbon brushes). The purchase receipt serves as proof of purchase. Appliances must be returned in a clean, undismantled state, preferably in their original packaging, with proof of purchase. The warranty period is not extended by claims or device replacements. Replaced parts remain the property of Varo NV.

Powerplus POWEB2530 Specifications

General IconGeneral
BrandPowerplus
ModelPOWEB2530
CategoryPower Tool
LanguageEnglish

Related product manuals