Do you have a question about the PowerTec LeverGym and is the answer not in the manual?
Unpack all items to verify parts and avoid tightening bolts prematurely.
Use specified bolts and parts to build the base of the gym without tightening bolts.
Attach the leg support tube and foam rollers to the main frame using the designated bolt.
Fit the upper upright tube, feed the cable down, and insert the pulley as shown.
Attach parts #4 to the frame using bolts #38 & #32 and tighten previously installed bolts.
Secure the weight horns to the weight rotating tube using bolts #28.
Attach the weight rotating tube and feed the cable through all pulleys.
Attach weight horns to the lever arms, similar to the previous step.
Slide the axle, tighten with bolt #31, attach lever arms, and secure them.
Tighten all bolts, check for looseness, and attach any final attachments.
| Frame Material | Steel |
|---|---|
| Weight Plates | Not included |
| Finish | Powder Coated |
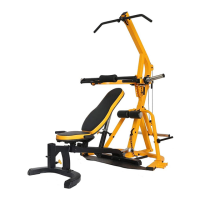
| Attachments | Lat pulldown bar, leg developer, press arm |
| Warranty | 2 Years on Component Parts (pads, pulleys, cables) |
| Exercises | Bench Press, Squat, Lat Pulldown |