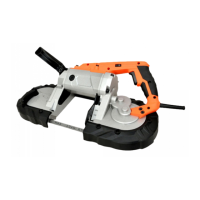
This document describes the Portable Band Saw, Model No: R2103. It is a power tool designed for cutting various materials.
Function Description
The portable band saw is used for cutting operations. It features a blade that runs continuously around two wheels, guided by a guide bar. The tool is designed for handheld use, allowing the operator to cut materials by applying minimal force. It is equipped with a speed dial for adjusting the cutting speed to suit different materials and an LED light for improved visibility during operation. The device is not intended for use by individuals under 16 years of age or by persons with reduced physical, sensory, or mental capabilities unless supervised or instructed by a responsible person.
Important Technical Specifications
- Model Number: R2103
- Voltage: 120V~, 60Hz and 220-240V~, 50Hz
- Power: 10A (for 120V~, 60Hz) and 1100W (for 220-240V~, 50Hz)
- Blade FPM (Feet Per Minute): 0-435SFPM
- Blade Dimensions: 44-7/8"(L)x1/2"(W)x0.025"(Thick) or 1141(L)x13mm(W)x0.65mm(Thick)
- Cutting Capacity: 5" or 127x127mm
- Protection Class: II (double insulation)
Usage Features
The band saw incorporates several features to enhance usability and safety:
- Tension Handle (A): Used to release and tighten blade tension. Before each use, ensure it is in the tightened position to make the blade taut.
- External Carbon Brush (B): Allows for easy replacement of carbon brushes.
- Auxiliary Handle (C): Provides an additional grip for better control during operation.
- Motor Housing (D): Encloses and protects the motor.
- Speed Dial (E): Allows the user to adjust the blade speed for different cutting materials.
- On/Off Switch (F): Controls the power to the tool and features electronic speed control.
- Guide Bar (G): Helps to stabilize the blade and ensure accurate cuts. It needs to be assembled before operation by releasing screws, moving it around the blade, and then locking the screws.
- Blade (H): The cutting component of the saw. Proper installation involves setting it into the guide bearings and ensuring it fits evenly around the wheels.
- Screw (I): Used for securing components, such as the guide bar.
- Guide Bearing (J): Supports and guides the blade during operation.
- LED On/Off Switch (K): Activates or deactivates the LED light.
- LED Light (L): Illuminates the workpiece for better visibility.
Operating Procedures:
- Blade Installation/Replacement: Turn the Tension Handle (A) clockwise to release tension. Set the blade (H) into both Guide Bearings (J), ensuring it is centered and fits evenly around the wheels. Turn the Tension Handle (A) until the blade is taut and the handle is "Tight."
- Guide Bar Assembly: Release Screws (I) on the frame. Move the Guide Bar (G) around the blade and then lock the screws.
- Switching On/Off: Use Switch (F) to turn the band saw on or off. Adjust speed with Speed Dial (E).
- LED Light: Use Switch (K) to turn the LED light on or off.
- Cutting Operations:
- Ensure the switch is in the off-position before plugging in the tool.
- Secure the workpiece to a workbench or solid surface.
- Keep the power cord out of the way.
- Set the Guide Bar (G) against the workpiece, maintaining a 90° angle with the blade.
- Turn on the saw and allow it to reach full speed before starting the cut.
- Adjust speed using Speed Dial (E).
- Tilt the unit so the blade is vertical.
- Apply minimal force to start a groove. Once the groove is started, allow the tool's weight to cut into the workpiece. Avoid pressing too hard, as this can twist or break the blade.
- Finish the cut by slowly raising the unit.
Safety Precautions:
- Always wear eye protection, hearing protection, a dust mask, and protective gloves.
- Do not overreach; maintain proper footing and balance.
- Avoid loose clothing, jewelry, or long hair near moving parts.
- Ensure the switch is in the off position before connecting to power or changing accessories.
- Disconnect the plug from the power source before making adjustments or changing accessories.
- Do not leave the band saw unattended while running or plugged into an electrical outlet.
- Do not force the tool; let its weight do the work.
- Be aware of dust hazards, especially from materials like lead paint, wood species, minerals, and metal. Use a dust extraction device when connectable.
- Consult a physician if you have a pacemaker, as electromagnetic fields could cause interference.
- Be mindful of vibration effects; take breaks and use tools with the lowest vibration.
Maintenance Features
- General Maintenance:
- Protect the tool from impact, shock, and grease.
- Keep the tool and cord clean, especially ventilation slots.
- Disconnect the plug before cleaning. Do not insert pointed objects into ventilation slots.
- Regularly check for misalignment, binding of moving parts, breakage, or any other condition that might affect operation. Have damaged parts repaired by a qualified person using identical replacement parts.
- Keep cutting tools sharp and clean.
- Maintain labels and nameplates; contact Harbor Freight Tools for replacements if unreadable or missing.
- Cooling: Cutting material and the motor housing can get very hot. Stop work until the unit cools down, and spray coolant or water onto the blade.
Environmental Considerations
- Do not dispose of electric tools, accessories, and packaging with household waste.
- In accordance with European Directive on waste of electric and electronic equipment, tools that have reached the end of their life must be collected separately and returned to an environmentally compatible recycling facility.