-- READ ENTIRE INSTRUCTIONS BEFORE STARTING
INSTALLATION. FOLLOW ALL CAUTIONS, WARNINGS
AND NOTES TO PREVENT INJURY OR DAMAGE
TO WINCH, OR TO SELF.
A. Read your Owner's Manual. Only let
people whohave read and understandthe
Powerwinch safety rules use your winch.
B. NEVER useyourwinchto liftormove
peopleor animals..
C. DO NOT USE YOUR WINCH AS A
HOIST! It is not made to be used for verti-
cal lifting.
D. KEEP the winching area FREE OF
CHILDREN! ONLY let adults use your
winch.
E. ALWAYS wire your winch with the circuit
breaker. This Is your assurance against
overheating and fire potential.
F. ALWAYS stand clear of the area between
the load or anchoring point, and your
winch. Should the cable snap while you
are in this area you could be seriously hurt.
G. ALWAYSInspect the entirecable before
useto check for fraying or kinking.The
cable couldbreak if it is frayed (wornby
rubbing)or kinked(short,tighttwistsor
cuds).
H. If you are using the emergency hand
crank, BE SURE to remove it from the
winch after use. Under power the crank will
turn end could cause an injury.
It,.
L
M.
N.
O.
If you need to replace the cable, ALWAYS
replace it with one of the same size and
strength. Use Powerwinch cable only!! The
winch rating and cable strength are care-
fully matched. Your warranty is void if any
other cable is used.
Never use rope instead of cable. Your
winch under load has the force to snap
rope easily--causing possible damage.
ONLY attempt to pull as much as your
winch is rated for.
NEVER wrap the winch cable around the
load. This causes cable kinking, which
breaks down cable strength. Use an Eco-
Strap or chain.
DO NOT USE your winch to secure a load
for traveling or to hold or support a load
once you finish the job. It is not meant to
be used this way. ALWAYS secure the
load properly! If you do not you risk injury,
damage or loss of the load.
ALWAYS wear leather gloves when
handling the cable. Steel cable can be
hard on the hands.
ALWAYS keep your hands and feet clear of
the drum area (where the cable winds on
spool).
-"- i mr
WARNING:
ALWAYS UNPLUG THE WIRING HARNESS TO PREVENT ACCIDENTAL
STARTING WHEN SE-nING UP, ADJUSTING OR MAKING REPAIRS TO YOUR
WINCH.
WHEN YOU FINISH USING YOUR WINCH UNPLUG THE PLUG FROM THE
SOCKE-[. IF THE PLUG STAYS IN THE SOCKET MOISTURE MAY COLLECT IN
THE SOCKET AND CAUSE A SHORT CIRCUIT.
ANY LIMITED WARRANTY WHICH MAY APPLY TO THIS PRODUCT MAY BE
VOID IF SAID PRODUCT HAS BEEN DAMAGED DUE TO ACCIDENT, UN-
REASONABLE USE. NEGLECT, MODIFICATION, OR FAILURE TO OBSERVE
THESE SAFETY RULES.
H
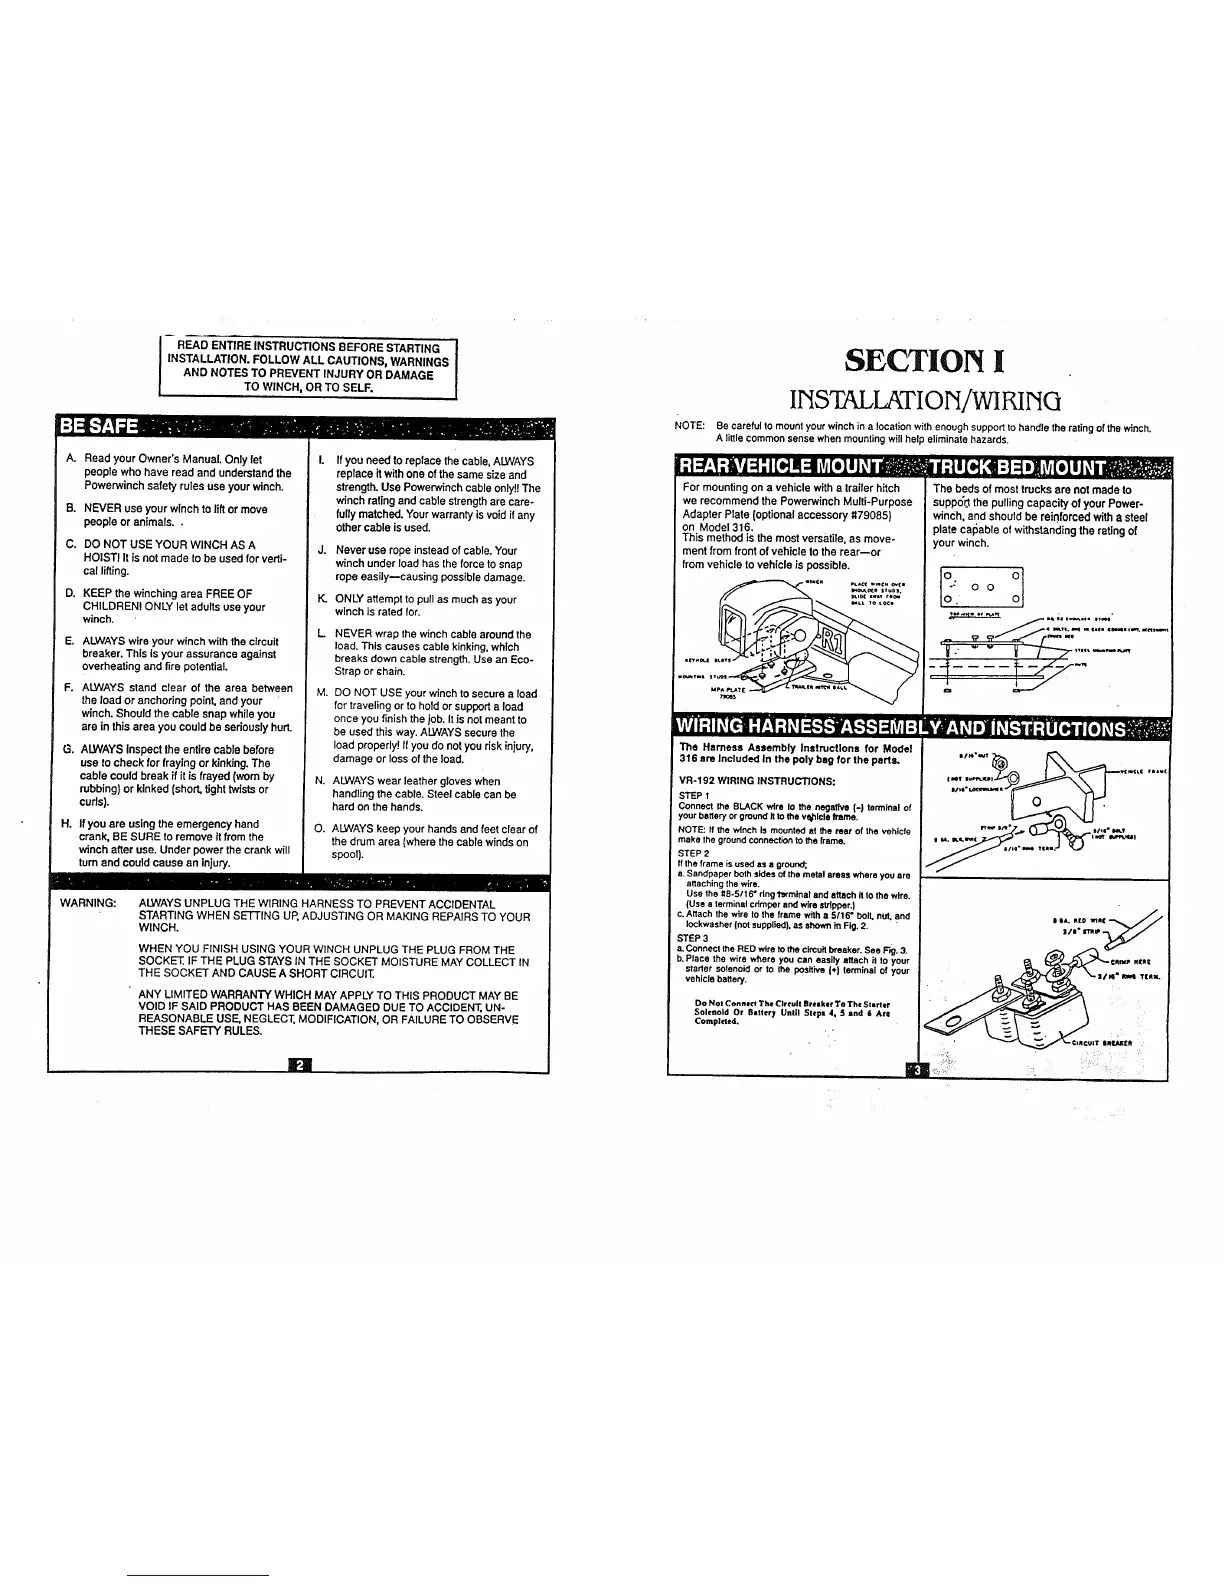
SECTION I
NOTE:
INSTALLATION/WIRING
Be careful to mount your winch in a location with enough supportto handle therating of the winch.
A littlecommon sense when mounting will help eliminate hazards.
I;t d.,1; vA=1-"I[d=1=llLVj[e]lJil i B_
For mounting on a vehicle with a trailer hitch
we recommend the Powerwinch Multi-Purpose
Adapter Plate (optional accessory _79085)
on Model 316.
This method is the most versatile, as move-
ment from front of vehicle to the rear--or
from vehicle to vehicle is possible.
ilII;1lid [_li:1__vl[e]il 0i _
The beds of most trucks are not made to
suppo'rt the pulling capacity of your Power-
winch, and should be reinforced with a steel
plate callable of withstanding the rating of
your winch.
o o
*L,_ -,€. o,(. -2 0 0
s._.. o(, |Tuos.
"w- ........
....... -T I
|vlr[J;1I_[L_]I-"f_'l;]_l::k'}.."]r_,!.."].=]=tLvjI:tik'dr;l_JJJlI_[.-"lII;llfI_ II[o]_[..._
The Harness Assembly Instructions for Model
316 are Included In the poly bag for the parts.
VR-192 WIRING INSTRUCTIONS:
STEP 1
Connect the BLACK wire Io the negative (-) terminal of
your battery or ground it to the vqphlcle frame.
NOTE: If the winch ts mounted at the rear of the vehicle
make the ground connection to the frame.
STEP 2
If the frame is used as a ground;.
a. Sandpaper both sides of Ihe metal areas where you are
attaching the wire.
Use the #8-5116" ring l'a,rminal and attach il to the wire.
(Use a terminal crimper and wire Stripper.)
c.Attach the wire to the frame with a 5/16" bolt. nut, and
Iockwasher (not supplied), as shown in Fig. 2.
STEP 3
& Connect the RED wire to the circuit breaker. See Fig. 3.
b. Place the wire where you can easily attach it to your
starter solenoid or to the positive (÷) terminal of your
vehicle battery.
Do Not Connect The Circuit Bresker To The Stirrer
Solenoid Or B=ttcr)* Until Steps 4, 5 and 6 Ass
C'ompleted.
L'
U
L
=l_'wf
)/i
Ill* rrm_
NRfldP N(Rt
<
 Loading...