Do you have a question about the pratic EVO and is the answer not in the manual?
This document describes the Pratic Handzender EVO, a remote control for various Pratic systems, including adjustable blades, RGB LED lighting, white LED lighting, and Raso vertical screens. The manual provides instructions in Dutch, English, French, and German.
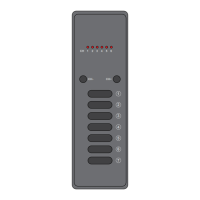
The Handzender EVO is a versatile remote control designed to operate different Pratic systems. It comes in a 1-channel, 7-function version or a 6-channel, 42-function version, allowing control over multiple devices or complex functionalities. The remote features channel change keys, function keys, and a wall mounting support for convenient placement.
Adjustable Blades (Lamellen): The remote allows for precise control over the angle of adjustable blades. Standard preset angles include 0°, 45°, 90°, and 140°. There are also '+' and 'STOP' functions. Upon request, additional preset angles of 45°, 68°, 95°, and 140° can be configured. The remote supports changing these preset angles using buttons CH1-CH4 of a 7-channel transmitter. The process involves pressing the desired channel button for 0-5 seconds, with different durations corresponding to different preset angles (e.g., 0-5 seconds for n=8, 1-2 seconds for n=6, etc.).
Memorization of 7-channel transmitter (Standard version: 0°-45°-90°-140°): To memorize a 7-channel transmitter for standard blade angles, open the blades control unit. Press the push button associated with the motors (P1 for Motor1, etc.) twice and hold it down. The buzzer will emit two beeps and then a continuous sound. While the sound is continuous, press one push button of the 7-channel transmitter to be memorized. Intermittent buzzer sounds indicate successful memorization. All push-buttons of the transmitter are automatically memorized.
Memorization of 7-channel transmitter (Upon request: 45°-60°-95°-140°): For custom blade angles, the process is similar but requires pressing the motor push button (P1) twelve times instead of two.
Memorization of Green Mouse transmitter: To memorize a Green Mouse transmitter, press the motor push button (P1) eleven times. During the continuous buzzer sound, press any button of the pair to memorize (∆ V).
Quick learning of limit switch: This feature allows self-learning of limit switches without accessing the control unit. Open the blades at 90°. Press and hold button P3 of the transmitter for 10 seconds. The control unit will automatically perform self-learning of complete closing (0°), complete opening (140°), automatic CLOSE (0°), and automatic OPEN (140°) maneuvers. For pergolas with two synchronized motors, both motors 1 and 2 operate together. For independent motors, motor 1 operates first, then motor 2.
Integrated RGB LED Lighting: The remote controls On/Off, dimmer, and color functions for RGB LED lighting. Memorization of 7-channel transmitters with On/Off/Dimmer Colour function: Open the LED control unit. Press the P2 button once and hold it down. The buzzer will beep once, then sound continuously. During the continuous sound, press a push button on the 7-channel transmitter to be memorized. Intermittent buzzer sounds confirm memorization. All push-buttons are automatically memorized.
RGB LED Lighting Usage Features: The remote offers various functions for RGB LED lighting:
Changing pre-programmed colors in the 8 (4+4) push buttons: Press and hold the automatic cycle push button CH6 for more than 4 seconds. The light will turn off and on twice, indicating entry into the new color memorization mode. Color variation starts at 4 seconds per color with a 1-second pause. Pressing CH6 again during a color allows changing the rotation direction. To memorize a new light value, press the desired push button for 3 seconds. The light will turn off and on for confirmation, then return to automatic cycle mode. Press CH7 to exit the mode.
Integrated White LED Lighting: The remote controls white LED lighting with different intensity levels (100%, 75%, 50%, min, +). Modification of preset light values: Press the push button to be modified (CH1, CH2, CH3, CH4). Adjust the value with buttons CH5 and CH6. Press CH7 and hold for 5 seconds. After 5 seconds, LED 1 turns on for 5 seconds, and the load turns on at the new value.
Raso - Vertical Closure with Zip: The remote controls the opening and closing of Raso vertical screens. Memorization of screens in the transmitter (dynamic push button): Open the Raso control unit and select the screen channel. Press the motor push button (P1 for Motor1, etc.) twice and hold it down. The buzzer will beep twice, then sound continuously. During the continuous sound, press a push button on the transmitter to be memorized. Intermittent buzzer sounds confirm memorization.
Raso Usage Features:
Remote Control (Afstandsbediening): Memorization of a transmitter with an already memorized transmitter: Press P3 of the already memorized transmitter. The buzzer emits a continuous sound. Within 5 seconds, press the button of the pair or any button on a 7-channel transmitter to copy. The buzzer stops for 1 second and then emits sound again. Within 5 seconds, press the button to memorize the new transmitter. Once memorization is complete, the buzzer emits a fast intermittent sound.
Channels limitation function: To activate, press the SEL button as many times as the maximum number of groups desired, holding it down for 5 seconds on the last press. The limitation is indicated by flashing LEDs for the selected groups (LED 1 for Group 1, LED 1-2 for Group 2, etc.). To deactivate, press the SEL button for 5 seconds, and all LEDs will flash.
| Brand | pratic |
|---|---|
| Model | EVO |
| Category | Remote Control |
| Language | English |