PAG. 26 T-Hide - Istruzioni d’installazione Rev. 11/18
USO DI NINA IO USE NINA IO
UTILISER NINA IO VERWENDUNG VON NINA IO
P
Individuare i
dispositivi già
registrati in un punto
di comando?
ABBINA
Individua dispositivi
senza punti di
comando associati.
Individua dispositivi
senza punti di
comando associati?
1
1
1
2
2
2
3
4
3
1
2
IT
EN
FR
DE
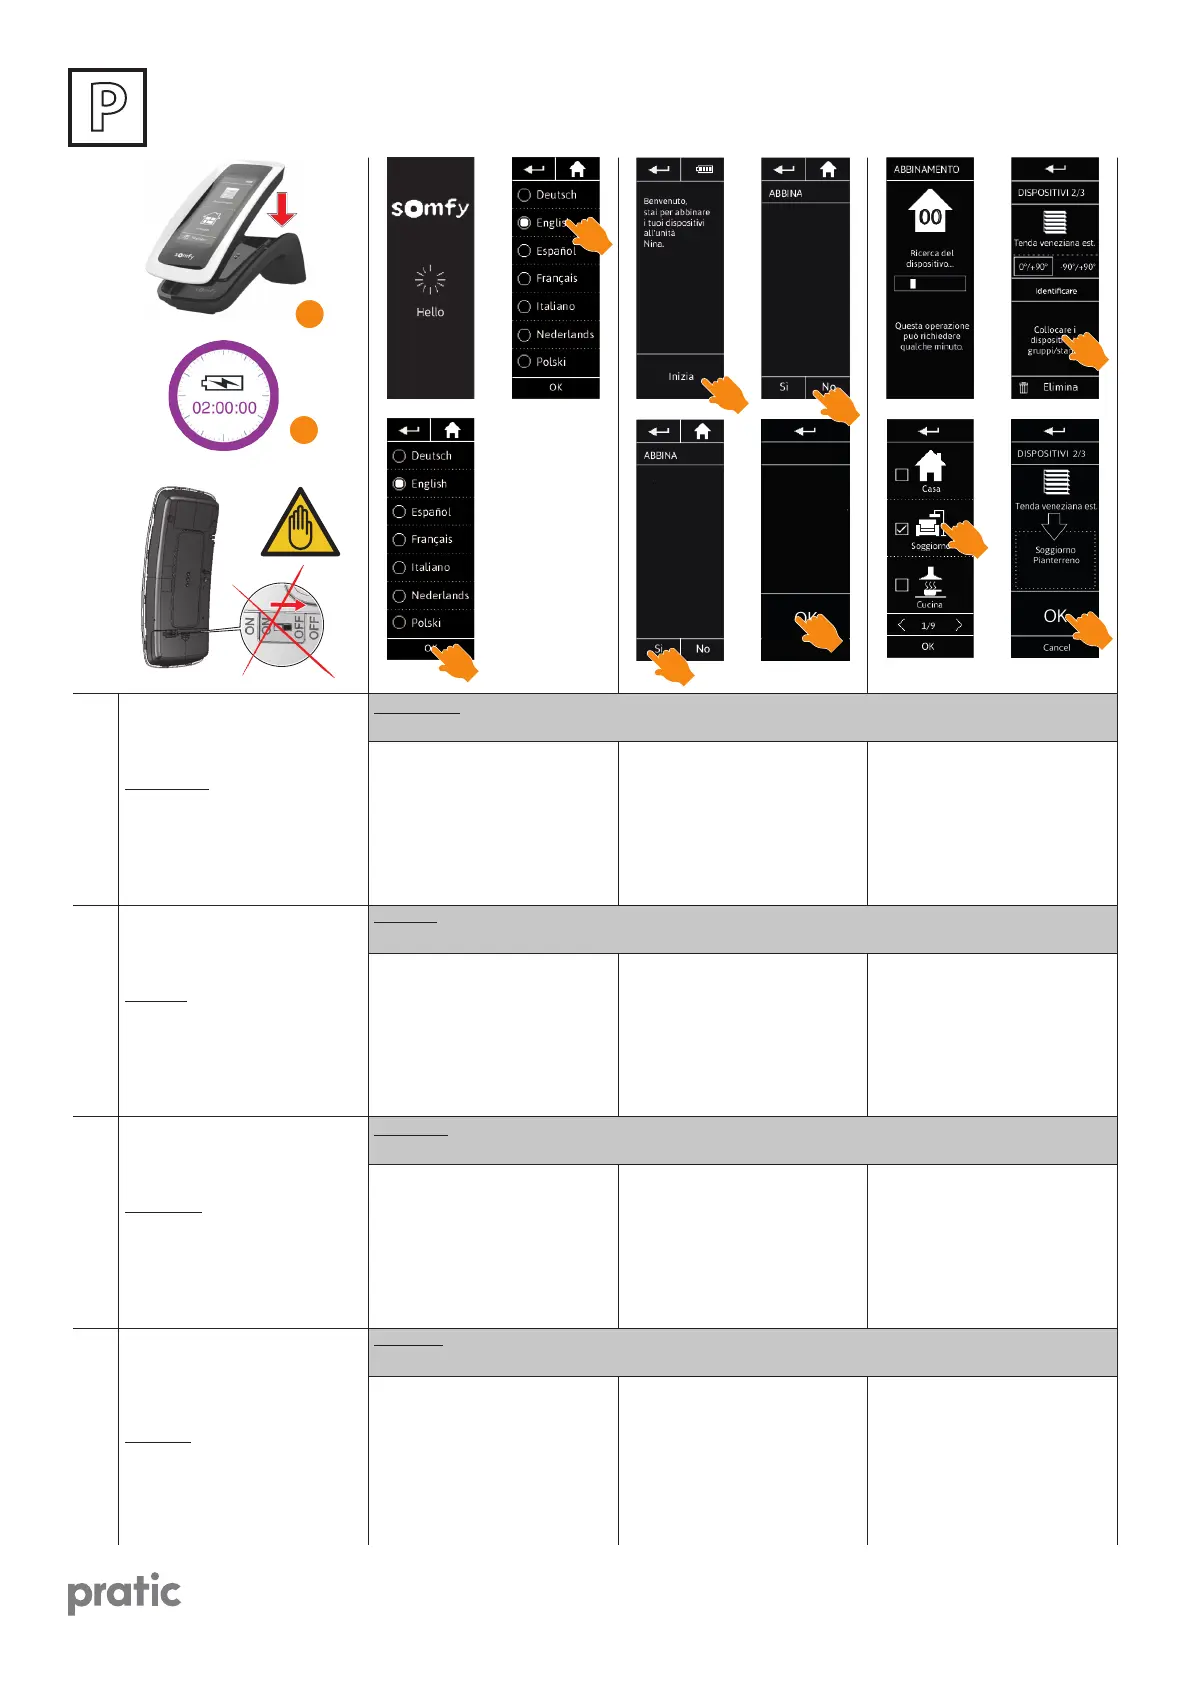
Per ricaricare il telecomando Nina
io, collocarlo sulla propria base.
Attendere circa due ore in caso Nina
io sia completamente scarico.
ATTENZIONE: non spegnere mai il
telecomando Nina attraverso l’inter-
ruttore ON-OFF posto sul retro.
To charge Nina io remote control,
place it on its base.
Wait about two hours when Nina io
is fully discharged.
CAUTION: never switch o Nina re-
mote control by using the ON-OFF
switch positioned at the back.
Pour charger la télécommande Nina
io, la placer sur sa base. Attendre en-
viron deux heures quand Nina io est
complètement déchargée.
ATTENTION: ne jamais éteindre la
télécommande Nina via l’interrup-
teur ON-OFF placé sur l’arrière de la
télécommande.
Sie laden den Nina io-Funksender,
indem Sie ihn auf die Basisstation
legen.Der Ladevorgang dauert ca.
zwei Stunden, wenn Nina io kom-
plett entladen ist.
ACHTUNG: schalten Sie nie die Fern-
bedienung Nina durch den auf der
Rückseite positionierten ON-OFF
Schalter aus.
Attendere alcuni secondi dopo l’a-
nimazione di benvenuto e scegliere
la lingua facendo clic sul riquadro
corrispondente.
Le lingue disponibili sono 7.
Wait for a few seconds the end of
the welcome animation and choose
a language by clicking on the corre-
sponding box.
There are 7 languages available.
Attendre pendant quelques secon-
des la n de l’animation d’intro-
duction et choisir une langue en cli-
quant sur la coche correspondante.
Il y a 7 langues disponibles.
Warten Sie das Ende der Be-
grüßungsanimation ab und wählen
Sie eine Sprache, indem Sie auf das
entsprechende Kästchen tippen.
Sieben Sprachen stehen zur Wahl.
Fare clic su INIZIA per avviare l’abbi-
namento dei dispositivi.
Dopo l’avvio del telecomando Nina,
abbinare i dispositivi senza punto di
comando seguendo i passaggi indi-
cati da Nina io.
Click on START to start the pairing of
equipment.
After the starting of the Nina io re-
mote control, pair the without con-
trol point equipments following the
stages indicated by Nina io.
Cliquer sur Commencez pour com-
mencer l’appairage des équipements.
Après le démarrage de la
télécommande Nina io, appairer les
équipements sans point de com-
mande en suivant les étapes
indiquées par Nina io.
Tippen Sie auf START, um mit der Ver-
knüpfung der Produkte zu beginnen.
Verknüpfen Sie den Nina io-Funk-
sender nach der Inbetriebnahme
mit den Produkten ohne Funksen-
der, indem Sie die von Nina io ange-
zeigten Schritte ausführen.
Per ogni dispositivo visualizzato,
fare clic su Collocare il dispositivo
in gruppi/stanze. Viene visualizzato
l’elenco dei gruppi. Selezionare
un gruppo selezionando la casella
corrispondente, quindi fare clic su
OK per confermare.
For every displayed equipment,
click on Place the equipment in
groups/rooms.
The groups list is displayed.
Select a group by checking the
corresponding box then click on OK
to valid.
Pour chaque équipement aché,
cliquer sur Placer l’équipement
dans des groupes / pièces.
La liste des groupes s’ache.
Sélectionner un groupe en cochant
la case correspondante puis cliquer
sur OK pour valider.
Tippen Sie für jedes angezeigte
Produkt auf “Ordnen Sie das Produkt
Gruppen/Räumen zu”. Die Liste der
Gruppen wird angezeigt. Wählen Sie
eine Gruppe, indem Sie das entspre-
chende Kästchen aktivieren, und
tippen Sie zur Bestätigung auf OK.
ATTENZIONE: Operazioni da eseguire se non viene rilevato alcun dispositivo oppure se Nina io è stato resettato
o se si deve eettuare la prima installazione di Nina io.
CAUTION: Carry out these operations if no equipment is detected or in case Nina has been reset or the rst
installation of Nina io must to be done.
ATTENTION: Opérations à eectuer si aucun dispositif n’est détecté ou si Nina io a été réinitialisé ou encore si Nina
doit être installé pour la première fois.
ACHTUNG: Führen Sie diese Vorgänge aus, wenn keine Vorrichtung erfasst wird oder wenn Nina io rückges-
etzt wurde oder wenn notwendig ist, die erste Installation von Nina io auszuführen.
 Loading...