PAG. 27 T-Hide - Istruzioni d’installazione Rev. 11/18
USO DI CONNEXOON IO USE CONNEXOON IO
UTILISER CONNEXOON IO VERWENDUNG VON CONNEXOON IO
Q
1
2
1
2
1
2
a
d
b
c
e
f
g
h
i
*
IT
EN
FR
DE
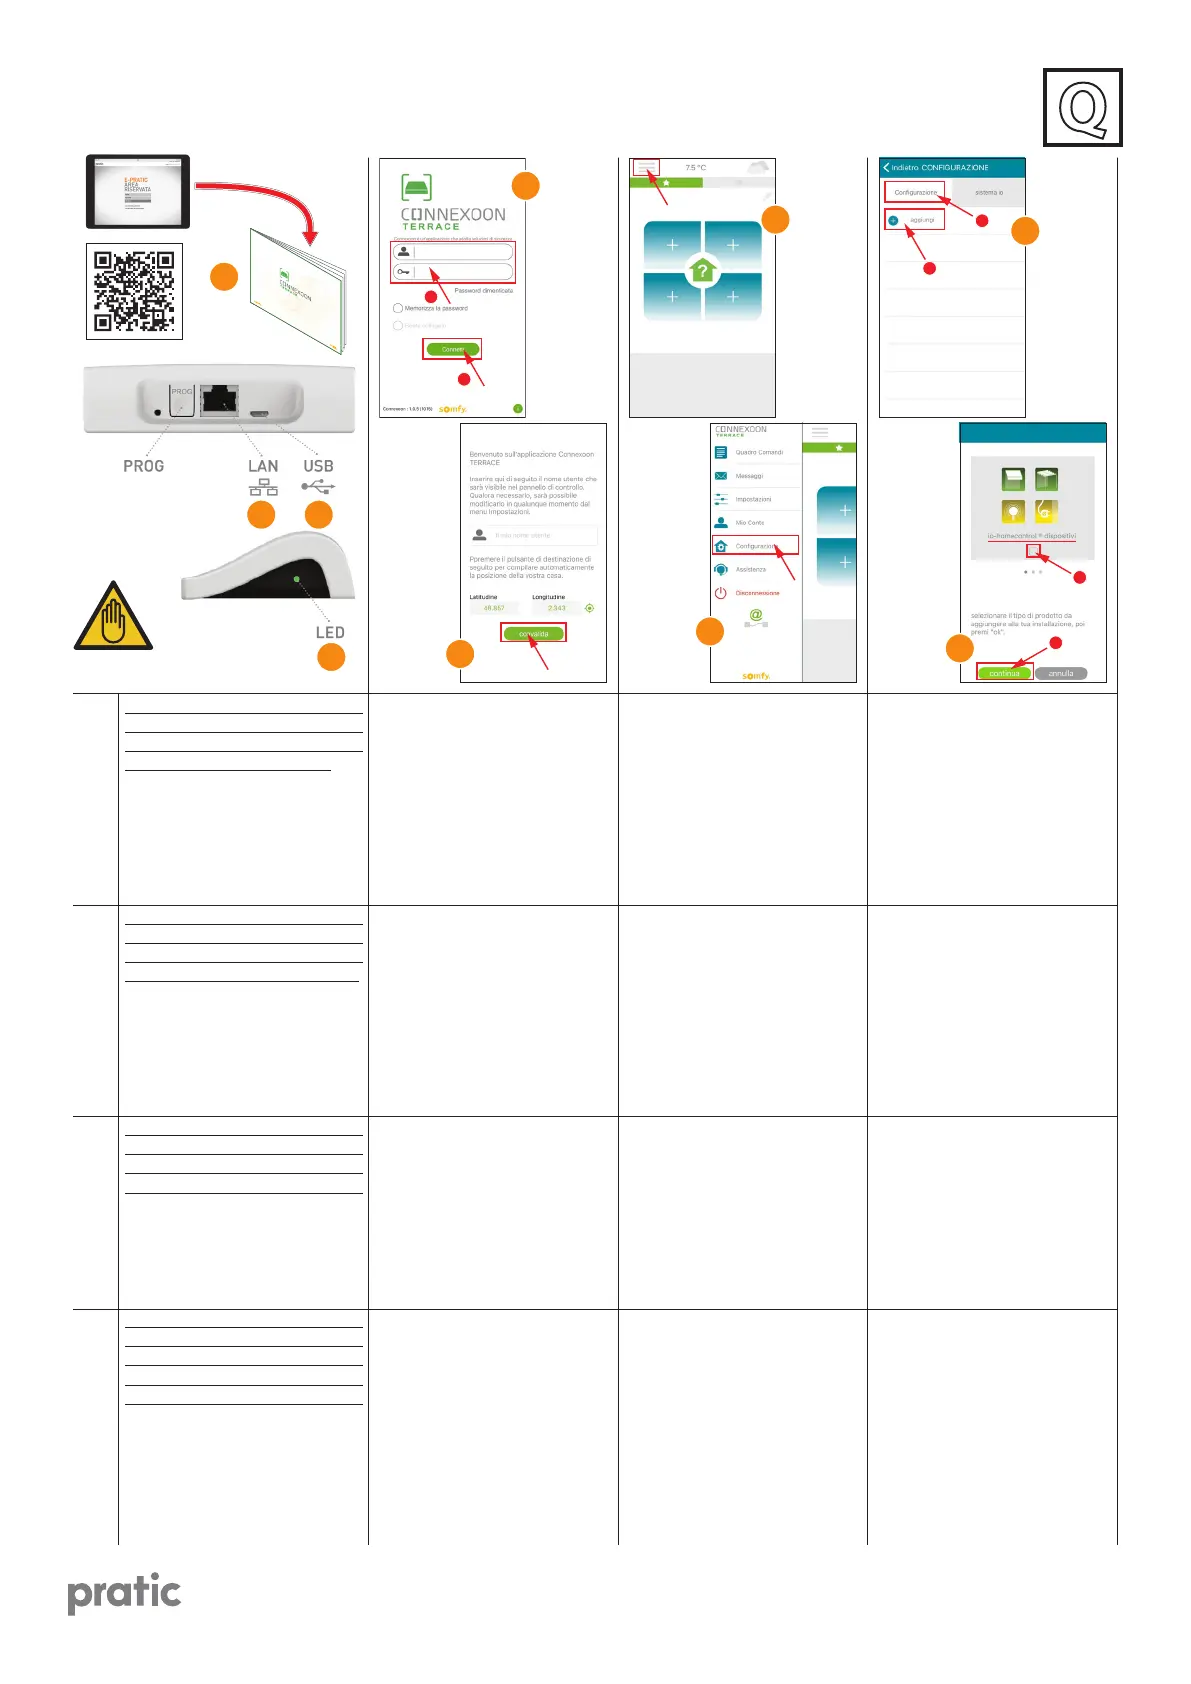
Istruzioni per congurare il connexo-
on quando è stato richiesto a Pratic
di registrare il dispositivo sul portale
di somfy con l’e-mail del cliente.
(Diversamente è possibile scaricare
il manuale Somfy dal nostro sito*).
Collegare il dispositivo alla rete in-
ternet (a) e poi alla presa USB (b)
per l’alimentazione. Attendere che il
Led si accenda di luce verde ssa (c).
Instructions to set up the connexoon
when it has been requested to pratic
to register the device on somfy por-
tal with the customer email address.
(Otherwise you can download the
Somfy manual from our website*).
Connect the device to the internet
network (a) and then to the USB
port (b) for power supply. Wait until
the xed green light lights up (c).
Instructions pour congurer le con-
nexoon si on a demandé à Pratic
d’enregistrer le dispositif sur le por-
tal de somfy avec l’e-mail du cliente.
(Autrement il est possible
télécharger le manuel Somfy de
notre site web*).Lier le dispositif au
réseau internet (a) et puis à la prise
USB (b) pour l’alimentation. Atten-
dre que le Led s’allume en vert (b).
Anleitungen zur konguration der
Connexoon vorrichtung, wenn bei
pratic angefordert wurde, die vor-
richtung auf dem somfy portal mit
der e-mail des kunden zu registrieren.
(Sonst, ist es möglich, das Somfy
Handbuch von unserer Website he-
runterzuladen*). Schließen Sie die
Vorrichtung an den Internet Netzwerk
(a) an und dann an die USB Buchse
(b) zur Versorgung. Warten Sie bis die
LED dauerhaft grün sich einschaltet.
Innserire le credenziali riportate su
due etichette (d):
- sopra il dispositivo (nome utente)
- sotto il dispositivo (password)
È possibile scegliere un nome uten-
te e/o registrare la posizione dove il
dispositivo è collegato (e).
Enter the login data indicated on
two labels (d):
- On the device (username)
- Under the device (password)
It is possible to choose a username
and/or register the position where
the device is connected (e).
Insérer l’accréditation qui se trouve
sur deux étiquettes (d):
- Sur le dispositif (nom d’utilisateur)
- Sous le dispositif (mot de passe)
C’est possible de choisir un nom
d’utilisateur et/ou enregistrer la po-
sition ou le dispositif est liè (e).
Geben Sie die auf zwei Etiketten (d)
angegebenen Zugangsdaten ein:
- auf der Vorrichtung (Benutzername)
- unter der Vorrichtung (Passwort)
Es ist möglich, einen Benutzername
und/oder die Position wo die Vor-
richtung verbunden ist auszuwähl-
en (e).
Premere il tasto del menù con le 3
righe in alto a sinistra (f).
Premere la voce “congurazione” (g).
Click on the menu symbol with 3 li-
nes situated top left (f).
Click on “conguration” (g).
Presser le bouton du menù avec les
3 lignes en haut à gauche (f).
Sélectionner l’item “conguration” (g).
Drücken Sie die Menü Taste mit den
3 Zeilen links oben (f).
Drücken Sie das Stichwort “Kongu-
ration” (g).
Selezionare la voce “aggiungi” (h).
(i) Selezionare il primo menù, quello
con i dispositivi, mettere la spunta
(1) e proseguire premendo “conti-
nua” (2).
(Gli altri menù sono per i sensori e
per lampadine Philips)
Select “add” (h).
(i) Select the rst menu, the one
indicating the devices, tick (1) and
proceed by clicking “continue” (2).
(The other menus are for sensors
and Philips bulbs)
Sélectionner l’item “ajoute” (h).
(i) Sélectionner le premier menu
avec les dispositifs, crochez (1) et sui-
vre en sélectionnant “continuer” (2).
(Les autres menus sont pour les cap-
teurs et pour les lumières Philips)
Wählen Sie das Stichwort “hin-
zufügen” aus (h).
(i) Wählen Sie das erste, die Vor-
richtungen anzeigende, Menü aus,
haken Sie (1) ab und drücken Sie
“weitergehen” (2).
(Die anderen Menüs sind für die Sen-
soren und für Philips Leuchtmittel)
 Loading...