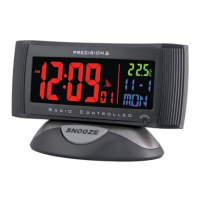
RADIO CONTROLLED LCD PROJECTION ALARM CLOCK
OPERATING INSTRUCTIONS
MODEL AP036
A. FEATURES
1. Automatic time and calendar set up
2. Accurate to 1 second in 10 million years* and changes automatically in daylight savings
time function (DST)Spring and Autumn
3. Time, Alarm Time, Calendar and Temperature LCD display
4. Alarm and 5 minute snooze
5. 12 or 24 hour format switchable
6. Seven LCD backlight colours selectable
7. Temperature display
o
C /
o
F switchable
8.
9. Three (3) "AA" batteries (not included) for DC mode operation
Power supply :AC 230 V, 50 Hz BS approved adaptor supplied
This clock has been pre-programmed to automatically switch when daylight savings
time is in effect.
NOTE: If you live in an area where daylight savings time is not observed, the time
display on your clock will remain +/- one hour.
B. INSTALLING OR REPLACING THE BATTERIES
Take-off the battery compartment cover at the back of the clock. Insert 3 "AA"
batteries (not included) into the battery compartment and make sure the polarity is
correct by following the (+ or -) symbols engraved inside. Replace the battery
compartment door on the back of the clock. Replace the batteries whenever the
display becomes dim or difficult to read.
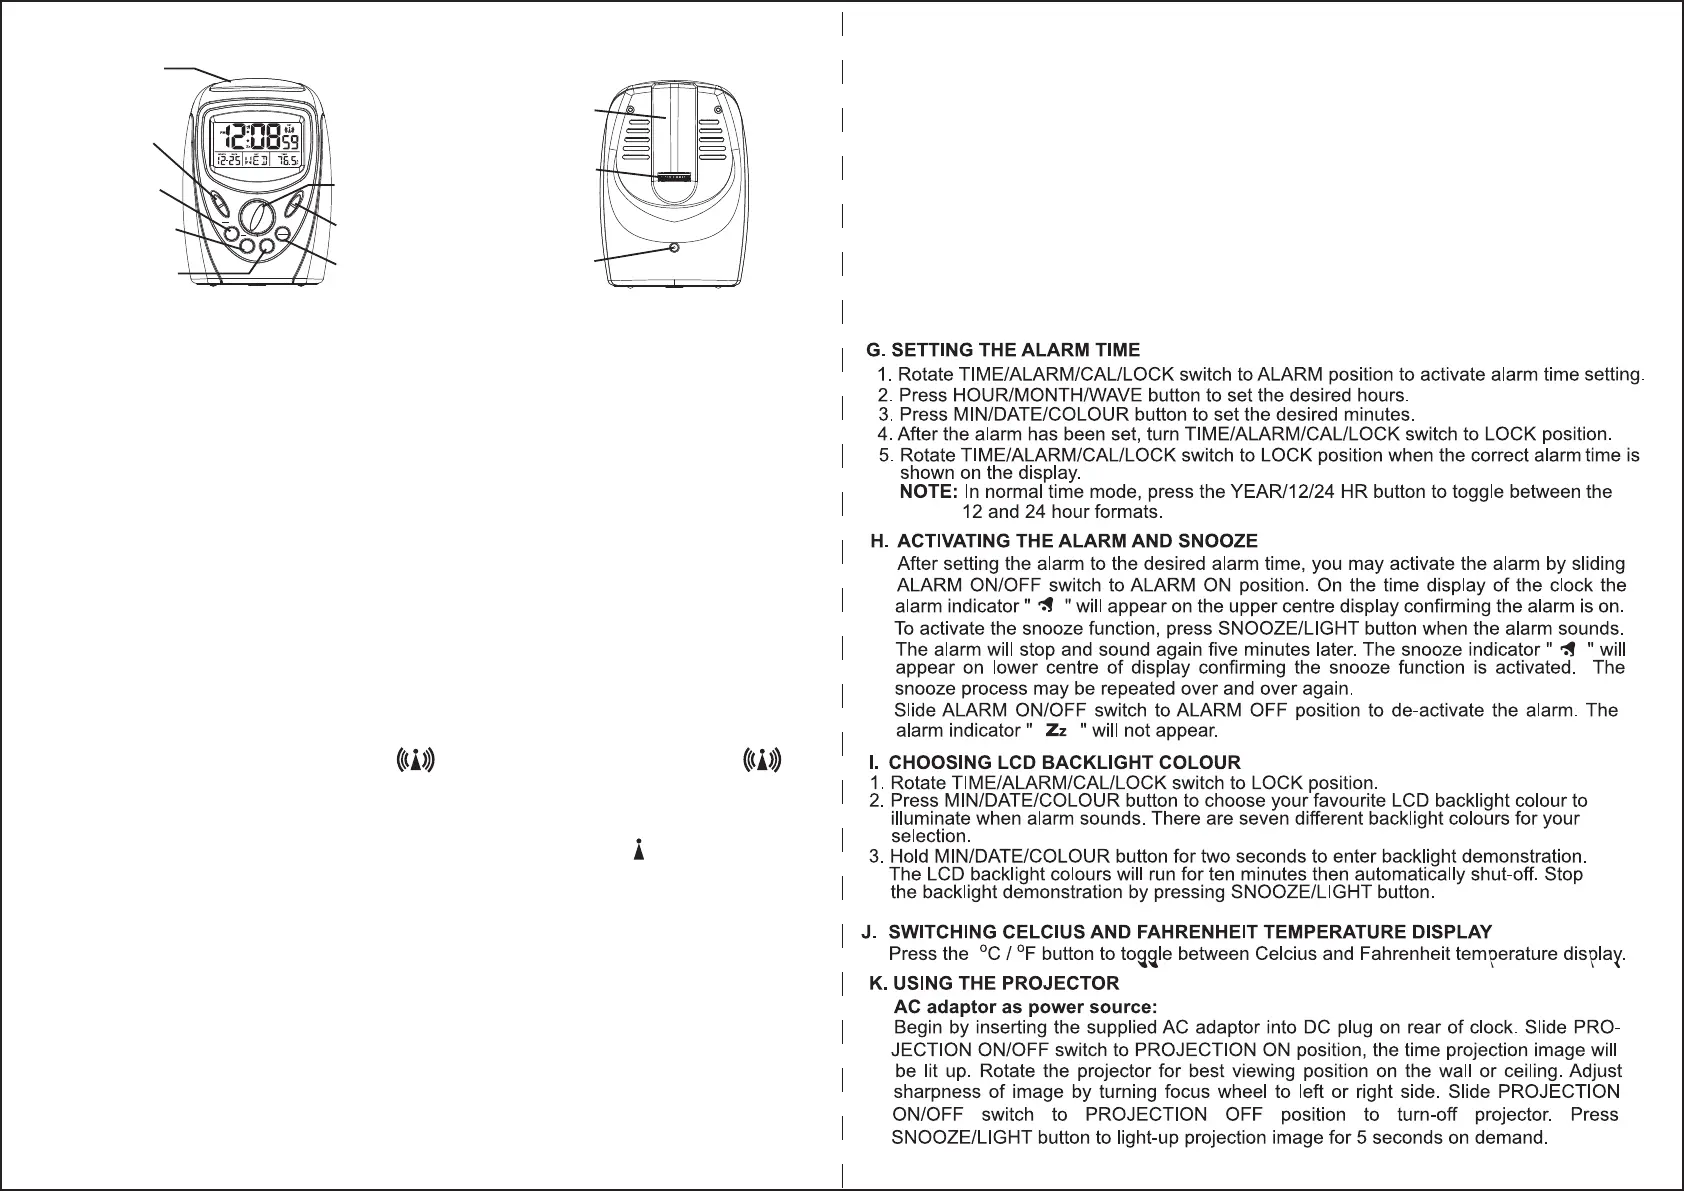
D. TO FORCE RADIO RECEPTION
1. Rotate TIME/ALARM/CAL/LOCK switch to LOCK position.
2. Press HOUR/MONTH/WAVE button for 3 seconds to force the clock to receive the
radio signal.
C. RADIO CONTROLLED FEATURE
After the batteries are inserted, the clock will display time and date. Immediately, radio
signal reception is initiated and the " " flashes. After 3-6 minutes, a full " "
appears showing that your clock has received a successful reception and automati-
cally sets its time. Reception and time calibration are initiated everyday at 1:00 AM
automatically. If the
signal is too weak and the clock cannot receive proper time
information, reception will be terminated after 12 minutes and a "
" mark appears.
After an unsuccessful reception, trying for reception is initiated automatically at 2:00
AM and 3:00 AM. If the clock fails in radio reception, try to find a better place (near to
window) and press and hold the HOUR/MONTH/WAVE button for 3 seconds. The
radio signal reception will be initiated again. Place the clock where minimal electrical
distrubance or shielding effects are expected. Try to avoid positioning very close to TV
sets or computers.
FOCUS
ALARM
SNOOZE
LIGHT
ON OFF
PROJECTION
ON OFF
ALARM
CAL
TIME
WAVE
COLOUR
o
C/
o
F
o
C/
o
F
YEAR
12/24 HR
HOUR
MONTH
MIN
DATE
LOCK
FRONT VIEW
BACK VIEW
PROJECTOR
FOCUS WHEEL
TIME/ALARM/CAL/LOCK
SNOOZE/LIGHT
PROJECTION
ON/OFF
HOUR/MONTH/
WAVE
MIN/DATE/COLOUR
ALARM ON/OFF
YEAR/12*24 HR
DC PLUG
E. SETTING THE TIME MANUALLY
1. Rotate TIME/ALARM/CAL/LOCK switch to TIME position to activate time setting.
2. Press HOUR/MONTH/WAVE button to set the desired hours.
3. Press MIN/DATE/COLOUR button to set the desired minutes.
NOTE : In normal time mode, press the YEAR/12/24HR button to toggle between
the 12 and 24 hour formats.
4. Rotate TIME/ALARM/CAL/LOCK switch to LOCK position when the correct time is
shown on the display.
F. SETTING THE CALENDAR
1. Rotate TIME/ALARM/CAL/LOCK switch to the CAL position. The Year digits will
flash in the middle of display indicating it needs to be set. Press YEAR/12/24HR
button to set the correct year.
2. Press HOUR/MONTH/WAVE button to set the correct month.
3. Press MIN/DATE/COLOUR button to set the correct date.
4. Rotate TIME/ALARM/CAL/LOCK switch to LOCK position when the correct calendar
is shown on the display.
 Loading...