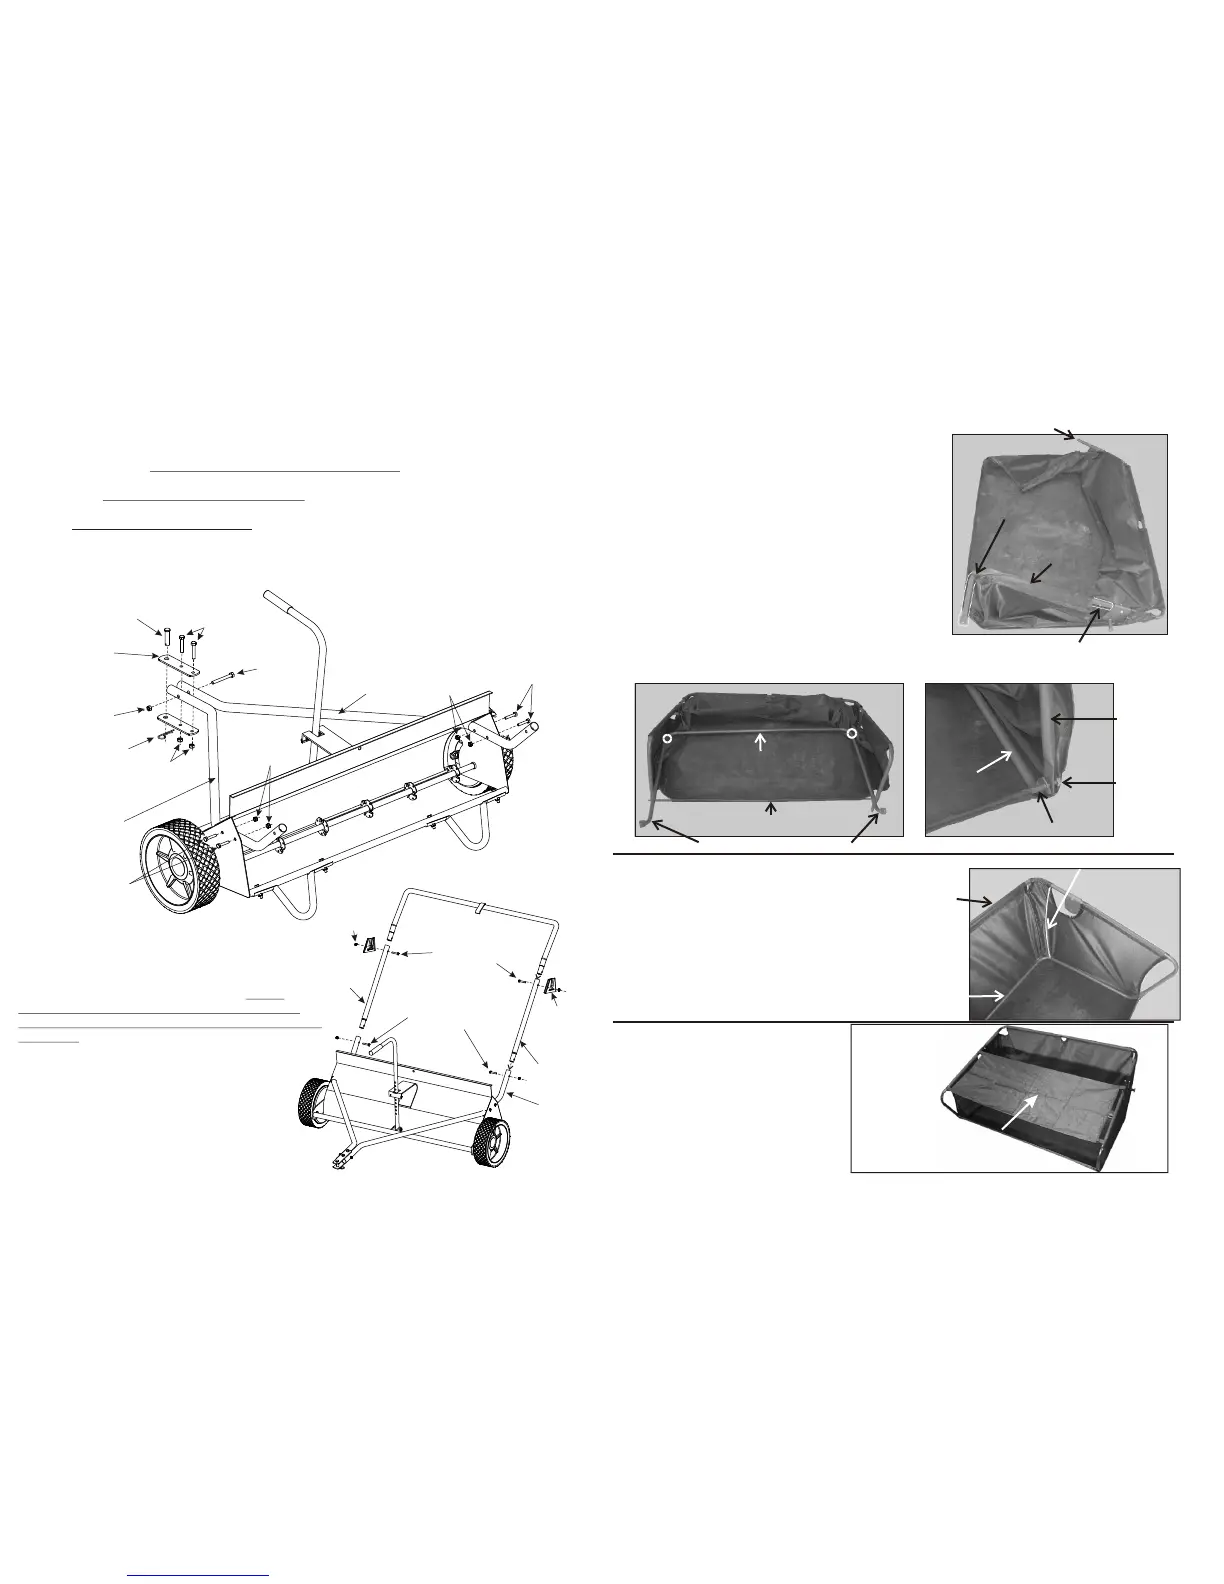
Step 5
Insert both Top Hamper Side Tubes (I) through the
loop on the fabric of the hamper (Outlined). Secure
to the Top Hamper Cross Tube using the spring button
located on the ends. Fig .1
Place the Bottom Hamper Cross Tube (E) into the
hamper basket assembly with the holes facing up.
Next, insert the Bottom Hamper Side Tubes (J)
on each end of the Bottom Hamper Cross Tube.
Fig. 2
Attach first, the Bottom Hamper Side Tube to the
Hamper Tie Rod (inside the fabric of the hamper)
followed by the Top Hamper Side Tube. Secure
each side of the Hamper Tie Rod with two
5/16” Nylon Lock Nuts. Fig. 3
Attach the optional Wind Apron to the
outside tubes towards the front of the
Hamper Assembly.
The Wind Apron helps keep debris from
blowing out of the Hamper Assembly while
the unit is in use.
Wind Apron
Step 3
Insert both the RH Hitch Arm Tube (L) and the LH Hitch Arm Tube (O) through the holes in the Chassis Assembly
as shown. Attach both Hitch Arm Tubes to the Chassis Assembly using four 1/4” x 1-3/8” Hex Head Bolts and
four 1/4” Nylon Lock Nuts. DO NOT TIGHTEN THESE BOLTS COMPLETELY YET!
Next, insert the 5/16” x 2-3/4” Hex Head Bolt through the end of both Hitch Arm Tubes and thread a 5/16” Nylon
Lock Nut onto it. DO NOT TIGHTEN THIS BOLT YET EITHER.
Attach the Clevis Plates to the Hitch Arm Tubes using two 5/16” x 1-3/4” Hex Head Bolts and two 5/16” Nylon
Lock Nuts. DO NOT TIGHTEN THESE BOLTS YET.
First tighten the 5/16” x 2-3/4” Hex Head Bolt and Lock Nut. Next, Tighten the two 5/16” x 1-3/4” Hex Head
Bolts and Lock Nuts. Finally, Tighten the 1/4” x 1-3/8” Hex Head Bolts and Lock Nuts connecting the Hitch Arm
Tubes to the Chassis Assembly.
Insert the Clevis Pin in through the holes on the end of the Clevis Plates and secure with the Hitch Pin Clip.
Step 4
Attach both Side Frame Tubes (N) to the ends
of the Hitch Arm Tubes using two 1/4” x 1-3/8” Hex
Head Bolts and two 1/4” Nylon Lock Nuts. Be sure
to attach the bolts from inside to out. This eliminates
any chances of the hamper bag snagging and ripping
during use. Next, insert the Top Frame Tube (F) inside
both upper ends of the Side Frame Tubes. Attach both
Hamper Pivot Brackets (C) (on the outside of the tubes)
using 1/4” x 1-3/8” Hex Head Bolts and 1/4” Nylon
Lock Nuts.
Fig. 1
Fig. 2
Fig. 3
Top Hamper
Side Tube
Hamper Fabric
Spring Button
Top Hamper Cross Tube
Bottom Hamper Cross Tube
Bottom Hamper Side Tubes
Hamper Tie Rod (inside fabric)
Hamper Tie Rod
5/16” Nylon
Lock Nut
Top Hamper
Side Tube
Bottom Hamper
Side Tube
Step 6
Insert one end of the Fiberglass Hamper Support
Rod (H) into the hole on the Top Hamper Cross
Tube (you may have to move the fabric together
to find). Bend the Fiberglass Hamper Support Rod
and pull up on the Top Hamper Cross Tube to
insert the other end of the rod into the hole located
on the Bottom Hamper Cross Tube. Repeat this for
the other side.
Fiberglass Hamper Support Rod
Top Hamper
Cross Tube
Bottom Hamper
Cross Tube
RH Hitch
Arm Tube
LH Hitch
Arm Tube
1/4” x 1-3/8” Hex
Head Bolts
1/4” Nylon
Lock Nuts
Clevis Plates
Clevis Pin
Hitch Pin
Clip
5/16” Nylon
Lock Nuts
5/16” x 1-3/4”
Hex Head Bolts
5/16” x 2-3/4”
Hex Head Bolt
5/16” Nylon
Lock Nut
1/4” x 1-3/8” Hex
Head Bolts
1/4” Nylon
Lock Nuts
Side Frame
Tube
Top Frame Tube
Side Frame
Tube
Hitch Arm
Tube
1/4” x 1-3/8”
Hex Head Bolt
1/4” Nylon
Lock Nut
LH (Left Hand)
Hamper Pivot
Bracket
1/4” x 1-3/8”
Hex Head Bolt
 Loading...