Do you have a question about the Precisionary Compresstome VF-510-0Z and is the answer not in the manual?
The Precisionary Compresstome® VF-510-0Z is a vibrating microtome designed for sectioning both fixed and live tissues. It features patented Auto Zero-Z® technology, which automates the sectioning process and allows for a thickness range of 4 µm to 1000 µm with an adjustable precision of 1 µm. This device is particularly well-suited for applications such as electrophysiology, immunohistochemistry, organotypic culture slices, precision cut tissue slices, and sectioning of mature or older brain tissues.
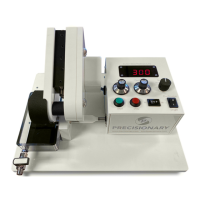
The device consists of a main unit with a vibration head, blade holder, buffer tray, and a sliding control box. The control box features a slice thickness display, knobs for oscillation and speed settings, start/stop buttons for sectioning, and fast forward/reverse functions for the tissue advancement plunger.
The Compresstome® VF-510-0Z supports double-edged razor blades, ceramic blades, and tungsten carbide blades. Double-edged stainless steel blades need to be cut horizontally to form two separate blades, and extra tabs (curled edges) should be trimmed to prevent them from sticking out beyond the blade holder. Ceramic and tungsten blades are removed carefully from their pack. For mounting blades via glue, the blade holder is first removed from the vibrating head unit by loosening a small screw. After removing the old blade and disposing of it safely, the blade holder is cleaned by soaking in acetone for 5 minutes to remove residual glue. A small amount of super glue (5 µL) is then pipetted along the full length of the blade holder, and the cutting blade is positioned so its edge touches the raised lip of the blade holder. The blade is pressed firmly and allowed to dry for one minute. Ceramic and tungsten blades must also be glued onto the blade holder, aligning their top edge against the raised lip. For magnetic blade holders, stainless-steel blades can be attached without glue. The blade is positioned on the flat side of the blade holder, ensuring the top edge touches the bottom edge of the raised lip, and then centered along the magnets.
Tissue specimens must be embedded in agarose for optimal performance. The manual recommends using 0.5 g agarose tablets to prepare a 2.0% to 3.0% agarose solution, with the firmness matching that of the tissue. The agarose tablet is dissolved in 20-25 mL of solution by swirling, then heated in a microwave in 10-second intervals until clear, avoiding overflow. The solution is then cooled to 39-42 °C in a water bath. For embedding, a chilling block is pre-chilled for at least one hour. The tissue sample is prepared to fit inside the specimen tube. Super glue is applied to the specimen tube base, and the tissue is positioned using forceps, allowing the glue to cure. The specimen tube base is then withdrawn until the tissue sample fully enters the tube. Agarose is pipetted into the tube to fully cover the specimen, ensuring no bubbles remain. Finally, the pre-chilled chilling block is placed over the specimen tube for 30 seconds to 1 minute to solidify the agarose.
Before operation, the transportation fixture must be removed from the vibrating head. The tapered end of the specimen tube (with embedded tissue) is inserted into the removable buffer tray. Applying petroleum jelly to the specimen tube is recommended for a good seal. The tube is pushed in until the stopper ring hits the adapter base. The buffer tray is then slid onto the Compresstome® slicer and locked in place with a thumbscrew, which must be tightened before sectioning. The micrometer should touch the back of the specimen tube. The 'Fast Forward' and 'Fast Reverse' functions on the control box can be used to adjust the micrometer position. The prepared blade holder is slid onto the axial bar of the vibrating unit and locked with an Allen key, with the blade facing the control box/specimen tube. The buffer tray must be in place before sliding the blade holder onto the machine. The power cord is plugged in, and the machine is turned on. The control box is used to set the slice thickness, sectioning speed, and oscillation frequency based on experimental needs (refer to the cutting parameters guideline). To achieve consistent thickness and accuracy, sectioning should begin 50-100 microns higher than the desired thickness in continuous mode, gradually reducing the thickness in smaller increments after each slice until the target thickness is reached.
This patented technology ensures near-zero Z-axis deflection of the blade holder without the need for optical alignment. This results in healthier slices, better surface structure preservation, and thinner minimum slice thickness (down to 4 µm for fixed brain slices without paraffin embedding or freezing). It also eliminates vibration marks and the need for optical or blade alignment procedures.
The VF-510-0Z Compresstome® vibrating microtome comes with a five (5) year warranty. Annual service plans are available for purchase after the warranty period. The warranty is voided if there is any attempt to repair or tamper with the control box, moving bar, oscillating head unit, or any Compresstome® parts without prior authorization from Precisionary Instruments. In such cases, the customer is responsible for all shipping and repair costs.
| Brand | Precisionary |
|---|---|
| Model | Compresstome VF-510-0Z |
| Category | Laboratory Equipment |
| Language | English |