EasyManua.ls Logo

Price Antec Controls VENTURI VV-112 - User Manual

Default Icon
32 pages
Print Icon
To Next Page IconTo Next Page
Loading...
VENTURI VALVE
VV Series
MANUAL v113

Questions and Answers

  • E
    Elizabeth CollinsJul 25, 2025
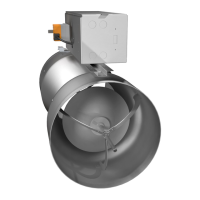
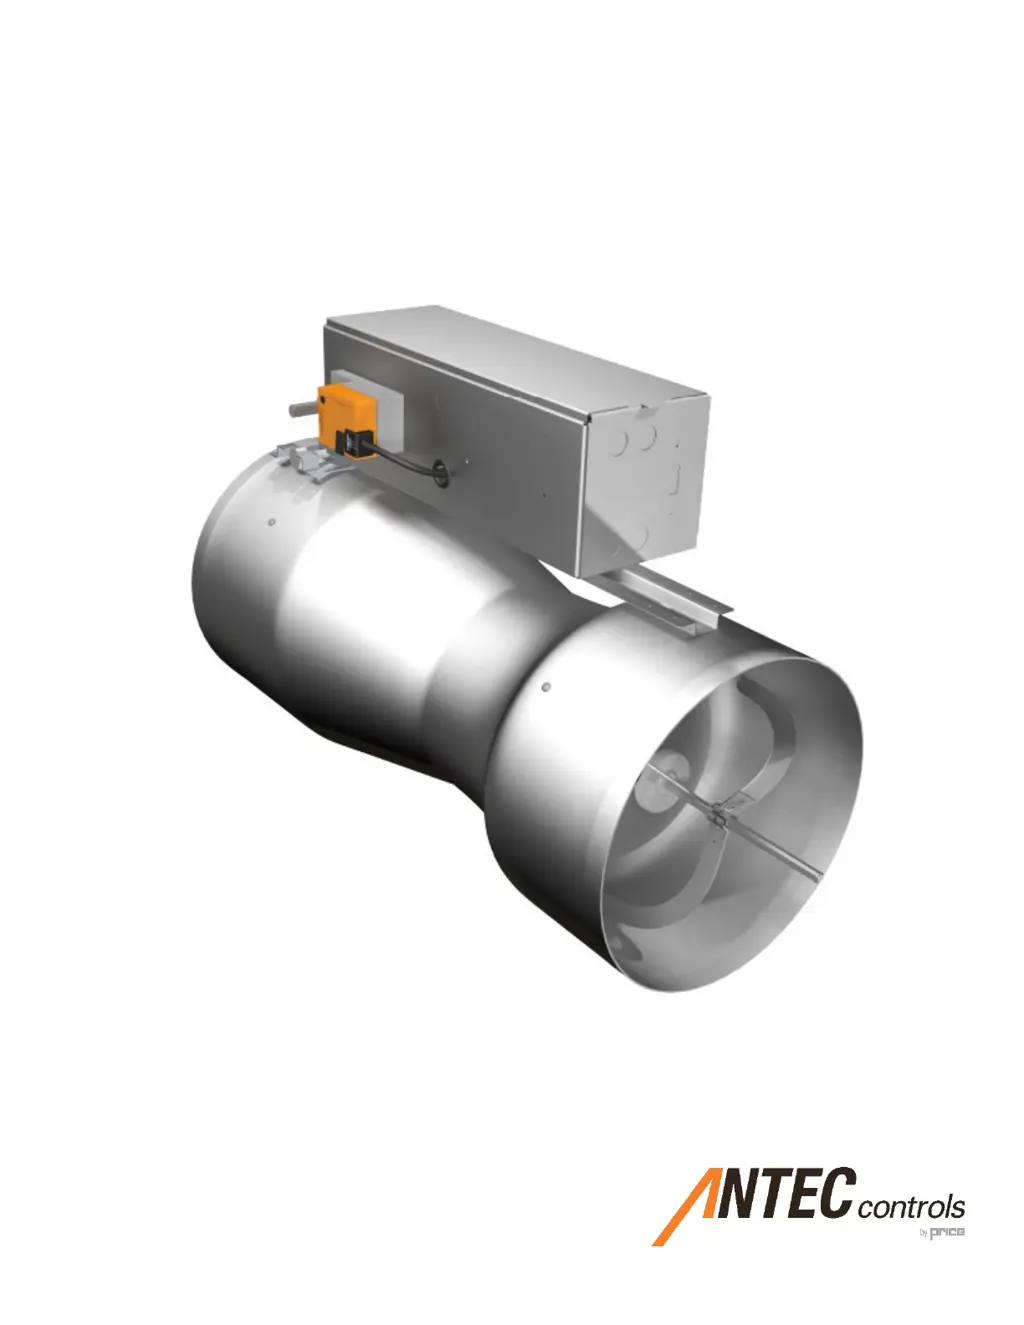
    What to do if the Price Control Unit actuator does not operate for Variable Volume Valves?
    • R
      Rachel GreenJul 25, 2025
      If the actuator isn't working, check these items: * Confirm that power is being delivered to the unit. * Verify the control signal. * Ensure the disconnect switch (if equipped) is not open. * Check if the fuse (if equipped) is blown. * Make sure there are no obstructions in the ductwork.
  • S
    Steven LeeAug 6, 2025
    What to do if the Price Control Unit heat cycles on and off?
    • J
      Jade MorganAug 6, 2025
      If the heat is cycling on and off, consider these possibilities: * **Automatic Temperature Limit-Switch:** Increase airflow to allow coils to cool faster; the switch will automatically reset. Also, check to see if airflow to coils is unobstructed. * **Manual Temperature Limit- Switch:** Use the metal reset tab (if applicable) and press it toward the switch to contact and reset it. Airflow should be increased, and check to see if airflow to coils is free.
  • A
    Andrew WilsonAug 13, 2025
    What to do if pressure is in alarm on Price Control Unit module, but airflow is present?
    • S
      Samantha StephensAug 13, 2025
      If the pressure alarm is active but airflow exists, take these steps: * Measure static pressure across the valve on available brass tees to confirm the pressure reading. * Ensure that red tubing runs from the valve inlet to the high (red) port and the green tubing runs from the valve discharge to the low (green) port. * Verify that the valve is installed in the correct airflow direction. * Ensure the tubing is not clogged with liquid or foreign debris.
  • M
    Michelle WilliamsAug 18, 2025
    What to do if actual airflow does not match airflow feedback in Price Control Unit?
    • K
      Kristina MorganAug 18, 2025
      If the actual airflow doesn't match the feedback, check the following: * Confirm static pressure is within the specified range. * Confirm that there is no blockage inside the duct or valve. * Confirm that there is no damage to any tamper proof paint. * Verify that there are no ductwork leaks before or after the valve. * Verify that the valve is installed in the correct orientation and airflow direction.
  • R
    russellpamelaOct 31, 2025
    What to do if my Price Control Unit has no heat?
    • P
      Paul EatonOct 31, 2025
      If your unit isn't producing heat, consider the following: * **Disconnection Switch:** Check to see if the door interlock is active. * **Fuses:** Use a Digital Multimeter (DMM) to measure resistance (R) of each fuse; it should read a negligible amount. If R is in MΩ, the fuse is likely blown. Order a new fuse from the replacement list. * **Wiring:** De-energize the panel and trace wires with the wiring diagram to check for loose, broken, or burned wires. * **Transformers:** With primary voltage active, use a digital multimeter to measure the secondary: it should be 24V ± 2V. If not in this range, replace the transformer. * **Automatic Temperature Limit-Switch:** Increase airflow to allow coils to cool faster; the switch will automatically reset. * **Manual Temperature Limit- S...

Summary

Introduction to Venturi Valves

General Information

Provides an overview of the manual's content, including specifications and installation.

Safety Precautions

Outlines essential safety measures for installation and handling to prevent injury or damage.

Contractor Warnings

Warns contractors against using valves in construction environments due to potential damage and calibration issues.

Product Overview and Specifications

Technical Specifications

Lists environmental, body, shaft, and bearing specifications for the Venturi Valve.

Airflow Ranges and Specifications

Details airflow ranges for Standard and Shutoff Valve Body Venturi Valves under different pressure conditions.

Getting Started with the VV

Receiving and Inspection

Guides users on how to inspect the valve for shipping damage upon arrival and proper handling.

Components Included in the Box

Lists the components included with Constant Volume (CV) and Variable Air Volume (VAV) Venturi Valves.

Construction Options

Valve Size Options

Details available valve sizes (8, 10, 12, 14 inches) and their construction features like single, dual, triple, quad.

Pressure Range

Medium Pressure Operation

Describes the medium pressure range (0.6-3.0 in.w.c.) and its airflow capacity.

Low Pressure Operation

Describes the low pressure range (0.3-3.0 in.w.c.) and its energy saving potential.

Body Type

Standard Valve Body

Features of the standard valve body, providing pressure independence from Min. to Max. Flow.

Shutoff Valve Body

Features of the shutoff valve body, offering 0 CFM override and a metal-on-metal seal.

Valve Orientation

Horizontal Valve Orientation

Specifies airflow direction and mounting tolerance for horizontal valve orientation.

Vertical Up Valve Orientation

Specifies airflow direction and mounting tolerance for vertical up valve orientation.

Vertical Down Valve Orientation

Specifies airflow direction and mounting tolerance for vertical down valve orientation.

Control Type

Constant Volume Control Type

Details manual airflow adjustments, field linkage assembly, and optional pressure switch for CV valves.

Variable Volume Control Type

Explains actuator control for VAV setpoints, factory calibration, and full airflow range linkage.

Connection Type Options

Slip Connection Type

Describes slip connections for single and multi-body Venturi Valves for ductwork installation.

Flanged Connection Type

Describes flanged connections with pre-welded mounting flanges for valve installation.

Coating Options

Aluminum Coating

Details aluminum valve body with stainless steel internal hardware, suitable for sheet metal screw mounting.

Phenolic Class 1 Coating

Features phenolic coated body with SS hardware; warns against screws compromising coating.

Phenolic Class 2 Coating

Features phenolic coated body with PVDF hardware; warns against screws compromising coating.

PVDF Kynar Coating

Features Kynar coated body with PVDF hardware; warns against screws compromising coating.

Installation & Mounting Instructions

Installing the Venturi Valve

Provides general installation guidance for the Venturi Valve, covering inspection and basic notes.

General Installation Notes

Lists ductwork support, access door requirements, clearance, and free space for controls enclosure.

Enclosure Orientation Guidelines

Provides guidance on orienting the control enclosure for Supply/GEV and Fume Hood applications.

Slip-Connection Venturi Valve Mounting Instructions

Slip-Connection Mounting Steps

Details the 3 steps for slip-connection mounting, including fitting, fastening, and sealing.

Flange-Connection Venturi Valve Mounting Instructions

Flange-Connection Mounting Step

Details the step for flange-connection mounting, including alignment and fastening.

Constant Volume Valve Reassembly

Reassembly Steps

Details the 4 steps for reassembling the Constant Volume Venturi Valve linkage.

Valve Accessories

Hot Water Coils (VVHWC)

Devices installed with Venturi Valves for heating air, designed for optimized heat transfer.

Hot Water Coil Options

Details options for Standard, High Capacity, and Oversized Standard/High Capacity Hot Water Coils.

Hot Water Coil Installation

Installation Steps

Details the 7 steps for installing hot water coils, covering positioning, plumbing, and mounting.

Electric Coils (VVEC)

Electric Coil Options

Details features of electric coils, including thermal cut-outs, airflow switch, and SCR controls.

Electric Coil Pre-Installation Checks

Advises checking for shipping damage, voltage ratings, and compliance with codes before installation.

Electrical Installation

Electrical Installation and Wiring

Covers reviewing wiring diagrams, ensuring circuit capacity, and proper grounding for safety.

Electric Coil Safety Devices

Explains automatic and manual reset thermal cut-outs and the airflow switch operation.

Mechanical Installation

Mechanical Installation Steps

Details the 3 steps for mechanical installation of electric coils.

Silencer (VVSIL)

Silencer Options

Details features of the VVSIL silencer, including transitions, connection type, and materials.

Silencer Installation Steps

Outlines steps for positioning, mounting, and sealing the silencer to the ductwork and valve.

Valve Companion Connections (VCT)

Valve Companion Connection Options

Details types of VCT: drawband clamps for slip connections and companion flanges for flanged connections.

Slip-Connection Venturi Valve with Drawband Clamps Installation

Installation Steps

Details the 5 steps for installing drawband clamps for slip-connection Venturi Valves.

Flange-Connection Venturi Valve with Companion Flanges Installation

Installation Steps

Details the 4 steps for installing companion flanges for flanged-connection Venturi Valves.

Valve Installation Tape (VIT)

Valve Installation Tape Options

Details VIT as a PTFE adhesive tape, 108 ft. in length and 2.0 in. in width.

Valve Pressure Switch (VPS)

Valve Pressure Switch Options

Details VPS features, including actuation pressure and adjustable setpoint range.

Valve Pressure Switch Installation

Provides instructions for mounting the VPS within the valve's enclosure and connecting pressure tubing.

Field Adjustment (VPS)

Adjustment Steps

Details the 5 steps for field adjusting the Valve Pressure Switch (VPS).

Valve Actuator

Valve Actuator Options

Details two main actuator options: Standard Speed (SSA) and High Speed (HSA), with their features.

Valve Relay

Valve Relay Options

Details features of the Valve Relay, including latching levers and push-in terminal sockets.

Valve Relay Installation

Provides instructions for foot mounting or DIN rail mounting the Valve Relay.

Balancing Venturi Valves

Balancing Variable Volume Venturi Valves

Explains using scale factor and offset to adjust calibrated position feedback for VAV valves.

Scale Factor Adjustment

Describes scale factor as a multiplication factor to adjust electronic flow feedback for airflow readings.

Offset Adjustment

Describes offset as an addition or subtraction in CFM to adjust electronic flow feedback.

Recommended Balancing Procedure

Outlines steps for balancing, including checking pressure and measuring airflows.

Constant Volume Valve Adjustment

Adjustment Steps

Details the 3 steps for adjusting the Constant Volume Venturi Valve, focusing on nut adjustments.

Troubleshooting

Venturi Valve Troubleshooting

Lists common symptoms like noise, actuator issues, and airflow mismatches with possible causes and solutions.

Electric Coil Troubleshooting

Lists common symptoms like no heat or cycling with possible causes and solutions for electric coils.

Support Information

Technical Support and Contact

Provides contact details via email and phone for technical support, including hours of operation.

Price Antec Controls VENTURI VV-112 Specifications

General IconGeneral
BrandPrice
ModelAntec Controls VENTURI VV-112
CategoryControl Unit
LanguageEnglish

Related product manuals