EasyManua.ls Logo

Priefert Horse Walker User Manual

Priefert Horse Walker
4 pages
To Next Page IconTo Next Page
Page #1 background imageLoading...
Page #1 background image
v5-0118
Horse Walker Operation Instructions
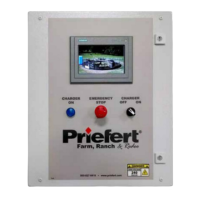
Charger ON/OFF
Stops
Horse Walker
Charger Indicator
Display Panel
TOUCH SCREEN CONTROL PANEL
Key Features on the Touch Screen Control Panel:
25 second “ramp up” time from start to the desired speed
setting helps ease horse into a walk.
25 second “ramp down” time from engage to full stop.
Remote control that allows the operator to Start/Stop,
change direction (Forward/Reverse), as well as increase
or decrease speed; all with a push of a button.
Convenient switch to allow low impedance electrical
stimulus to drop panels, encouraging horses to keep
pace, which can be turned o󰀨 as horses become
accustomed to routines.
Customized programming to set-up automated exercise
routines. Each routine can be programmed with up to
12 steps for changing pace, direction, etc.
Flexibility to choose Programmed Routines or use the
Manual option.
Additional Features of the Touch Screen
The Start Screen appears after powering up the control panel.
Pressing the “MENU
button accesses the functions of the Walker.
After 30 minutes, the display screen goes to screen-saver.
Touching returns to the last screen opened.
15
Question and Answer IconNeed help?

Do you have a question about the Priefert Horse Walker and is the answer not in the manual?

Priefert Horse Walker Specifications

General IconGeneral
Safety FeaturesEmergency stop
ModelHorse Walker
Capacity4, 6, or 8 horses
Diameter12' to 36'
Power SourceElectric
Speed ControlAdjustable
ConstructionSteel

Summary

Key Features on the Touch Screen Control Panel

Additional Features of the Touch Screen

Section 1: MANUAL CONTROL Tab

Options for Remote Control Operation

Details how remote control differs from manual operation for starting, stopping, speed, and direction.

Section 2: RUN ROUTINE Tab

Section 3: SET-UP ROUTINE Tab

Section 4: MAINTENANCE Tab

Section 5: MAINTENANCE Tab: ALARM HISTORY

Fault Alerts and How to Reset Them

Explains fault alerts, causes like over-torquing, and how to reset them using the RESET button.

View Alarm History

Describes how to view past fault occurrences to aid in troubleshooting and prevention.

Section 6: MAINTENANCE Tab: VIDEO

Related product manuals